
Adding a time and date picker in WooCommerce can help customers choose the exact time of the local delivery / pickup or other shipping methods! Let's see how to implement such a feature on your WooCommerce checkout page with a plugin.
Are your customers missing couriers or would you like to let buyers pay extra for choosing specific pickup hours?
Letting your customers choose the precise time and date for the product delivery can be a game changer!
Contents
- Local delivery / pickup time & WooCommerce checkout customization
- How to add a time picker in WooCommerce checkout?
- Summary & more about the plugin
- An easy way to add the Date Time Picker field to your WooCommerce checkout
- Show Delivery Time Picker on your WooCommerce Product Page
- How to show the date picker on the WooCommerce product page
- How to Add and Display WooCommerce Custom Fields on the Checkout & Order Pages
- Customize the WooCommerce Checkout Page: Top Tips for a Seamless Experience
Local delivery / pickup time & WooCommerce checkout customization
The Flexible Checkout Fields plugin lets you add custom fields to the checkout, edit or disable the present ones and even rearrange them. Over 239,708 stores use it daily!
With Flexible Checkout Fields PRO, you can add a date and delivery time picker for local pickup on the WooCommerce checkout page. But that's not all!
✅ Add Checkout field types
Let's see now a list of new types of checkout fields you may use in your WooCommerce store with the plugin!
- Single Line Text
- Textarea
- Paragraph Text
- Number
- Phone
- URL
- Image
- Multi-checkbox
- Checkbox
- Radio button
- Select (Drop Down)
- Multi-select
- Date
- Radio with colors
- Radio with images
- Color Picker
- Headline
- HTML or plain text
- File Upload
How to add a time picker in WooCommerce checkout?
Now, I will show you a few steps to add new fields. Then, I will tell you how you can promote a specific delivery time of the local pickup WooCommerce for better shipping management.
-
Get Flexible Checkout Fields
First, you'll have to get the plugin.
-
Install and activate the plugin

Install the WooCommerce delivery time plugin -
Add pickup date or time picker
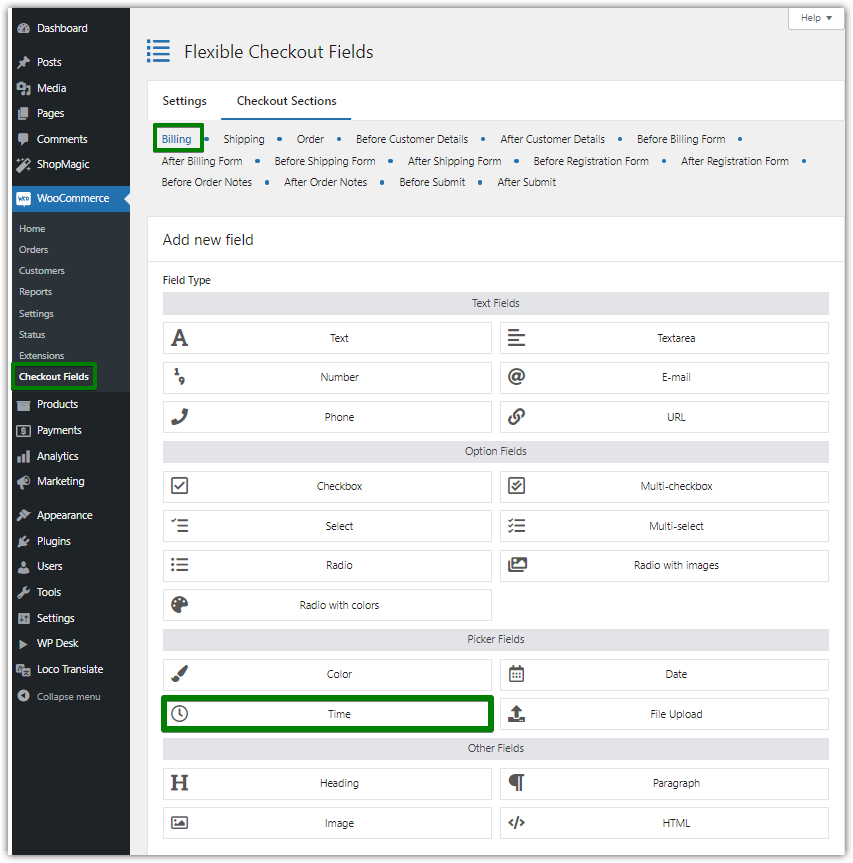
Next, go to WooCommerce → Checkout Fields and go to the Billing section.
The billing section is the one I’ll use in my example, but Flexible Checkout Fields lets you add custom fields to different sections of the checkout. You can edit the Order, Billing, and Shipping sections.
In Add New Field section choose Time as a Field Type, enter your label and click Add Field like in the screenshot below.
Add the time field to set the WooCommerce pickup time As a result, your time picker should appear on the right in Section Fields. You can drag it and decide where you want it to be displayed on the checkout page. In my example, I put it just below the Company name field.
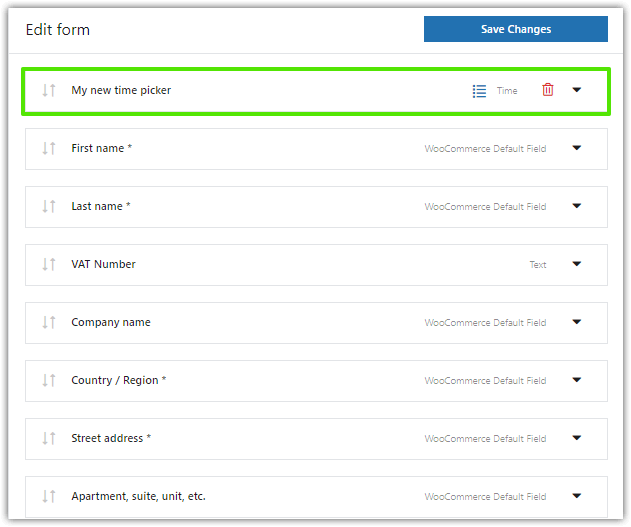
My new time picker -
Configure the field
Now, click on your local time picker to configure the new WooCommerce checkout field.
There are four sections of settings and I’ll go through all of them. First of all, the General section.
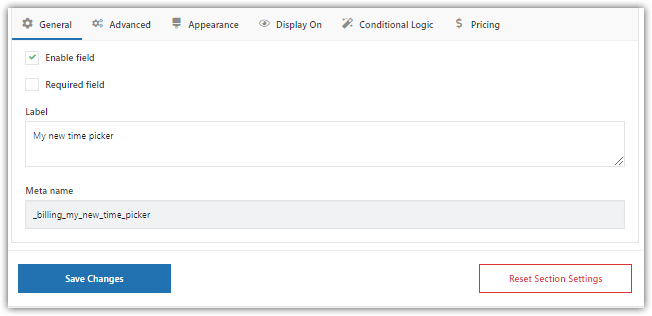
Go to general settings to customize the field Here, you can Enable Field to set it visible, and set it as a Required Field. You can change the previously entered Label and choose Validation.
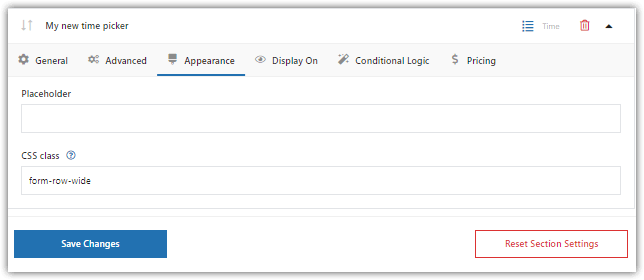
💡 Read more about validation in our WooCommerce Checkout Custom Validation Guide.Another option is Appearance. Here you can set Placeholder which will be displayed in the empty field and set your CSS Class to style it as you want.
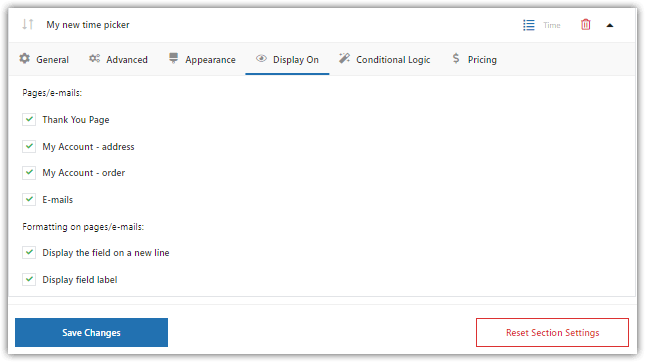
WooCommerce delivery time plugin In the Display On section, you can decide where to display the WooCommerce Checkout Time picker. By default, it will be displayed in the checkout, user account page, and in emails. If you don’t want to let your clients change the time after the order, disable My Account - address and My Account - order.
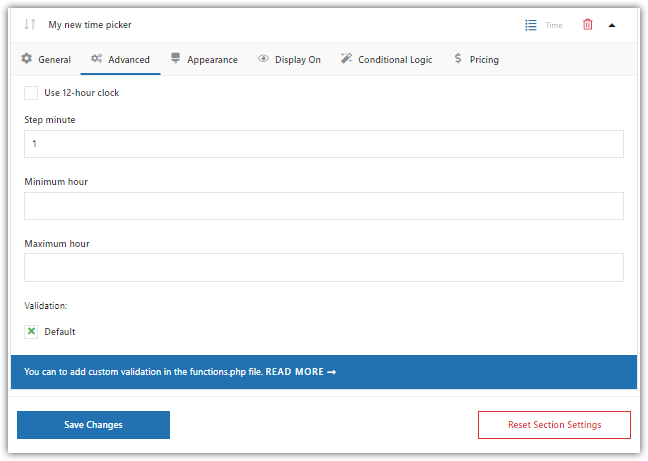
Define where to display the field The next tab is Advanced. Here you can choose the minute step and set the minimum and maximum hour.
Time picker field. Advanced settings Finally, the last two tabs are Pricing and Conditional Logic, where you can enable it.
💡 You can read more about it in our Conditional Logic Guide.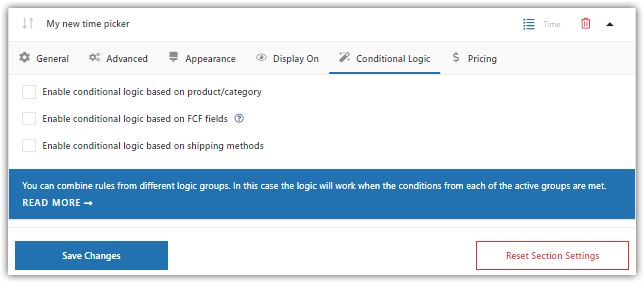
Conditional logic for WooCommerce delivery time picker for shipping Let's now add the time picker only for the local pickup shipping method!
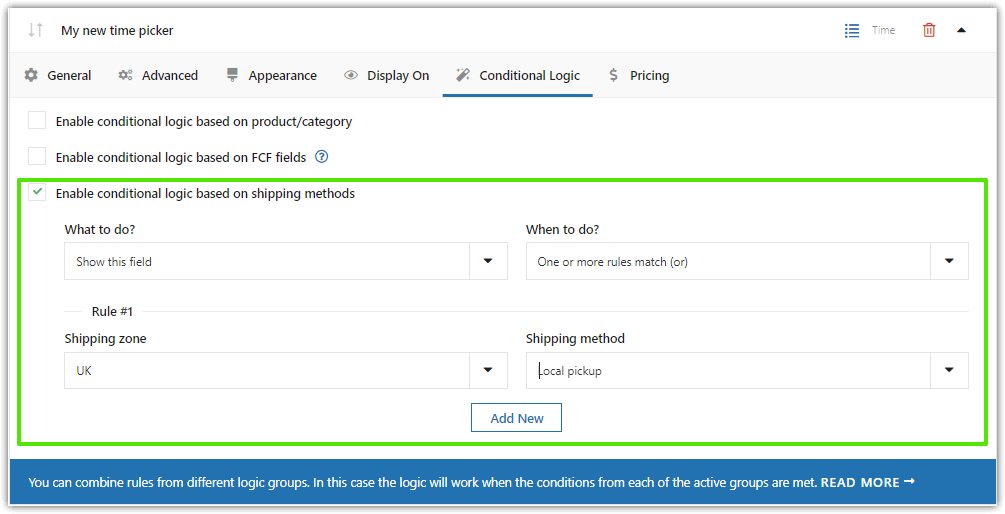
Local pickup set with Flexible Checkout Fields -
Time picker example
🎉 When everything is configured, let’s check how it looks in my WooCommerce store.
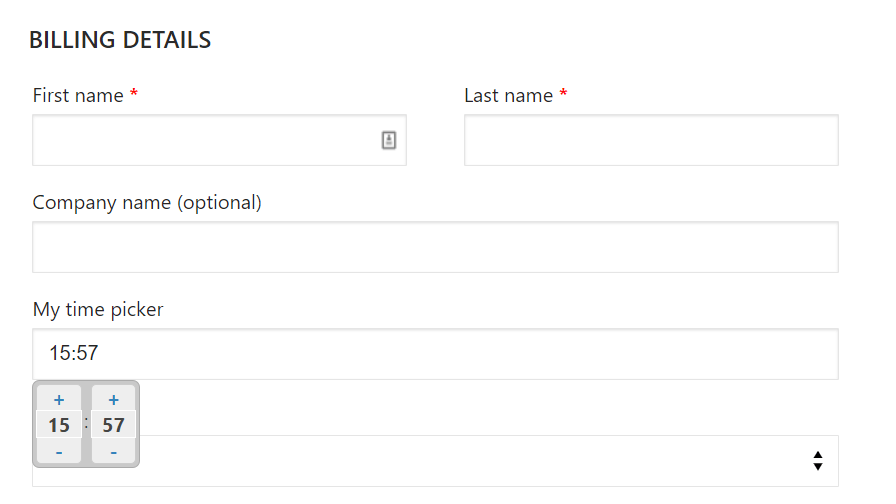
This is how your time picker will look like It’s just the default display. But you can customize it with CSS.
💡 Find out how to customize the checkout page with CSS. - My chosen time will also appear in the order summary and all the places that were checked in Display on settings.
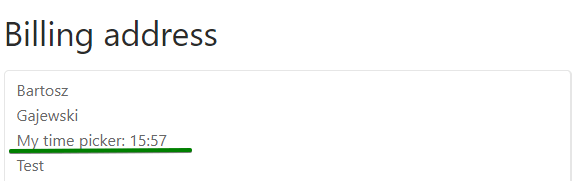
WooCommerce pickup time visible in the billing address -
Time picker with an extra fee - Advanced
💡 Also, you can let customers pay extra if they want to choose the specific local pickup hours. Let's see the example below. I will use both conditional logic & pricing here.In my case, I want to give the customer the possibility to pick up the ordered product in the store. Since I only allow access during the weekend, such an option is paid extra (let's establish that normally my store is not open at weekend and during the week such an option is not possible). The option of personal pickup is charged an additional 2 £.👉🏽 Here is an example of applying such a solution at checkout:

This is an example of how to apply the time and date picker at the checkout 👀 This is how to do it:
-
Firstly, you will have to add the checkbox field.
In the Label field, write the text you want to display. My text to display to the customer is Weekend in-store pick-up possible at an additional cost. The latest order pickup time is 16:00. In the field settings, I checked that the latest pickup time is 4 p.m. See how to do it step by step:

First, add a checkbox field -
Now, go to the Pricing tab and set an additional price for in-store pickup.
As you already know, in my case it's +2 £.
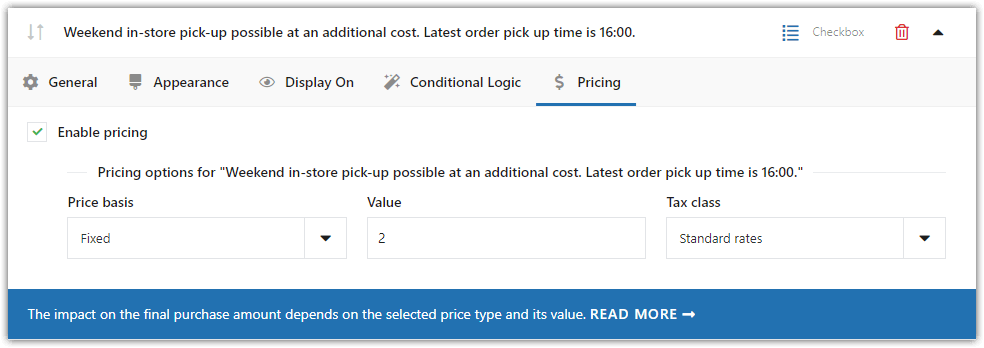
Setting an extra price for local pick up Save changes. Congrats, you have added the checkbox with extra pricing 😜
Let's proceed with the pickup time.
-
Add both time and date picker fields.
As in the previous case, write the text you want to display in the label field. In my case, it looks something like this:

Time picker and date picker added to the checkout -
Let's proceed with Advanced Time picker settings.
To replicate my scenario, proceed as follows:
Set the latest pickup time. As you can see, in my case it is 16:00 (or 4 pm - you can set either a 12 or 24-hour clock). This means that selecting a later time will not be possible.
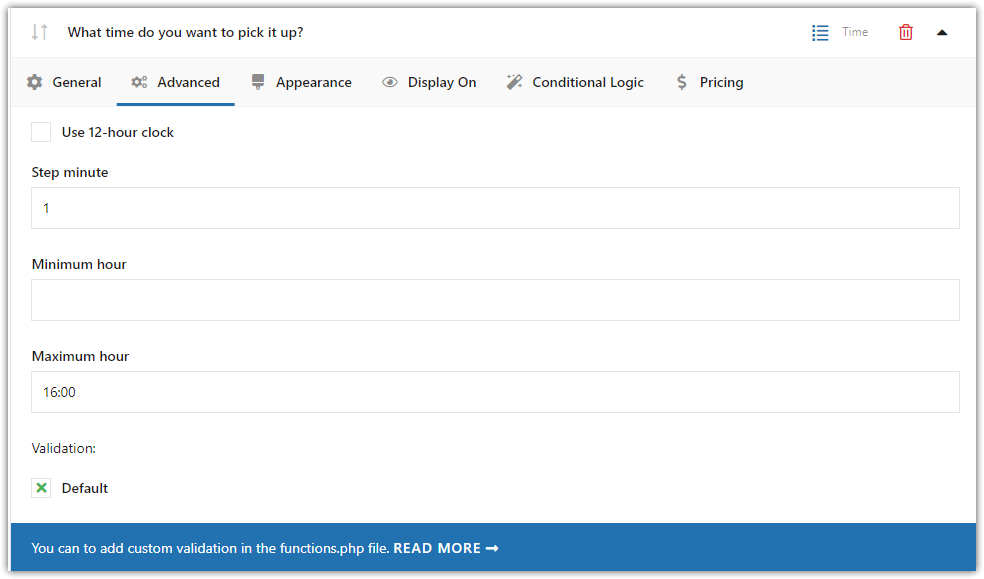
Latest pickup time -
Go to the Conditional logic tab.
👉🏽 Set a rule that the time picker should only appear here if the customer selects that he wants to pick up the product in our store.
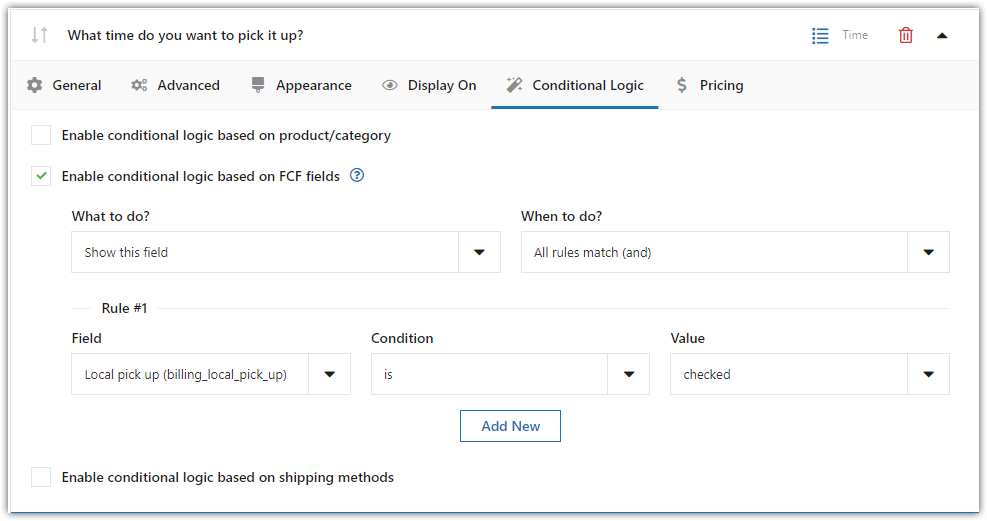
Conditional logic settings for showing the WooCommerce custom checkout field -
Now, let's get on with its advanced settings for the Date picker field.
👀 First, apply the same conditional logic rule as for the above field.👉🏽 Then go to the Advanced tab. Here we set the date format you want to display, excluded days of the week (as we allow pickup in person only during the weekend, we must exclude all days of the week), and so on.
See how these settings look in my scenario:
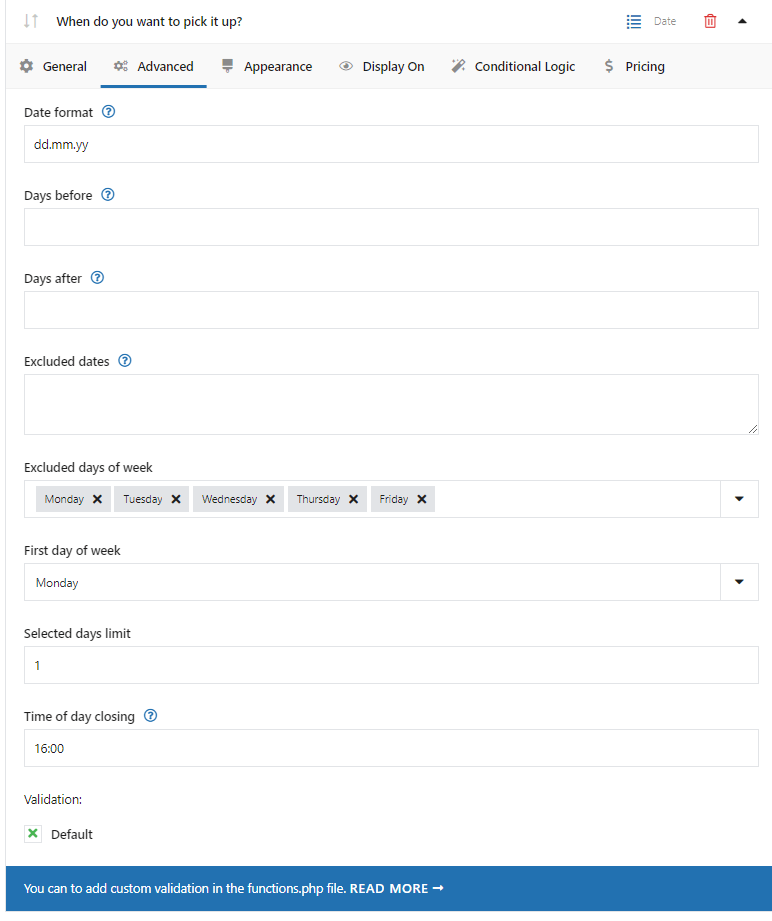
Date picker advanced settings 👏🏼👏🏼👏🏼 Done! Congratulations, you have successfully set up an additional charge for in-person pickup in your store.
💡 You can diversify this step and add conditional logic based on the products that are in the shopping cart. This way you can add pricing for a local pickup, but only for selected products. -
Summary & more about the plugin
In this article, I showed you how to add a Time picker in WooCommerce checkout with the Flexible Checkout plugin.
Adding a time and date picker in WooCommerce allows choosing the exact time of the local delivery / pickup.
If you have any questions let us know!


Leave a Reply