

I don’t have to convince you that the checkout page is one of the most important parts of every WooCommerce store. The possibility to fully adjust it is a must for most store owners. Let’s find out what are the additional possibilities, and how to add custom fields to the classic WooCommerce checkout page.
Contents
- Classic checkout or block checkout: check before you start
- Download Flexible Checkout Fields
- Flexible Checkout Fields
- Custom fields for your checkout
- How to add custom fields in WooCommerce checkout?
- Extra features for advanced checkout customization
- woocommerce_checkout_fields filter guide
- How to customize the WooCommerce checkout page fields with the woocommerce_checkout_fields filter (examples)
- Add a checkout field
- woocommerce_checkout_update_order_meta
- Hide a field
- Rearrange checkout fields
- Make fields optional/ required
- Add a CSS class to style a field
- Clear fix a field
- Set a CSS class for the field label
- Set options for select
- Validate fields
- woocommerce_checkout_fields filter vs Flexible Checkout Fields
- Frequently asked questions about customizing the checkout page
- How to Change the WooCommerce Checkout Page Template?
- Can I add custom fields to the WooCommerce block checkout?
- Where is the data from custom checkout fields saved?
- Can I make a checkout field required only in some cases?
- How many fields should a checkout form have?
- How to customize your WooCommerce checkout page?
- How to customize WooCommerce checkout pages using plugins?
- Flexible Checkout Fields WooCommerce
- How to create a checkout page in WooCommerce?
- Customize WooCommerce checkout fields summary
- Customize the WooCommerce Checkout Page: Tips & Tools for Success
- How to Add and Display WooCommerce Custom Fields on the Checkout & Order Pages
- WooCommerce Checkout Field Editor: How to Add, Edit & Remove Billing Fields
- WooCommerce Checkout - Settings, Shortcode & Configuration Guide
- Create Custom Fields in WooCommerce Checkout and Product Pages
Classic checkout or block checkout: check before you start
Everything in this guide applies to the classic WooCommerce checkout, the one built on the woocommerce_checkout shortcode. Newer WooCommerce installations create the checkout page with the Checkout block instead, and the two are edited in completely different ways. Before you copy any code or install anything, open Pages, edit your checkout page and look at what is inside: a single shortcode means classic checkout, a block with an editable sidebar means block checkout.
The difference matters because the woocommerce_checkout_fields filter has no effect on the block checkout. Neither do most snippets you will find in older tutorials, which is the usual reason a piece of code that works on one store does nothing on another. The block checkout has its own extensibility API, and fields have to be registered through it rather than added to the classic field arrays.
If your store runs the block checkout and you want custom fields without code, use Checkout Fields for Blocks, which adds fields directly to the block-based form, with a separate add-on for conditional logic. If your store still runs the classic checkout, everything below applies and Flexible Checkout Fields gives you the fullest set of options. Switching a live store from one to the other is a decision worth testing on staging first, because custom fields, payment gateways and shipping plugins do not always behave identically on both.
Flexible Checkout Fields WooCommerce
Add a custom field to the WooCommerce checkout page!
💾 Active Installations: 80,000+ | WordPress Rating:
First, you may see how to edit the WooCommerce checkout page with the plugin. Then, you can read about the woocommerce_checkout_fields filter. For example, to add or remove checkout fields in WooCommerce.
There are various ways in which you can add and use additional custom fields in your WooCommerce checkout. You can add a VAT number field for B2B, collect some marketing information with a simple select query, or even add a GDPR consent checkbox. Of course, these are just basic examples.
There are hundreds of different store types with various page requirements, but most of them can be fulfilled with one WooCommerce plugin to customize all checkout fields. Let's begin!
Download Flexible Checkout Fields
Start customizing your checkout page with the free plugin! Have a look at what you can achieve with Flexible Checkout Fields.
Here's a link to download the plugin in the free version:
👉 So now let's see how to add custom fields and customize your checkout page.
Flexible Checkout Fields
When it comes to adding custom fields to the WooCommerce checkout page, there is no better solution than the Flexible Checkout Fields plugin.
It’s a very popular (3,729,520 downloads💾) and well-rated (4.7 average rating ⭐) plugin with lots of great features.
Flexible Checkout Fields WooCommerce
Add a custom field to the WooCommerce checkout page!
💾 Active Installations: 80,000+ | WordPress Rating:
Also, see this video to check the features available in the free version of the plugin:
See how to customize WooCommerce checkout fields with the free Flexible Checkout Fields plugin. The video shows how to edit field settings, add validation, change field appearance, reorder fields with drag and drop, and add new custom checkout fields.
Custom fields for your checkout
The plugin lets you customize your WooCommerce checkout page within minutes!
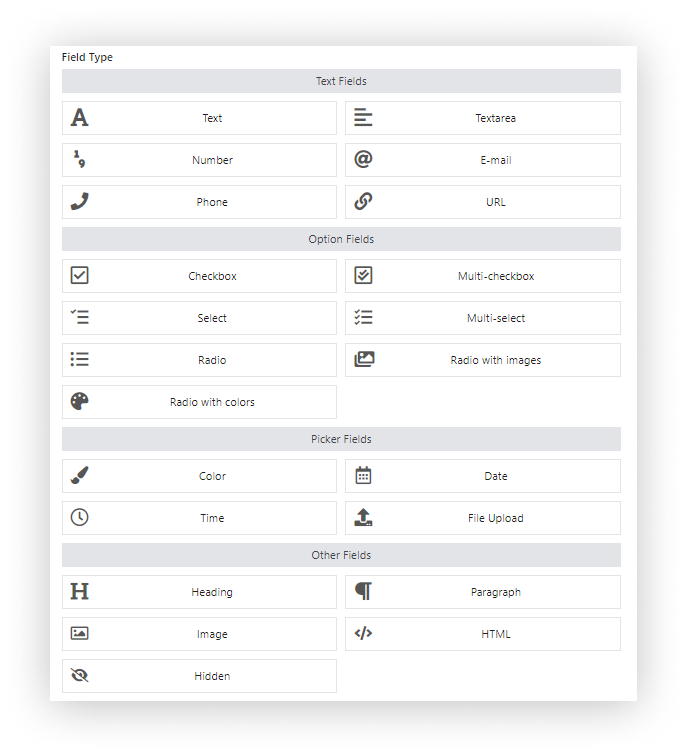
The free version lets you add these additional fields to the WooCommerce checkout form:
- Single Line Text
- Paragraph Text
- Textarea
- Number
- Phone
- URL
- Checkbox
- Color Picker
- Headline
- Image
- HTML or plain text
With the PRO version, you can create
all the above and additionally:
- Radio button
- Select (Drop Down)
- Multi-Checkbox
- Date
- Time
- Multi-Select
- Radio with images
- Radio with colors
- File Upload
- Hidden
Using Flexible Checkout Fields you can also edit, rearrange, or even disable default checkout fields in WooCommerce!
How to add custom fields in WooCommerce checkout?
You already know why you should add custom fields, and what tool is recommended to do that. Now it’s finally time to guide you through actually adding these fields in your store.
Of course, first, you have to install and activate the plugin.
When it’s done, go to WooCommerce → Checkout Fields.
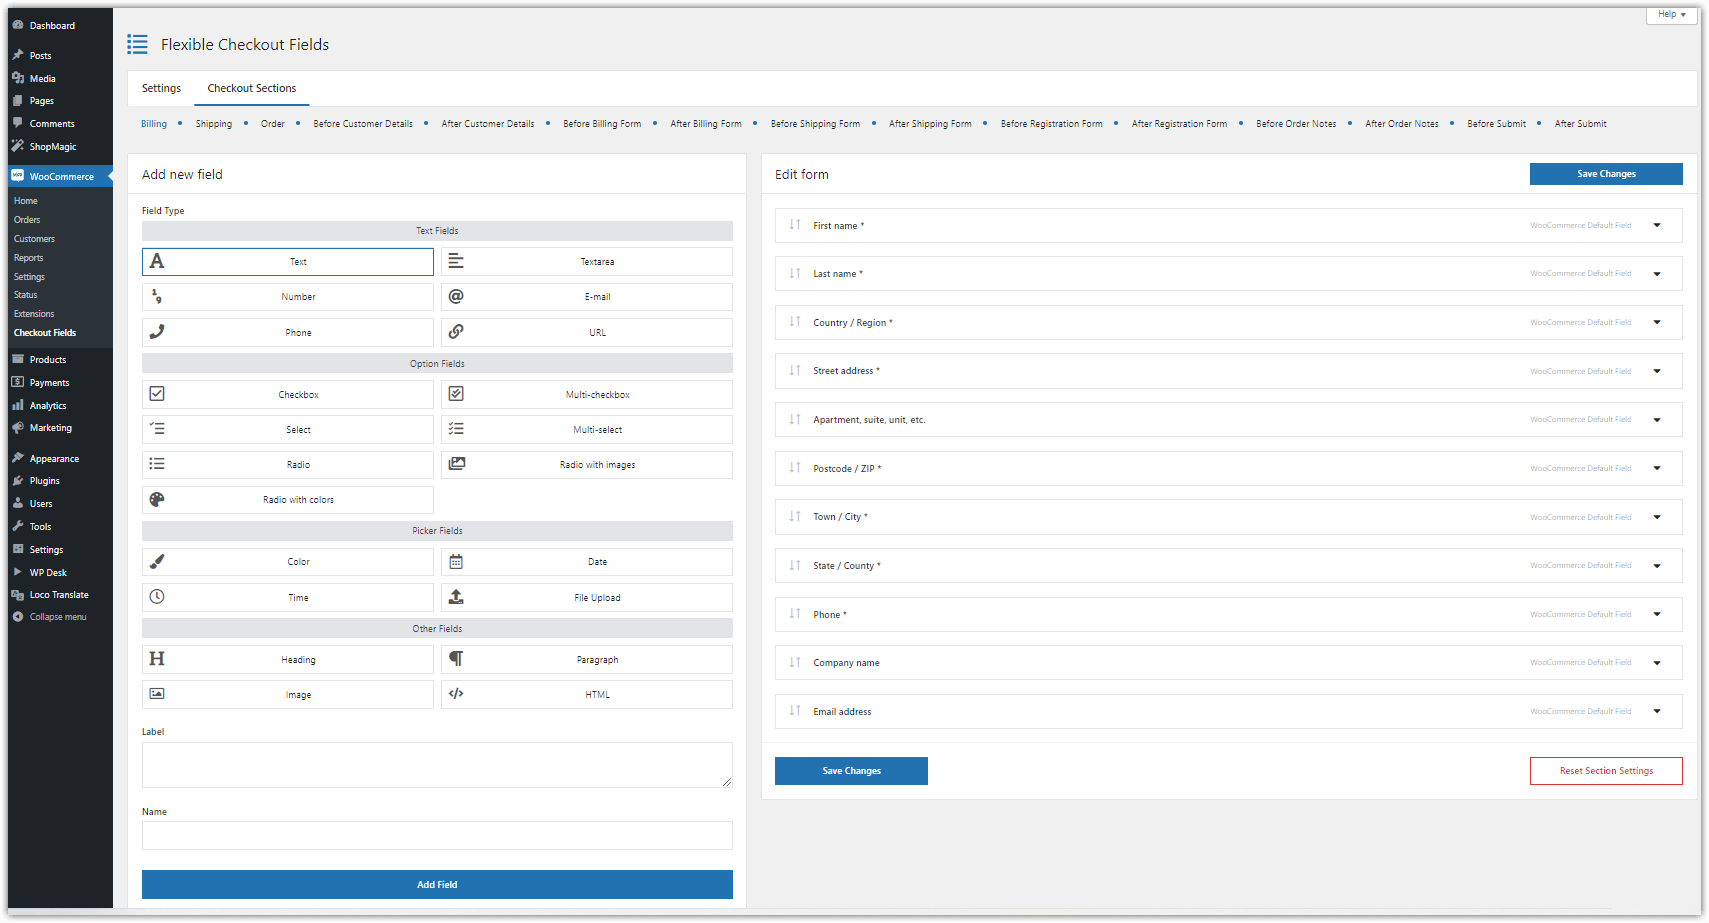
👉🏼You can customize default billing, shipping, and order fields in the Billing, Shipping, or Order tabs. The Custom Sections tab has more options so you can add any custom field after or before:
- Customer Details
- Billing Form
- Shipping Form
- Registration Form
- Order Notes
- Submit Button.
To add a custom field to the WooCommerce checkout, select the field type in the Add New Field section, enter a label name and click on Add Field.
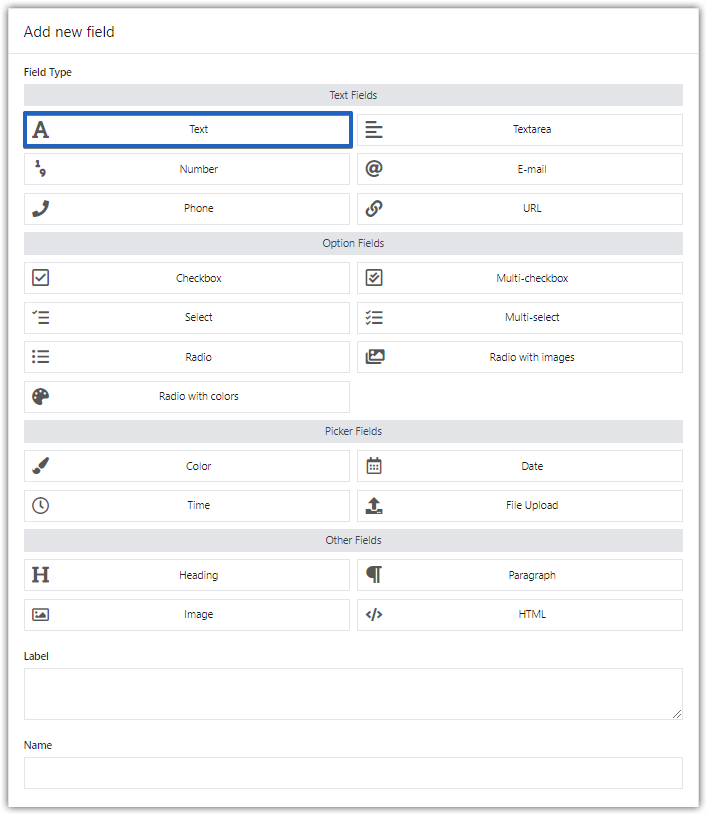
🎉 And it’s done! But, it’s just a start. It's possible to add another custom field to the WooCommerce checkout page. Now you can adjust your brand new field to your needs!
Let’s see what are the options.
General settings
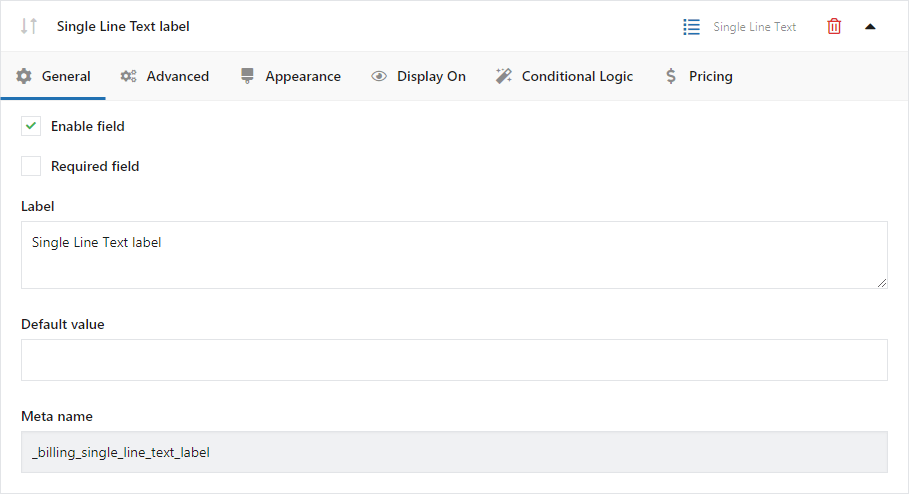
👉🏼 Here you can enable or disable a field (even the WooCommerce default ones), or set it as required. In this section, you can also change the label of the custom field you add to the WooCommerce checkout or set up validation. A validation check is a great way to make sure that your customers enter their data in the right format.
👉🏼 In Flexible Checkout Fields, you can set a phone, email, or postcode validation. Check out our article about checkout field validation to get more information.
Appearance settings
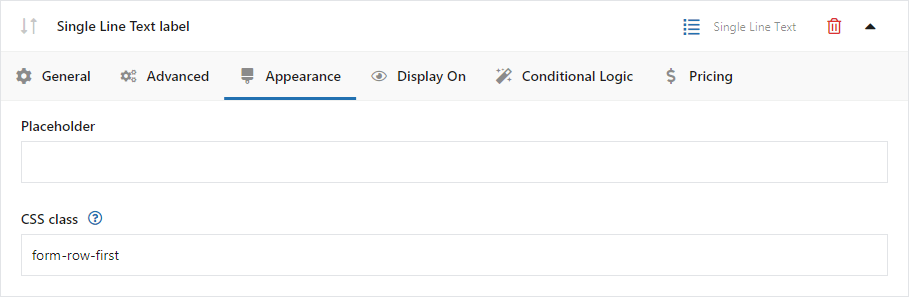
👉🏼 In the Appearance tab, you can set Placeholder and CSS Class. With it, you can use the magic of CSS and style it the way you want. Check out our article on how to set your CSS class after you add a custom field to the WooCommerce checkout.
Display On
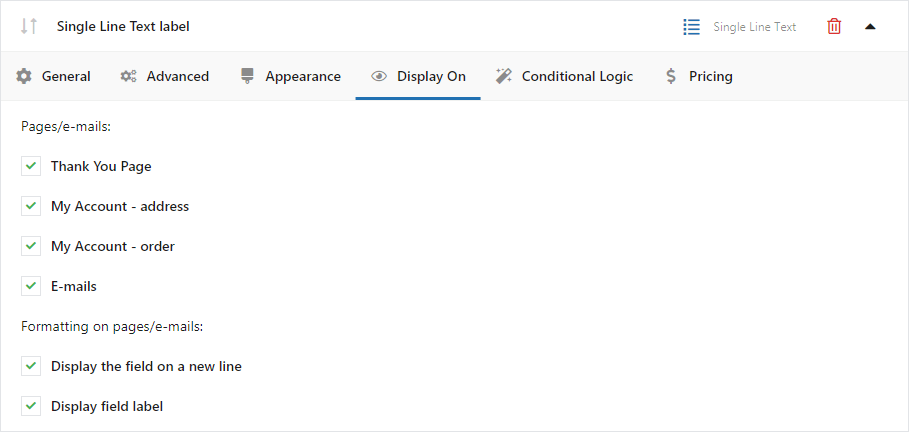
In this section, you can configure where the field should be displayed. There are four options: Thank You Page, My Account - address, My Account - order, and Emails.
Extra features for advanced checkout customization
You may also use the PRO options if you need more. Let's have a look!
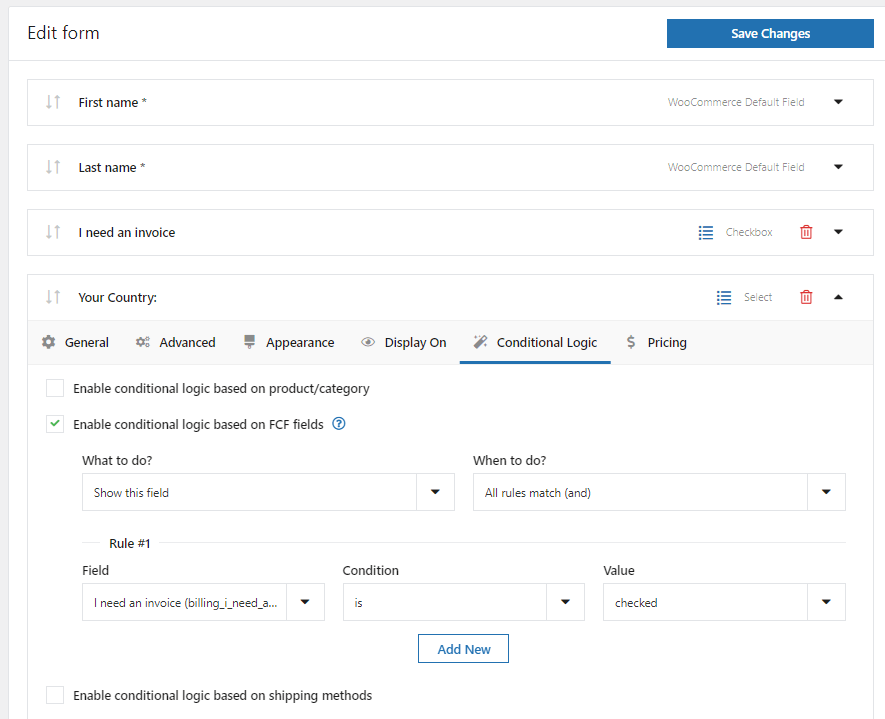
Conditional Logic
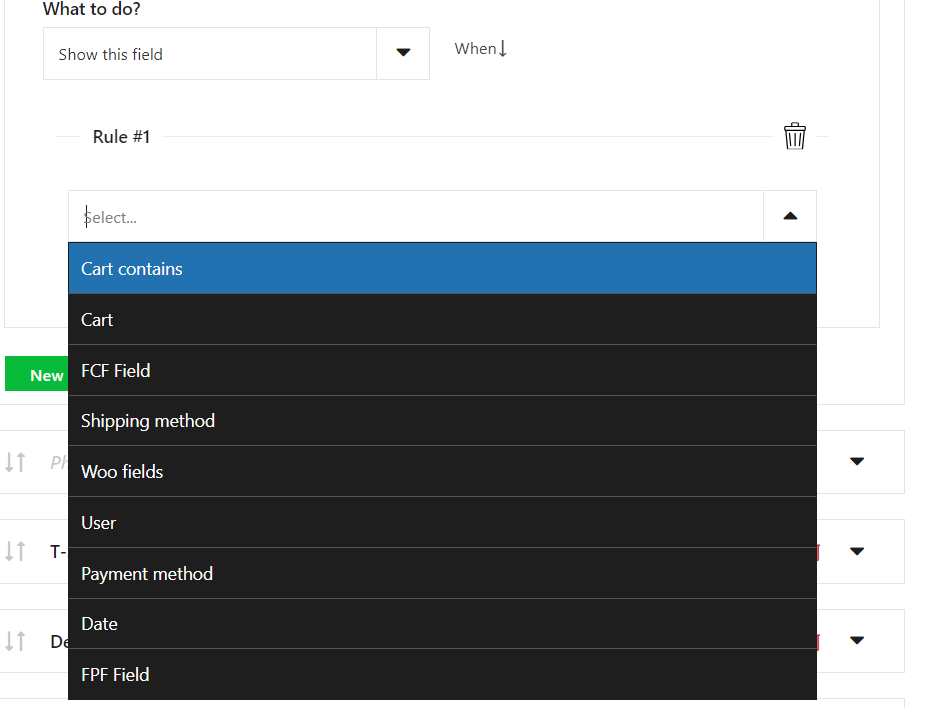
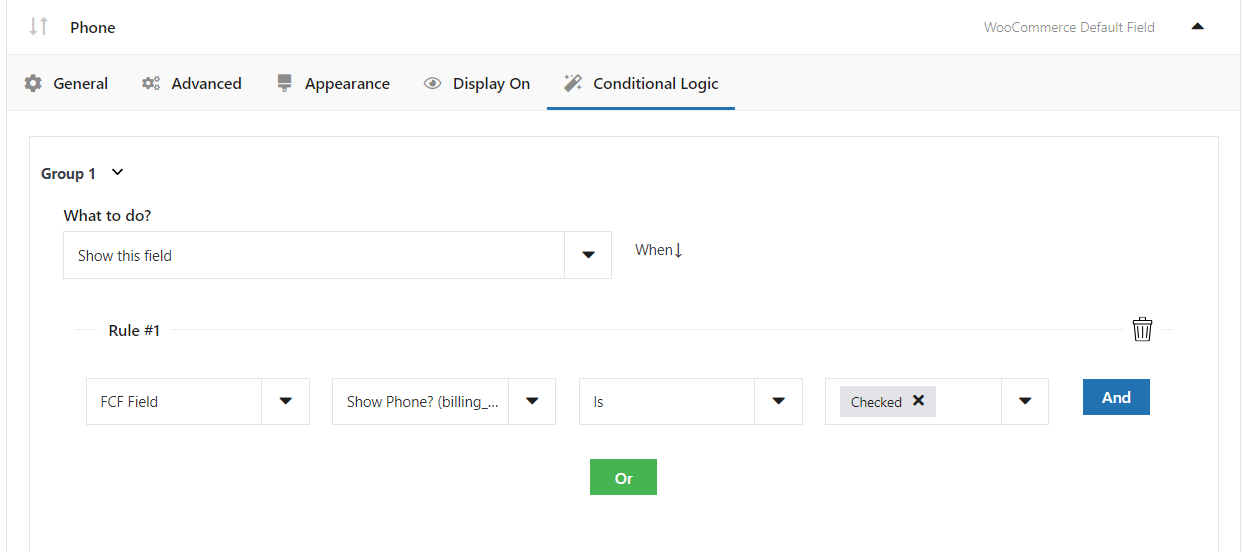
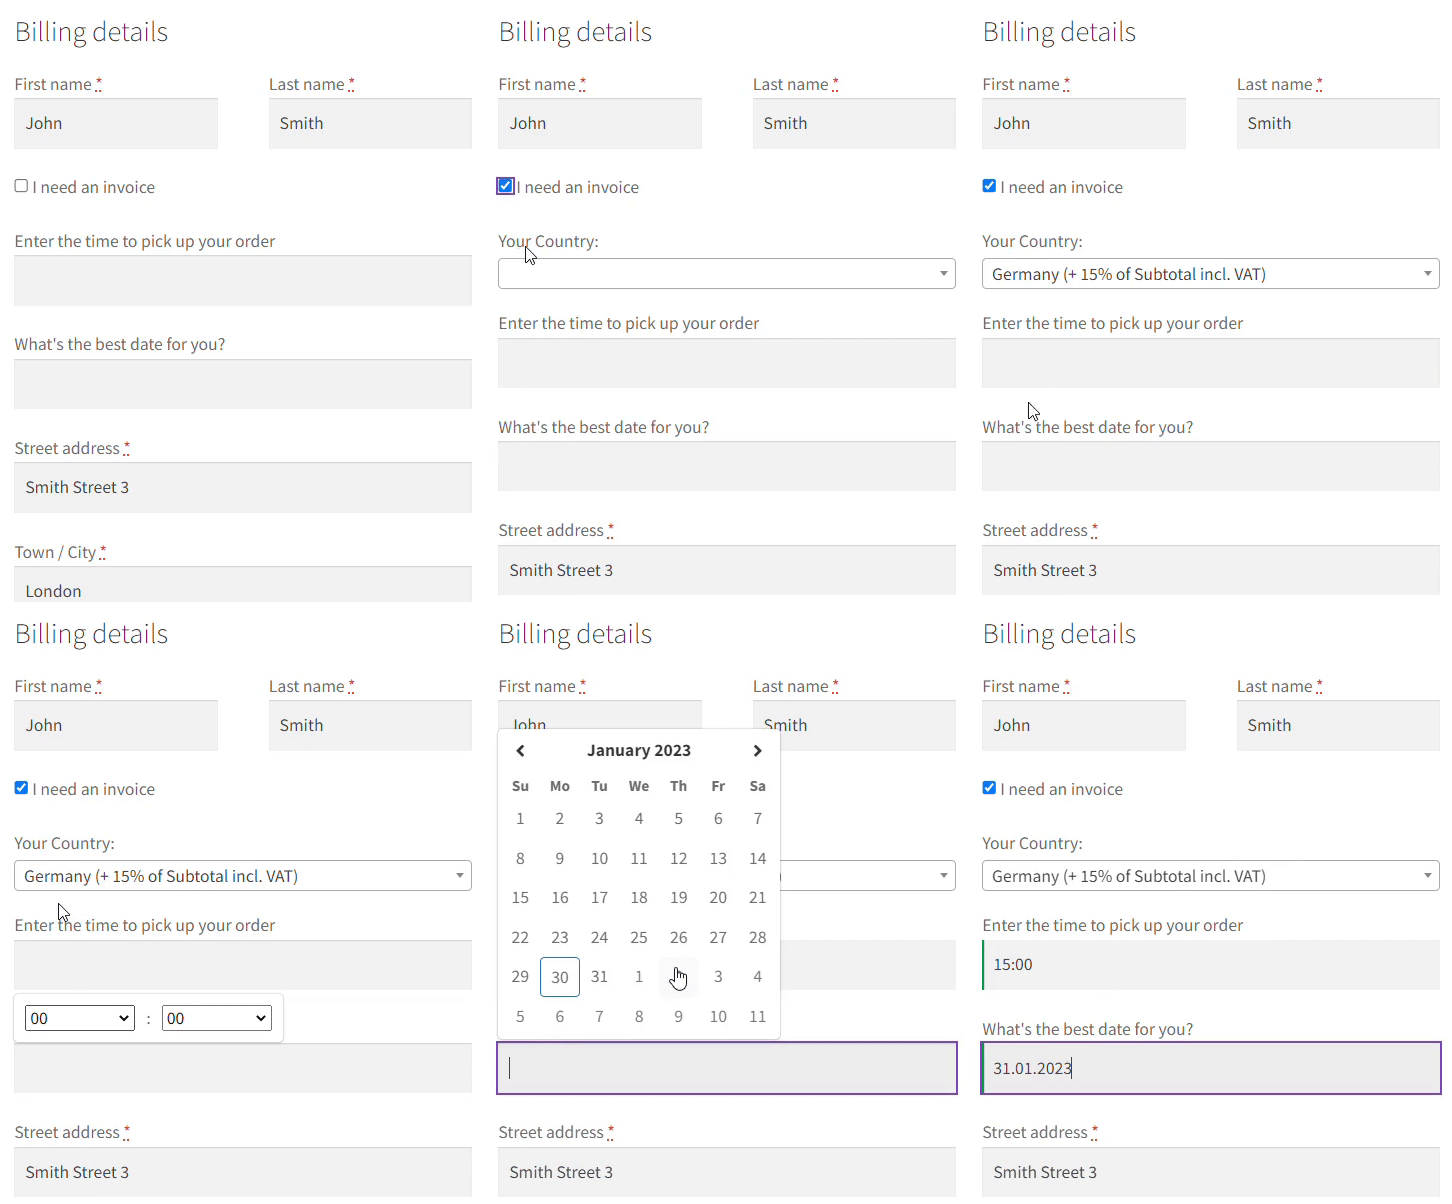
👉🏼 In this tab, you can configure the conditional logic of the fields. There are eight really useful options. You can show or hide fields or even set them as required based on:
- WooCommerce default fields,
- Flexible Checkout Fields plugin fields,
- Flexible Product Fields plugin fields,
- Cart,
- User role,
- Shipping method,
- Payment method,
- Date.
Pricing
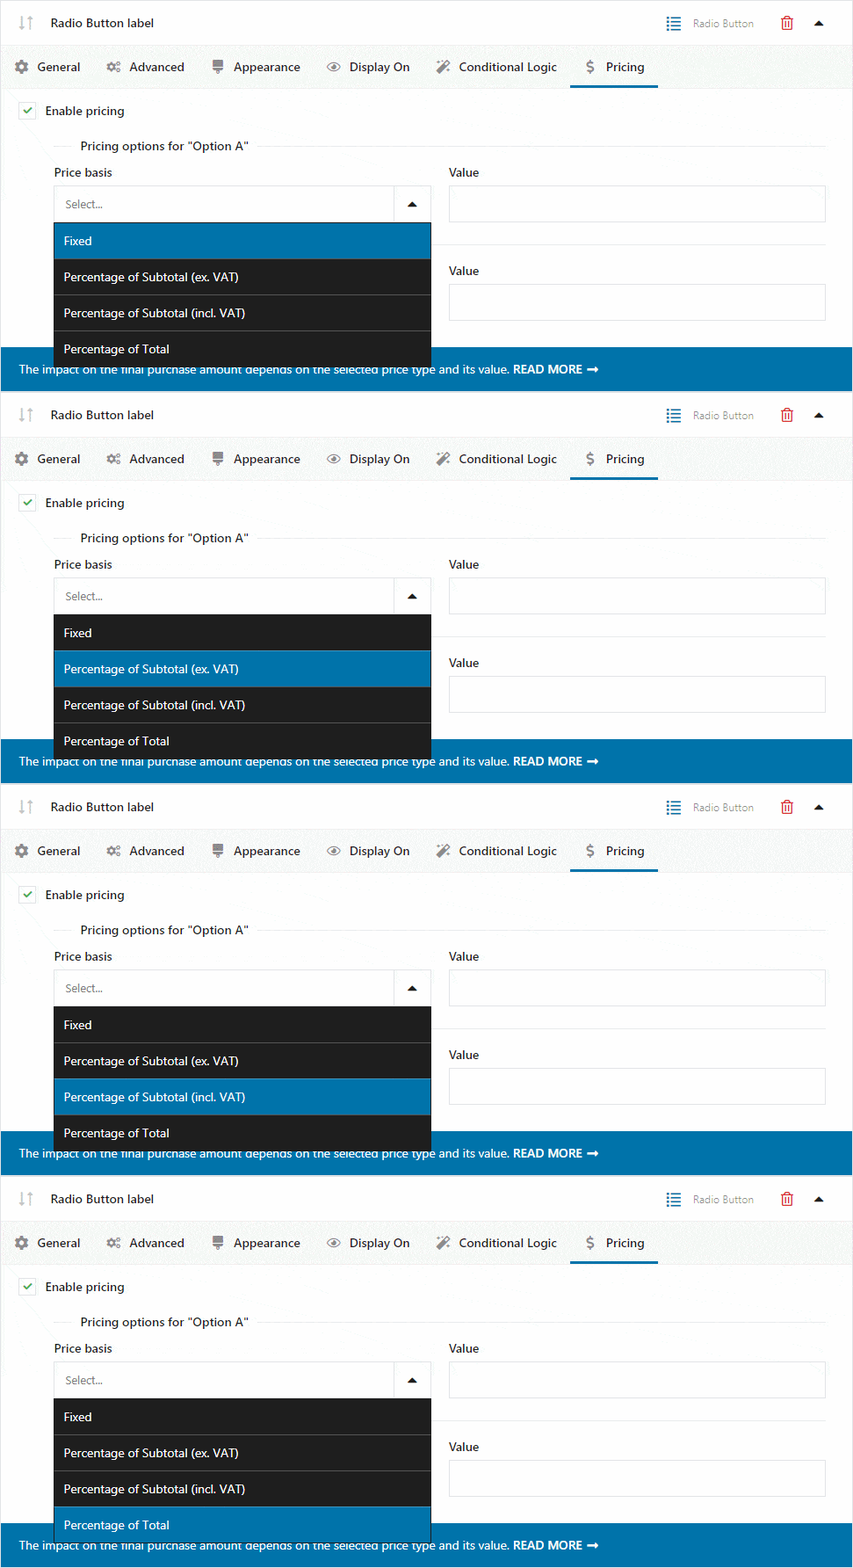
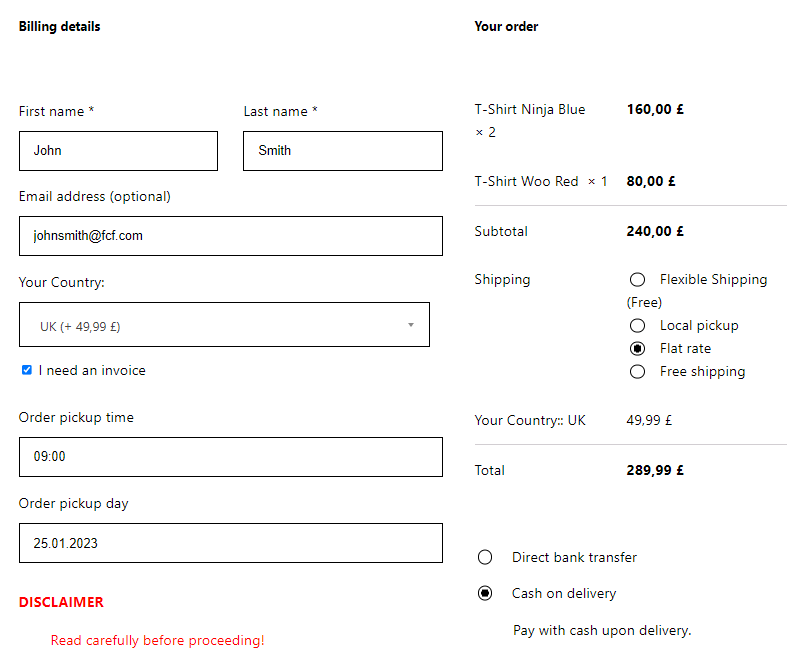
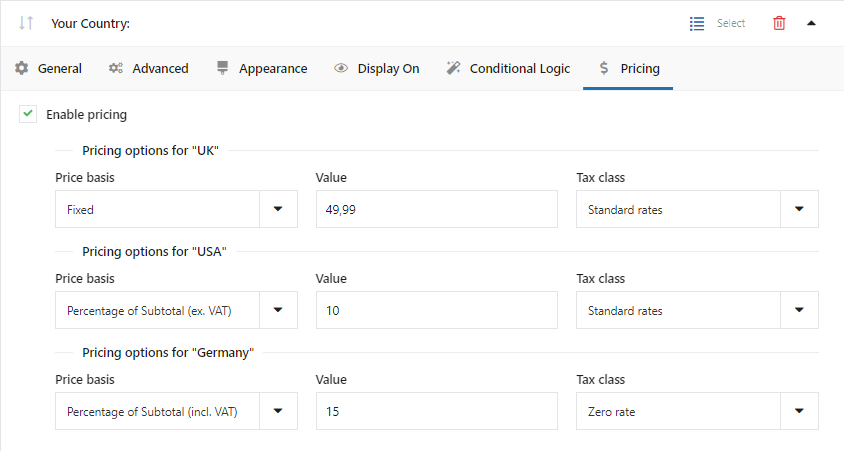
The fields added using our plugin also have a Pricing tab with available options for assigning a price. The impact on the total purchase amount depends on the set price type and its value. Check out our article about field pricing to get more information.
Checkout fields with prices using Flexible Checkout Fields
All Plugins Bundle £99
Add a custom field to the WooCommerce checkout page!
💾 Active Installations: 80,000+ | WordPress Rating:
woocommerce_checkout_fields filter guide
WooCommerce allows adjusting the classic checkout page form with the filter. It will work only when the page uses the woocommerce_checkout shortcode (classic checkout).
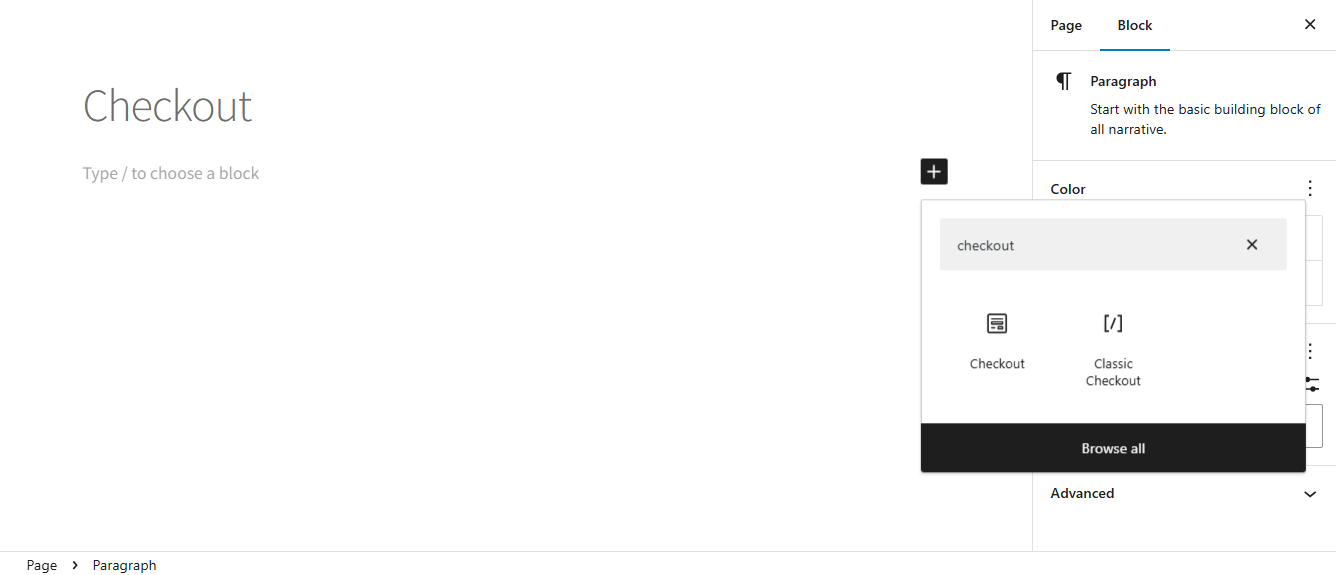
There are also some basic built-in WooCommerce options for checkout customization:
- endpoints (WooCommerce → Settings → Advanced)
- tax visibility (WooCommerce → Settings → General)
- enabling coupon codes (WooCommerce → Settings → General)
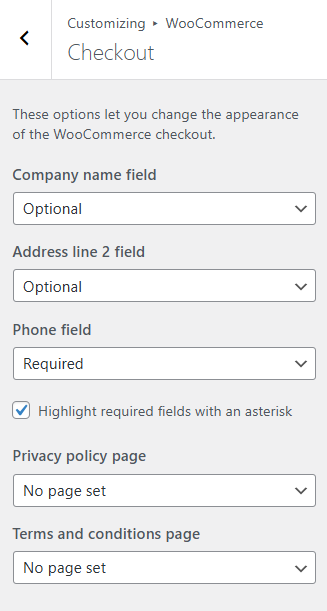
- adjust some privacy and field settings (Appearance → Customize → WooCommerce → Checkout). These options may vary based on an active WordPress theme.
Let's come back to customizing the checkout fields with the filter.
You may adjust the form fields by adding a custom code to the theme's functions.php file. Check if the code works and does not have any errors, for example, in a testing environment. Also, consider adding a custom code inside a child theme so that the code is not overwritten during theme updates.
woocommerce_checkout_fields
You may customize the fields (hide, remove, rearrange, make optional/ required) by addressing the correct fields and their parameters. Using the filter you may customize the existing form fields or WooCommerce additional fields.
The filter comes with a few arrays for billing, shipping, account, and order.
The billing array (field priority)
- billing_first_name (10)
- billing_last_name (20)
- billing_company (30)
- billing_country (40)
- billing_address_1 (50)
- billing_address_2 (60)
- billing_city (70)
- billing_state (80)
- billing_postcode (90)
- billing_phone (100)
- billing_email (110)
Some fields will not be present in the form or the layout (priority) will be a bit different. It depends on the country. The above layout is for the UK and USA.
You can also make the company name, address_2, and phone fields optional with the theme's customization tool.
The shipping array (field priority)
- shipping_first_name (10)
- shipping_last_name (20)
- shipping_company (30)
- shipping_country (40)
- shipping_address_1 (50)
- shipping_address_2 (60)
- shipping_city (70)
- shipping_state (80)
- shipping_postcode (90)
The above list is the layout with field priorities for the UK and US.
The account array (field priority)
- account_username (10)
- account_password (20)
- account_password-2 (30)
The order array (field priority)
- order_comments (10)
Checkout field properties
You may change or set the following field options:
- label - the field label.
- type - field type, for example, text, select, textarea, or checkbox.
- priority - used for the field location.
- required - used with false or true to make a field optional or required.
- validate - for example used with 'tel', 'email', 'number', or 'date'.
- class - adds a class or classes for the field.
- label_class - adds a class or classes for the label.
- clear - used with false or true (applies a clear fix to an input or label).
- placeholder - the example value (placeholder) in the input or textarea fields.
- options - possible options for select or radio.
How to customize the WooCommerce checkout page fields with the woocommerce_checkout_fields filter (examples)
Using the filter can suffice for example to add or remove a field. Let's see some examples that use the custom code with the woocommerce_checkout_fields filter.
Add a checkout field
It's possible to add new fields using the filter and field structure with the appropriate field properties.
-
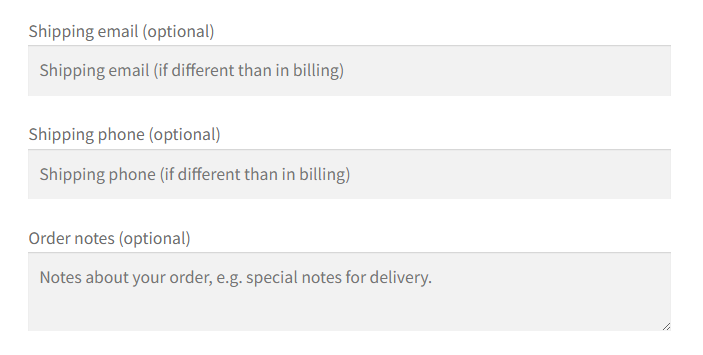
New email field in the WooCommerce checkout
add_filter('woocommerce_checkout_fields','new_email_field_classic_checkout');
function new_email_field_classic_checkout($fields) {

$fields['shipping']['shipping_email'] = array(

'type' => 'email',

'label' => 'Shipping email',

'priority' => 101,

'required' => false,

'class' => array('form_row_wide'),

'validate' => array('email'),

'autocomplete' => 'email',

'placeholder' => 'Shipping email (if different than in billing)',

);

return $fields;

}
-
New phone number in the shipping section
add_filter('woocommerce_checkout_fields','new_phone_field_classic_checkout');
function new_phone_field_classic_checkout($fields) {

$fields['shipping']['shipping_phone'] = array(

'type' => 'number',

'label' => 'Shipping phone',

'priority' => 111,

'required' => false,

'class' => array('form_row_wide'),

'validate' => array('tel'),

'autocomplete' => 'tel',

'placeholder' => 'Shipping phone (if different than in billing)',

);

return $fields;

}
-
Additional info in the billing section
add_filter('woocommerce_checkout_fields','new_input_field_classic_checkout');
function new_input_field_classic_checkout($fields) {

$fields['billing']['additional_info'] = array(

'type' => 'text',

'label' => 'Additional info',

'priority' => 121,

'required' => false,

'class' => array('form_row_wide'),

'placeholder' => '',

);

return $fields;

} -
Referral info in the billing section
add_filter('woocommerce_checkout_fields','new_select_field_classic_checkout');
function new_select_field_classic_checkout($fields) {

$fields['billing']['referral_info'] = array(

'type' => 'select',

'label' => 'Who referred the store?',

'priority' => 121,

'required' => false,

'class' => array('form_row_wide'),

'label_class' => array('bg-cta'),

'clear' => true,

'options' => array(

'' => 'Please choose',

'search' => 'I found it through search results',

'affiliate_link' => 'I came from an affiliate blog',

'video' => 'I found the link in the video description',

'ad' => 'I clicked an ad',

),

);
return $fields;
}
woocommerce_checkout_update_order_meta
To save the data to the order meta you should also use the woocommerce_checkout_update_order_meta action, for example:
add_action('woocommerce_checkout_update_order_meta','save_additional_info_to_order_meta');
function save_additional_info_to_order_meta($order_id) {

$array_options = ['search','affiliate_link','video','ad'];

if ( ! empty($_POST['referral_info']) && in_array ($_POST['referral_info'], $array_options)) {

$order = wc_get_order($order_id);

$order->update_meta_data('Referral', sanitize_text_field($_POST['referral_info']));

$order->save_meta_data();

}

}
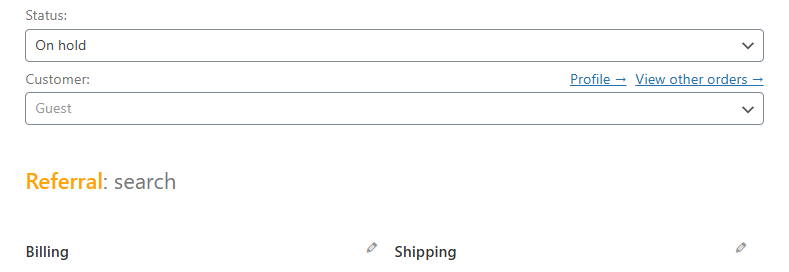
If you want to see the field when editing an order, you should also use the appropriate action to show the field's name and the value next to the billing or shipping order details. You may use the following actions:
-
woocommerce_admin_order_data_after_billing_address
-
woocommerce_admin_order_data_after_shipping_address
-
woocommerce_admin_order_data_after_order_details
For example, to show the value from the referral field below the order details I will use the below code.
add_action('woocommerce_admin_order_data_after_order_details','add_referral_field_below_order_details',10,1);
function add_referral_field_below_order_details($order) {
echo '<p> </p><p style="font-size:20px"><strong style="color:orange">' . esc_html__('Referral') . '</strong>:<span> '. esc_html($order->get_meta('Referral', true)) . '</span></p>';
}
Hide a field
You may use the unset function to remove a field.
add_filter('woocommerce_checkout_fields','hide_address_2_field_classic_checkout');
function hide_address_2_field_classic_checkout($fields) {

unset ($fields['billing']['billing_address_2']);

return $fields;

}
Rearrange checkout fields
Changing the field location requires understanding the default values for the field priority property. The lower the number, the higher the field appears in the checkout form. The field priority starts with 10 e.g. billing_first_name, then comes billing_last_name with 20, and so on. It's possible to move or add a field in a specific location (at the end or after a certain field) knowing the field priority and adding a custom code.
The field priorities are also visible on the list of available checkout fields above.
add_filter('woocommerce_checkout_fields','move_company_field_classic_checkout');
function move_company_field_classic_checkout($fields) {

$fields['billing']['billing_company']['priority'] = 200;

return $fields;

}
Of course, it's possible to change the order of the fields, for example, phone and email.
add_filter('woocommerce_checkout_fields','change_field_order_classic_checkout');
function change_field_order_classic_checkout($fields) {

$fields['billing']['billing_phone']['priority'] = 110;

$fields['billing']['billing_email']['priority'] = 100;

return $fields;

}
You may set the custom order for fields in one function. It's also possible to set the priority for additional WooCommerce fields after registering.
add_filter('woocommerce_checkout_fields','change_order_more_fields_classic_checkout');
function change_order_more_fields_classic_checkout($fields) {

$fields['billing']['billing_phone']['priority'] = 21;

$fields['billing']['billing_email']['priority'] = 22;

$fields['billing']['billing_country']['priority'] = 23;

$fields['billing']['billing_company']['priority'] = 121;

return $fields;

}
Finally, you can change the order and add a field based on conditions, for example, only above a specific cart value.
add_filter('woocommerce_checkout_fields','change_order_add_field_conditional_classic_checkout');
function change_order_add_field_conditional_classic_checkout($fields) {

$woocommerce_cart = WC()->cart;

$woocommerce_cart_value = $woocommerce_cart->total;

if($woocommerce_cart_value > 100) {

$fields['billing']['billing_company']['priority'] = 21;

$fields['billing']['billing_company_vat_number'] = array(

'type' => 'number',

'label' => 'VAT',

'priority' => 22,

'required' => false,

'class' => array('form_row_wide'),

'validate' => array('number'),

'placeholder' => 'Company VAT',

);

}

return $fields;

}
Make fields optional/ required
One can make the field optional or required by changing the 'required' property of a field.
add_filter('woocommerce_checkout_fields','optional_required_field_classic_checkout');
function optional_required_field_classic_checkout($fields) {

$fields['billing']['billing_phone']['required'] = false;

$fields['billing']['billing_company']['required'] = true;

return $fields;

}
Add a CSS class to style a field
It's similar to the previous examples, but in this case, you can add an array to define more classes.
add_filter('woocommerce_checkout_fields','new_input_field_classic_checkout_css_class');
function new_input_field_classic_checkout_css_class($fields) {

$fields['billing']['additional_info'] = array(

'type' => 'text',

'label' => 'Additional info',

'priority' => 121,

'required' => false,

'class' => array('form_row_wide', 'bg-main'),

'placeholder' => '',

);

return $fields;

}
Clear fix a field
The field property 'clear' makes sure the fields stay organized.
add_filter('woocommerce_checkout_fields','new_input_field_classic_checkout_clear_fix');
function new_input_field_classic_checkout_clear_fix($fields) {

$fields['billing']['additional_info'] = array(

'type' => 'text',

'label' => 'Additional info',

'priority' => 121,

'required' => false,

'clear' => true,

);

return $fields;

}
Set a CSS class for the field label
You may also add a CSS class (or classes using array()) for the field label.
add_filter('woocommerce_checkout_fields','new_input_field_classic_checkout_css_class_label');
function new_input_field_classic_checkout_css_class_label($fields) {

$fields['billing']['additional_info'] = array(

'type' => 'text',

'label' => 'Additional info',

'priority' => 121,

'required' => true,

'class' => array('form_row_wide'),

'label_class' => array('bg-cta','bg-label'),

);

return $fields;

}
Set options for select
If the field type equals 'select' you can use this property to define options for the field.
add_filter('woocommerce_checkout_fields','new_select_field_classic_checkout_options');
function new_select_field_classic_checkout_options($fields) {

$fields['billing']['referral_info'] = array(

'type' => 'select',

'label' => 'Who referred the store?',

'priority' => 121,

'required' => false,

'class' => array('form_row_wide'),

'label_class' => array('bg-cta'),

'clear' => true,

'options' => array(

'' => 'Please choose',

'search' => 'I found it through search results',

'affiliate_link' => 'I came from an affiliate blog',

'video' => 'I found the link in the video description',

'ad' => 'I clicked an ad',

),

);

return $fields;

}
Validate fields
You may also use the validate parameter to validate some basic data types (for WooCommerce additional fields or existing ones).
add_filter('woocommerce_checkout_fields','date_field_classic_checkout_validation');
function date_field_classic_checkout_validation($fields) {

$fields['billing']['date'] = array(

'type' => 'date',

'label' => 'Delivery date',

'priority' => 151,

'required' => false,

'validate' => array('date'),

);

return $fields;

}
It's also possible to add a message in the checkout using wc_add_notice.
woocommerce_checkout_fields filter vs Flexible Checkout Fields
In other words, here is when writing custom code with the filter is not the right option.
Let's see the list of the most important advantages of the plugin.
- You don't want to write or maintain a custom code.
- You're a bit scared of losing the code when changing a theme or accidentally.
- The plugin can add, remove, rearrange, or adjust checkout fields without rewriting the code.
- Advanced validation rules.
- Nice UI for managing checkout fields.
- Customizing the fields with a free plugin.
- Saving time.
- Personalize the checkout form with a lot of field types.
- Style fields with CSS classes or by choosing new field types.
- Conditional logic for advanced field behaviour (PRO).
- Option to add price per field (PRO).
- Hide fields based on several conditions and exceptions (PRO).
- Conditional logic based on products, product category, user role, shipping methods, date, or payment methods (PRO).
- Add field to new checkout sections to adjust the layout (PRO).
- Professional technical support.
- Plugin updates.
- Documentation with examples.
Frequently asked questions about customizing the checkout page
How to Change the WooCommerce Checkout Page Template?
To change the WooCommerce checkout page template, you can use the woocommerce_checkout_fields filter. Or a free plugin to customize the checkout form.
Can I add custom fields to the WooCommerce block checkout?
Yes. The block checkout has its own extensibility API, so fields are registered differently than in the classic form. Checkout Fields for Blocks adds them without code, with a separate add-on for conditional logic. The woocommerce_checkout_fields filter and the snippets in this guide do not affect the block checkout at all.
Where is the data from custom checkout fields saved?
Field values are stored in the order meta, so they show up on the order edit screen in the WooCommerce admin. With a plugin this happens automatically. With the filter you also need the woocommerce_checkout_update_order_meta action, otherwise the customer fills in the field and the value disappears after the order is placed.
Can I make a checkout field required only in some cases?
Yes, but not with the filter alone, which sets a field as required or optional for everyone. Rules such as requiring a VAT number only for company orders, or a delivery date only for a certain shipping method, need conditional logic, available in the PRO version of the plugin.
How many fields should a checkout form have?
As few as the order genuinely needs. Every additional field is another decision between the customer and the purchase, and required fields cost more than optional ones. Before adding one, check whether the answer can be collected after the order instead, in a confirmation email.
How to customize your WooCommerce checkout page?
To customize your WooCommerce checkout page, you can use custom code snippets (above) or plugins like "Flexible Checkout Fields" to add, edit, or remove fields according to your needs.
Additionally, utilizing custom CSS in your theme or using a page builder can help you adjust the layout and design elements for a more user-friendly experience.
Custom checkout page (customization on a WooCommerce site) can make the checkout page's design better. Make sure that your checkout is simple and easy to navigate.
Stay away from the form with too many fields on your checkout or checkout page design that may harm the checkout flow or increase cart abandonment.
How to customize WooCommerce checkout pages using plugins?
You may choose free plugins from the WordPress repository for checkout customization. WP Desk has built such an extension as well - Flexible Checkout Fields.
Start by downloading the free version of the WP Desk's checkout form manager.
Flexible Checkout Fields WooCommerce
Add a custom field to the WooCommerce checkout page!
💾 Active Installations: 80,000+ | WordPress Rating:
This WooCommerce extension allows you to add, remove, or modify fields to streamline the checkout process.
Additionally, the plugin helps in styling and layout changes that can help boost conversion rates.
In PRO, you can use options to show checkout fields based on specific conditions or add pricing per field.
How to create a checkout page in WooCommerce?
To create a checkout page in WooCommerce, first ensure that you have the WooCommerce plugin installed and activated on your WordPress site.
Then, go to Pages to check if you have the checkout page already added.
If not, or if you would like to edit the page, add a new page and add a checkout block. Then, save the changes, and go to WooCommerce → Settings → Advanced → Page setup and choose the page as checkout.
The same approach works for the cart page. You don't need a checkout field editor to add the cart page, product page, or default WooCommerce checkout page. The additional plugin, though, will help manage checkout fields without the need to code.
Customize WooCommerce checkout fields summary
In this article, you have learned how to add custom fields to the classic WooCommerce checkout page. Using a plugin or with the woocommerce_checkout_fields filter. I hope that it’ll help you to adjust your store to customers' demands. They can get a better customer experience, and you’ll sell more. Good luck!
Flexible Checkout Fields WooCommerce
Add a custom field to the WooCommerce checkout page!
💾 Active Installations: 80,000+ | WordPress Rating:







Dzień dobry, mam problem z przetłumaczeniem tego pluginu za pomocą Loco Translate. Będę wdzięczny za pomoc.
I can add an exiatent field fron other place in chexkou? Example: I have an profile page with place to atache id, i want pat the same place at checkout, is it possible with this plugin?