• Skip to primary navigation
  • Skip to main content
  • Skip to primary sidebar
  • Skip to footer
WP Desk = premium plugins for WordPress & WooCommerce
  • Plugins
        • Checkout & OrdersMake your work easier and automate the orders. Adjust the order form to your needs and make it more useful to your customers. Print order labels directly from WooCommerce. Put the orders in order using our plugins. Find out how to streamline the procurement process in your store.
          • Flexible Checkout Fields
          • Active Payments
          • Automatic Payment Status
          • Flexible Refund and Return Order
          • Print Orders and Address Labels
          • Flexible Subscriptions Recurring Shipping
          • Flexible Subscriptions Payment Retry
          • Flexible Subscriptions Stock Management
        • ProductsThese plugins will help you manage your WooCommerce products. Here you will find the plugins to import and update products from XML or CSV files. Then you can change the product unit of measure, show the lowest price in the last 30 days (Omnibus Directive), or let customers name the product price!
          • Flexible Product Fields
          • Dropshipping Import Products
          • Dropshipping FTP Import Products
          • Dropshipping Export Products
          • Custom Price
          • WP Desk Omnibus
          • Flexible Quantity Calculator
          • Dropshipping Orders Export
        • MarketingPromote your store online. Add products from your shop to price comparison websites directly from WooCommerce. Acquire new customers and communicate with your existing ones. Build a customer base and communicate with clients using one of the most effective marketing tools, namely e-mail marketing. Check out our promotional tools!
          • Flexible Pricing
          • Flexible Wishlist - Analytics & Emails
          • OLX WooCommerce
          • Flexible PDF Coupons
          • ShopMagic
          • Flexible Invoices
  • Bundle🔥
  • WP Desk Care
  • Support
  • Blog
  • My Account
  • 0

More results

WooCommerce Checkout - Settings, Shortcode & Configuration Guide

Checkout, Plugin Tutorials, WooCommerce checkout fields, WooCommerce tutorials

Maciej Swoboda6 minutes read2025-08-20
blog category heading image

WooCommerce checkout features - which are mostly related to payment settings - play a vital role in running an online store. It's often thanks to them that a customer decides to make a purchase. Therefore, provide your customers with convenient payment methods, so they are more likely to buy from you. Read our step-by-step guide through the WooCommerce settings, the [ woocommerce_checkout ] shortcode, guest checkout & checkout customization! Also, download the FREE plugin to customize your WooCommerce checkout page in minutes 🚀!

⭐ Grab our FREE plugin to customize the WooCommerce checkout fields⭐!

Are you sure you've set your WooCommerce checkout right and configured all the necessary settings?😊

Today, I will show you how to use the shortcode, and customize the WooCommerce checkout page design with a free plugin to get more sales! Let's begin!

Contents

    • Flexible Checkout Fields WooCommerce
  • WooCommerce Checkout Settings
    • General
    • Coupons Settings
    • Tax
    • Prices settings
    • Shipping
    • Payments
    • Accounts & Privacy
    • Guest checkout in WooCommerce settings
    • Account creation settings
    • Privacy policy settings
    • Advanced
    • Page setup settings
    • Checkout endpoints settings
    • Account endpoints settings
  • WooCommerce checkout - troubleshooting
    • There is no woocommerce_checkout shortcode
    • How to adjust the woocommerce_checkout shortcode?
    • How to use woocommerce_checkout to modify the checkout process?
    • How to show privacy information at checkout?
    • woocommerce_checkout - classic vs block-based form
  • How to manage WooCommerce checkout fields
  • Get a FREE plugin for managing WooCommerce checkout fields
    • Flexible Checkout Fields WooCommerce
    • Customize WooCommerce checkout page design (free plugin)
  • WooCommerce checkout - summary
    • Related Articles
  • Customize the WooCommerce Checkout Page: Tips & Tools for Success
  • Customize the WooCommerce Checkout Page: Top Tips for a Seamless Experience
  • WooCommerce Checkout Page: settings, missing options & errors
  • WooCommerce Checkout Field Editor: How to Add, Edit & Remove Billing Fields
  • My Account in WooCommerce - Settings, Shortcode & Custom Fields

Flexible Checkout Fields WooCommerce

Edit, add new or hide unnecessary fields from the WooCommerce checkout form. Add pricing to fields and use conditional logic. It's all about conversions and better user experience. NEW: now you can set multiple conditions (OR) under one or more condition groups (AND).

💾 Active Installations: 80,000+ | WordPress Rating:

Download for free or Go to WordPress.org
WP Desk
80,000+ Active Installations
Last Updated: 2026-08-19
Works with WooCommerce 10.7 - 11.1

The plugin lets you add, remove, and manage existing WooCommerce checkout fields in minutes 💪! Read more about the extension ⬇️

💡 For block-based checkout, you may use Checkout Fields for Blocks.

Let's go back to the available checkout settings!

WooCommerce Checkout Settings

You can find them under the General, Tax, Payments, Accounts & Privacy, and Advanced tabs on the WooCommerce → Settings page.

Each section has settings that will affect the checkout page design.

General

💡 First, go to WooCommerce → Settings → General.
WooCommerce Coupons
Enable Coupons in the General WooCommerce settings

Coupons Settings

Enable the use of coupon codes - select this option if you would like to create coupons that your customers can use when placing an order. If you turn on this feature, a coupon code field will appear on the cart and checkout pages.

Calculate coupon discounts sequentially - choose this feature if you want multiple coupons to lower the price discounted by the previous coupon rather than allowing multiple coupons to always lower the same value of the full price.

For example, your customer has received two coupons that they are using while placing an order:

  • The full price of the ordered product is $100.
  • The first one is a 10% off coupon, and the second one is 20% off.
  • How we calculate the discount if we turn off the feature: $100 * 10% + $100 * 20% = $10 + $20. Therefore, the discount is $30 while the discounted product price is $70.
  • How we calculate the discount if we turn on the feature: $100 * 10% + ($100 * 10%) * 20% = $10 + $18. Therefore, the discount is equal to $28 and the lowered price is $72.

Tax
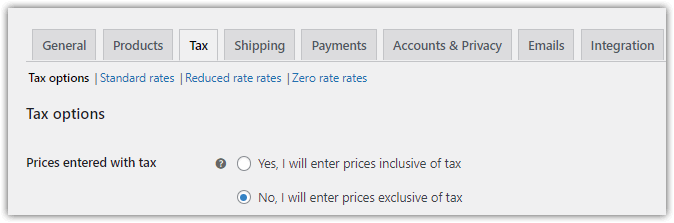
💡 Next, go to WooCommerce → Settings → Tax → Tax options.
WooCommerce settings: Tax tab
Tax options in WooCommerce settings

Prices settings

Display prices in the shop - decide if you want to show prices with or without tax.

Display prices during cart and checkout - choose if you want to display prices including or excluding tax in the cart and checkout pages.

Price display suffix - this setting is optional. You may set the price suffix that will appear next to the prices on the product and catalog pages. It will not affect the prices in the cart or checkout pages.

Shipping
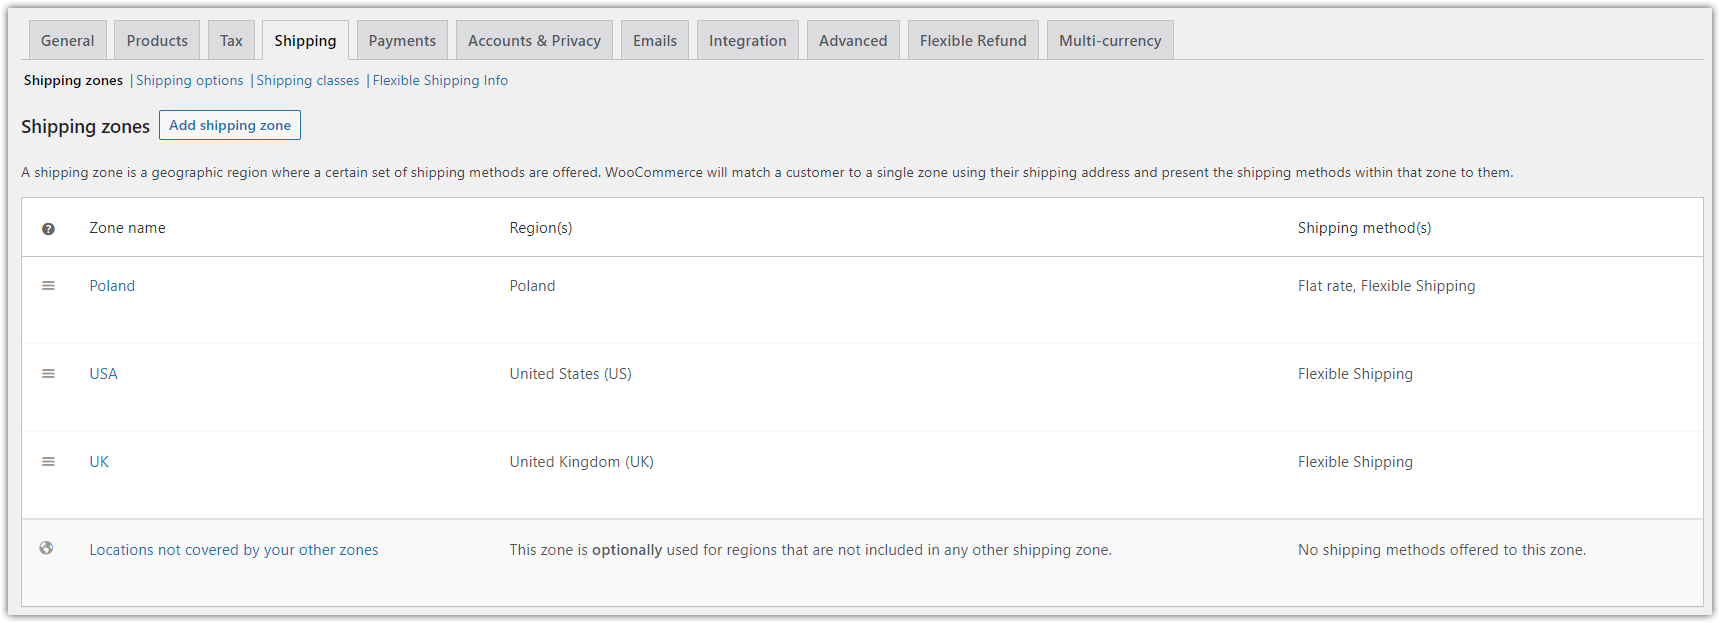
💡 Next, go to the WooCommerce → Settings → Shipping tab.
Shipping zones, classes and info
Shipping settings
Configure shipping methods in WooCommerce
Your configured shipping methods

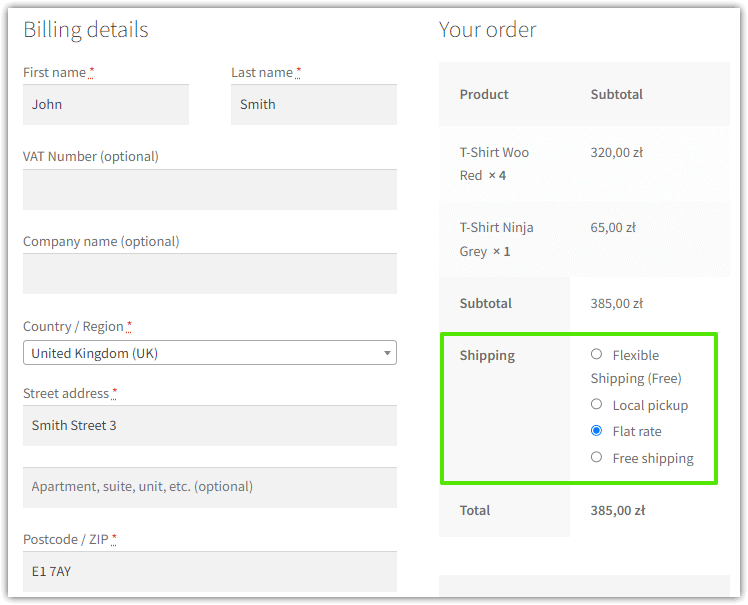
Here, you can configure the shipping zones, shipping methods, and costs that will appear on the checkout page.

Read how to configure shipping methods in WooCommerce. You may also like the plugin to set conditional payments per each WooCommerce shipping zone and shipping method (with payment gateway-based fees too)!

Payments

💡 Now proceed to the WooCommerce → Settings → Payments tab.
Payments in WooCommerce
WooCommerce settings: Payment tab

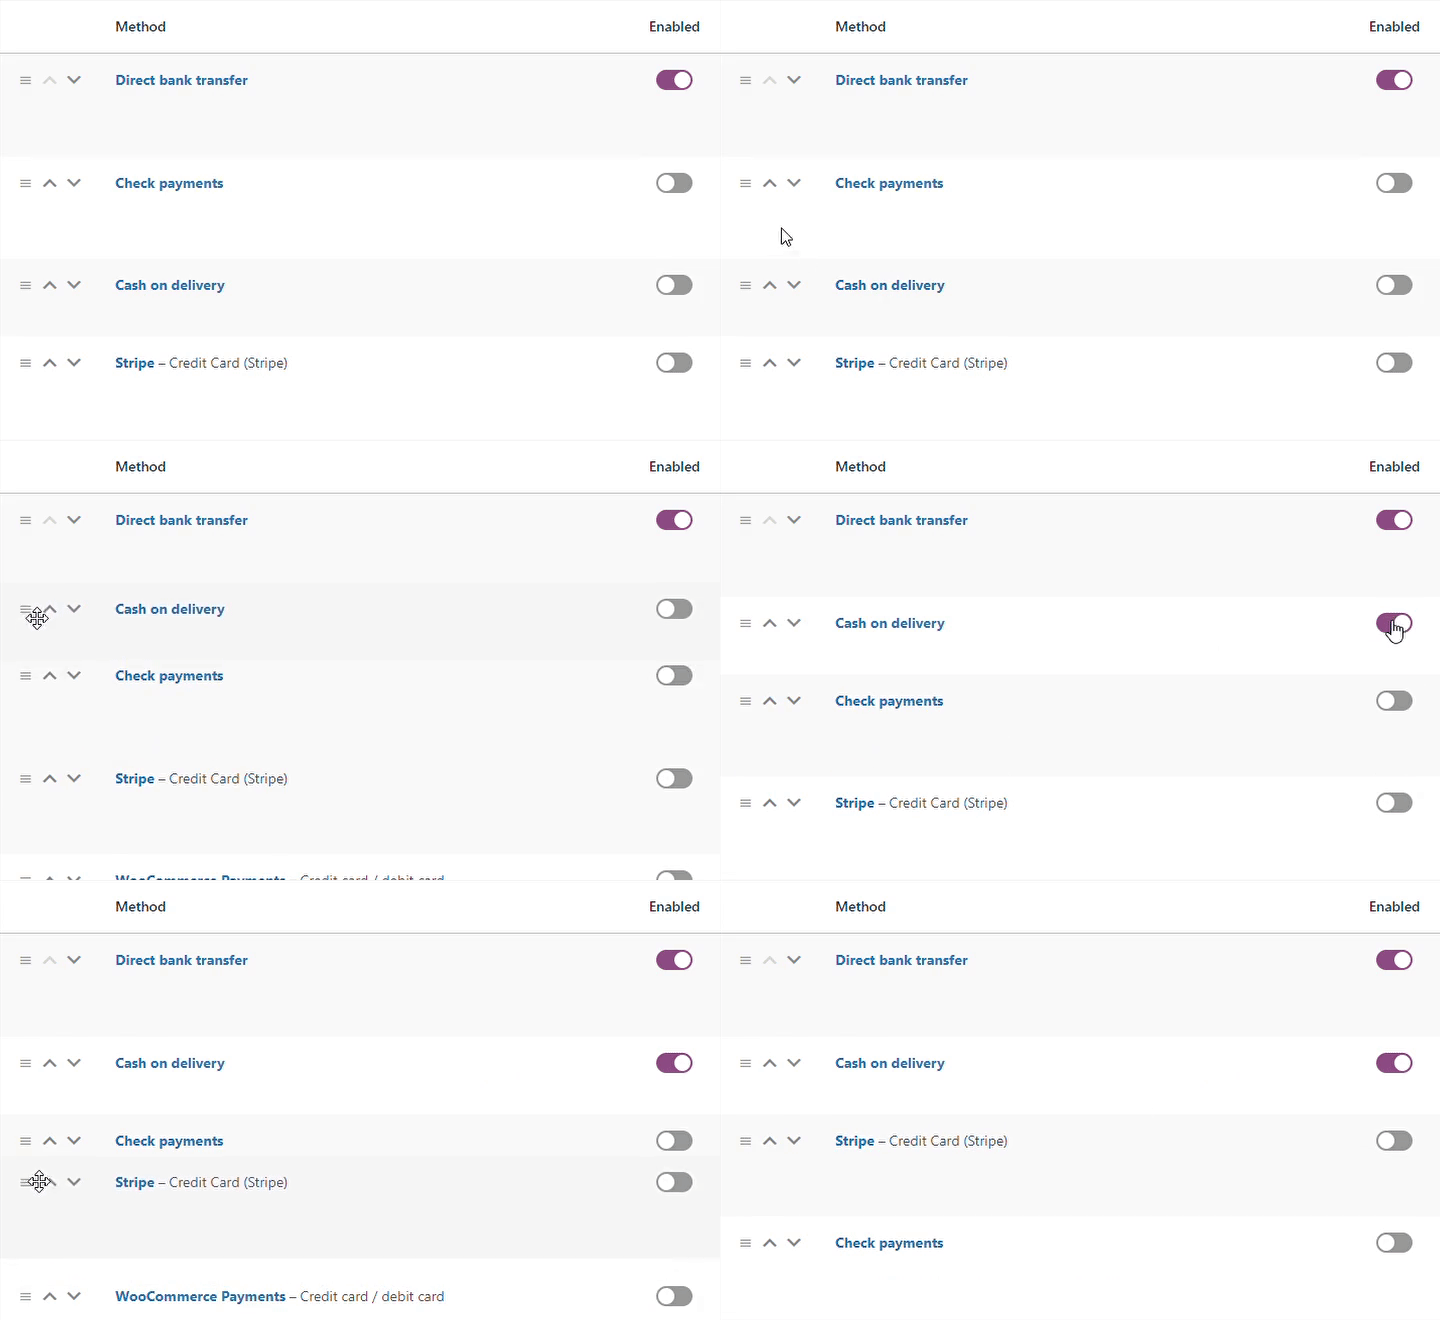
The table shows all the payment gateways that are available at your store. You can drag and drop the gateways to rearrange them. Also, you can press the name of a specific payment gateway to edit it.

When you install WooCommerce, you will find the following 4 available payment gateways, but of course, you can install more:

  • Direct bank transfer (BACS)
  • Check payments
  • Cash on delivery
  • PayPal

Accounts & Privacy

💡 Next, go to WooCommerce → Settings → Accounts & Privacy.
Accounts and Privacy tab
Accounts & Privacy settings in WooCommerce

Guest checkout in WooCommerce settings

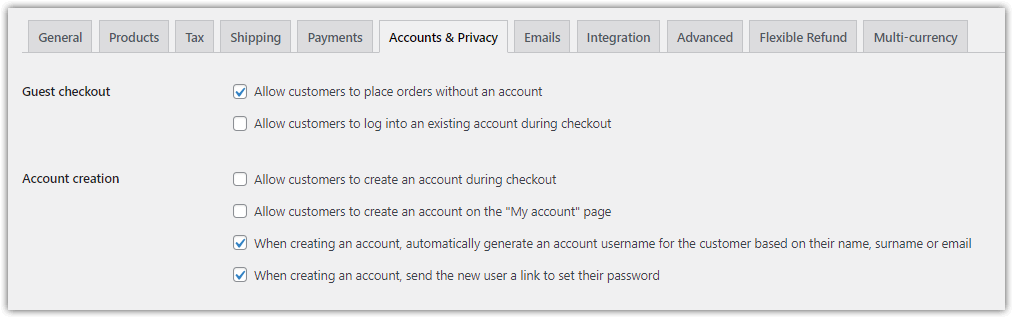
Allow customers to place orders without an account - enable this option if you want to allow for placing orders without creating an account. We suggest that you turn on this feature since many customers decide against buying if they need to set up an account. So, this option will turn on guest checkout in WooCommerce!

💡 Read more about WooCommerce guest checkout with 3 optimizing tips for the checkout!

Allow customers to log into an existing account during checkout - enable existing users to speed up their shopping.

Please remember to set SSL for your WooCommerce so that orders go through a secure connection (https://). It's a must for virtually every online store nowadays.

💡 Read about WooCommerce secure checkout and SSL →

Account creation settings

Allow customers to create an account during checkout - enable this option to let buyers create an account in your store during checkout.

Use additional settings to decide about account creation, the My Account page, and personal data removal.

Privacy policy settings

You can also decide about the privacy policy information for WooCommerce registration and checkout.
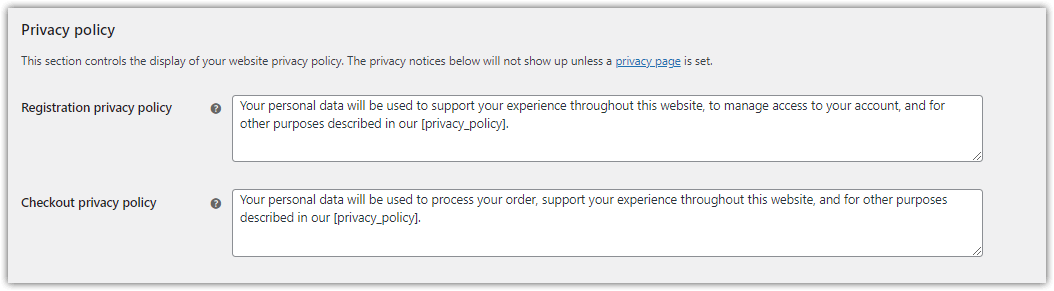
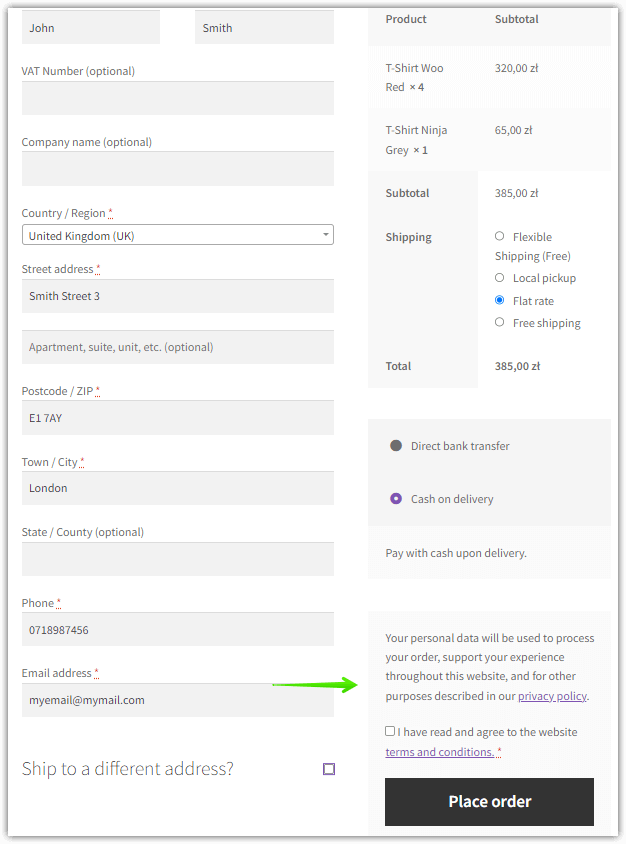
Privacy policy for WooCommerce checkout. WooCommerce settings.
Privacy policy and checkout privacy policy
Privacy policy at the checkout
Once you are done with Privacy settings in WooCommerce, this is how it looks like at the checkout

Advanced

💡 Finally, go to WooCommerce → Settings → Advanced.

Page setup settings

Advanced options, shortcode, endpoints for WooCommerce checkout
WooCommerce checkout settings

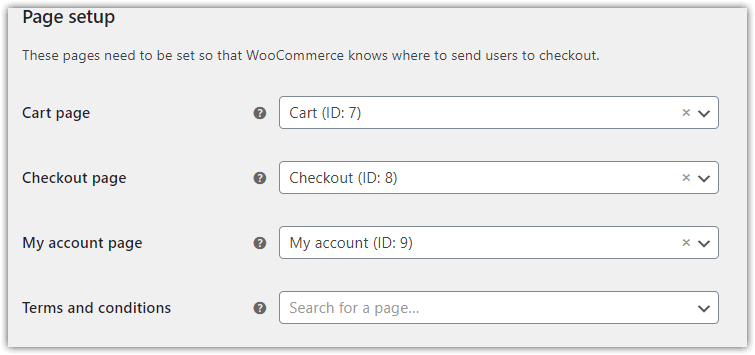
Cart page - select a page that you will use as the cart page. Then include the [ woocommerce_cart ] shortcode on one of your pages.

Checkout page - choose a specific page for the checkout page. Remember to add the [ woocommerce_checkout ] shortcode in the content of one WordPress page to show the WooCommerce checkout form.

My account page - select a page for the My account page and include the [woocommerce_my_account] shortcode on a page.

Terms and conditions - choose a page for the terms and conditions. You will require your customers to accept your terms and conditions before they can place an order.

Read more about WooCommerce shortcodes, how to use them on any page or post, and see new cart and checkout Gutenberg blocks 🙂!

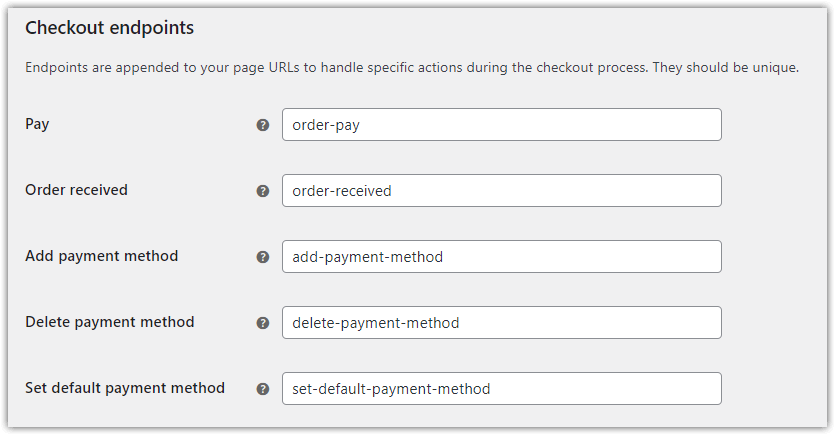
Checkout endpoints settings

Advances options in WooCommerce checkout endpoints
WooCommerce settings: Checkout endpoints

In this section, you need to define unique endpoints that will be added to the URL:
yourstorename.com/order/

Thanks to endpoints, each page will receive a unique URL. Remember not to use diacritics or spaces here. For example, the URL of a page on which you thank your customer for placing an order may look like this:
yourstorename.com/order/order-received/

Account endpoints settings
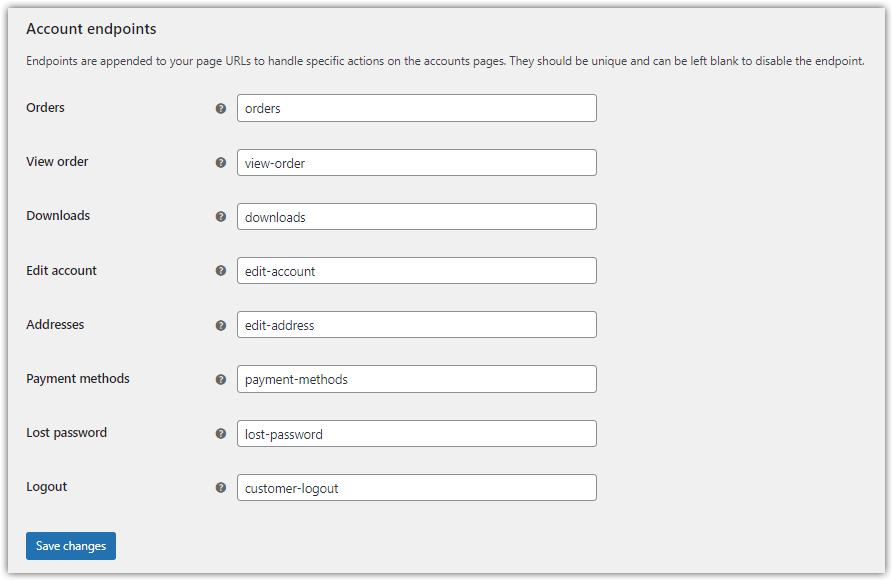
Account endpoints settings
You can find the settings of Account endpoints in the Advanced tab in WooCommerce settings

Similarly, you may change the default endpoints to the specific parts of the WooCommerce My account page.

💡 Read about WooCommerce My account shortcode, settings, and custom fields →

WooCommerce checkout - troubleshooting

There is no woocommerce_checkout shortcode

It may happen if you find out (for example with a notice or a blank page) that the checkout page has no form or block-based one. In that case:

  1. First, edit the page.
  2. Add the woocommerce_checkout shortcode.
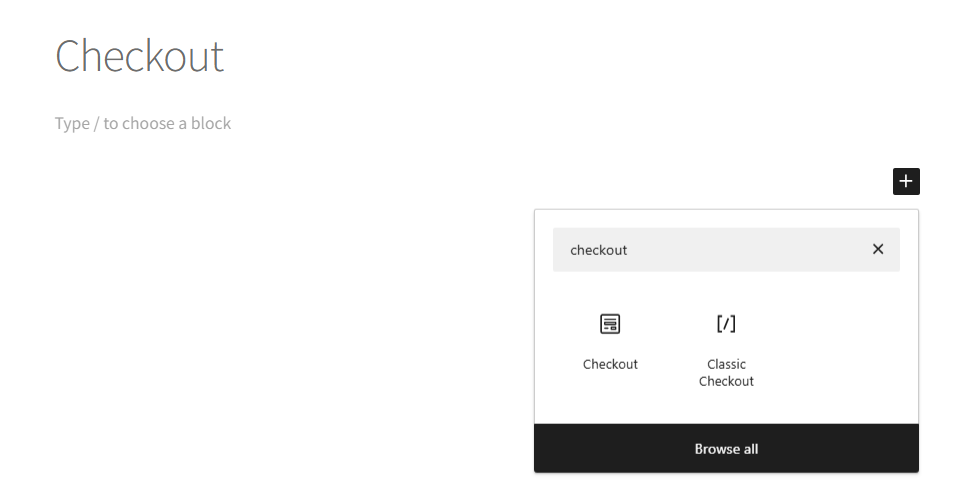
    Choose the WooCommerce checkout block when editing the page
  3. Update the page (you may also need to delete the cache for the page).
  4. Refresh the page and check if the form appears with custom fields from the Flexible Checkout Fields plugin.
  5. If you prefer using block-based checkout, you may use the WP Desk free plugin to add new blocks to WooCommerce checkout.

How to adjust the woocommerce_checkout shortcode?

It's possible to customize the WooCommerce shortcode's output using Flexible Checkout Fields to build the custom checkout page with styling. The shortcode itself generates the classic WooCommerce checkout form on pages or posts. With woocommerce_cart and woocommerce_my_account, it's a starting point for WooCommerce's basic configuration.

💡 You also may adjust the default WooCommerce checkout fields with the woocommerce_checkout_fields filter.

How to use woocommerce_checkout to modify the checkout process?

You may also try using the shortcode along with woocommerce_cart to build one page checkout and lower cart abandonment in WooCommerce.
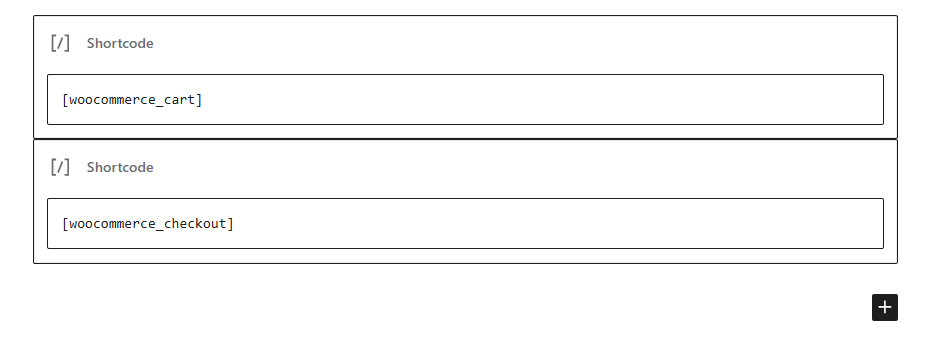
woocommerce_checkout and woocommerce_cart shortcode

How to show privacy information at checkout?

To customize and add general information about the privacy policy go to Appearance → Customize. Then, open the WooCommerce tab settings → Checkout. Finally, choose the pages for privacy policy and terms and conditions, optionally you may add a text with a link to show during the checkout process.

Privacy policy on the checkout page

You may also set the message in WooCommerce → Settings → Accounts & Privacy.
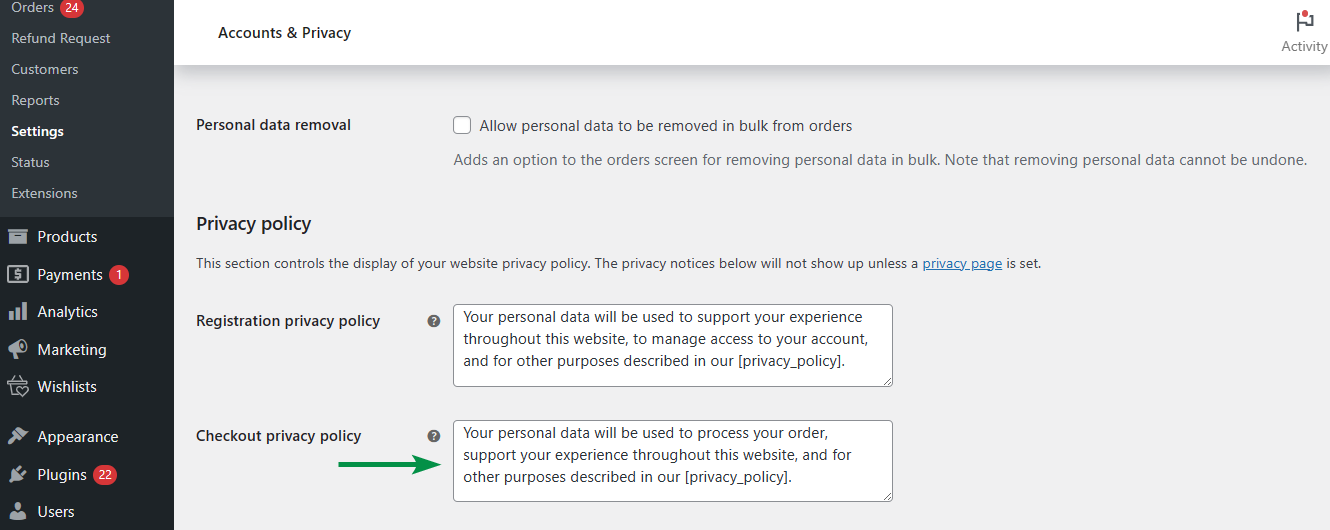
Checkout privacy or refund policy message in WooCommerce

💡 It's possible to add a checkbox using a theme or Flexible Checkout Fields.

woocommerce_checkout - classic vs block-based form

Since WooCommerce version 8.3, you may choose a new block-based layout of the checkout form. The classic woocommerce_shortcode shortcode is still available when editing the content.

Choose the WooCommerce checkout block when editing the page

WP Desk has developed 2 plugins for customizing two versions of WooCommerce checkout forms.

  • For classic checkout - Flexible Checkout Fields for WooCommerce – WooCommerce Checkout Manager
  • For block-based checkout - Checkout Fields for Blocks
💡 You may also check the article about plugin compatibility with WooCommerce checkout blocks. And how to configure WooCommerce checkout based on blocks.

How to manage WooCommerce checkout fields

As you see WooCommerce checkout has a great experience out of the box, but there is one crucial feature missing. It is not possible to manage WooCommerce checkout fields. This is sometimes necessary to do.

🤔 Imagine that you only sell digital goods and you do not want to ask your customers for all address information. Just a name and an e-mail will do.

This means that you have to hide some fields, such as the address field. The bad news is that by default WooCommerce won't let you do that. The good news, on the other hand, is that the Flexible Checkout Fields plugin will come handy here. All you need to do is to decide which fields will be enabled in your checkout form:
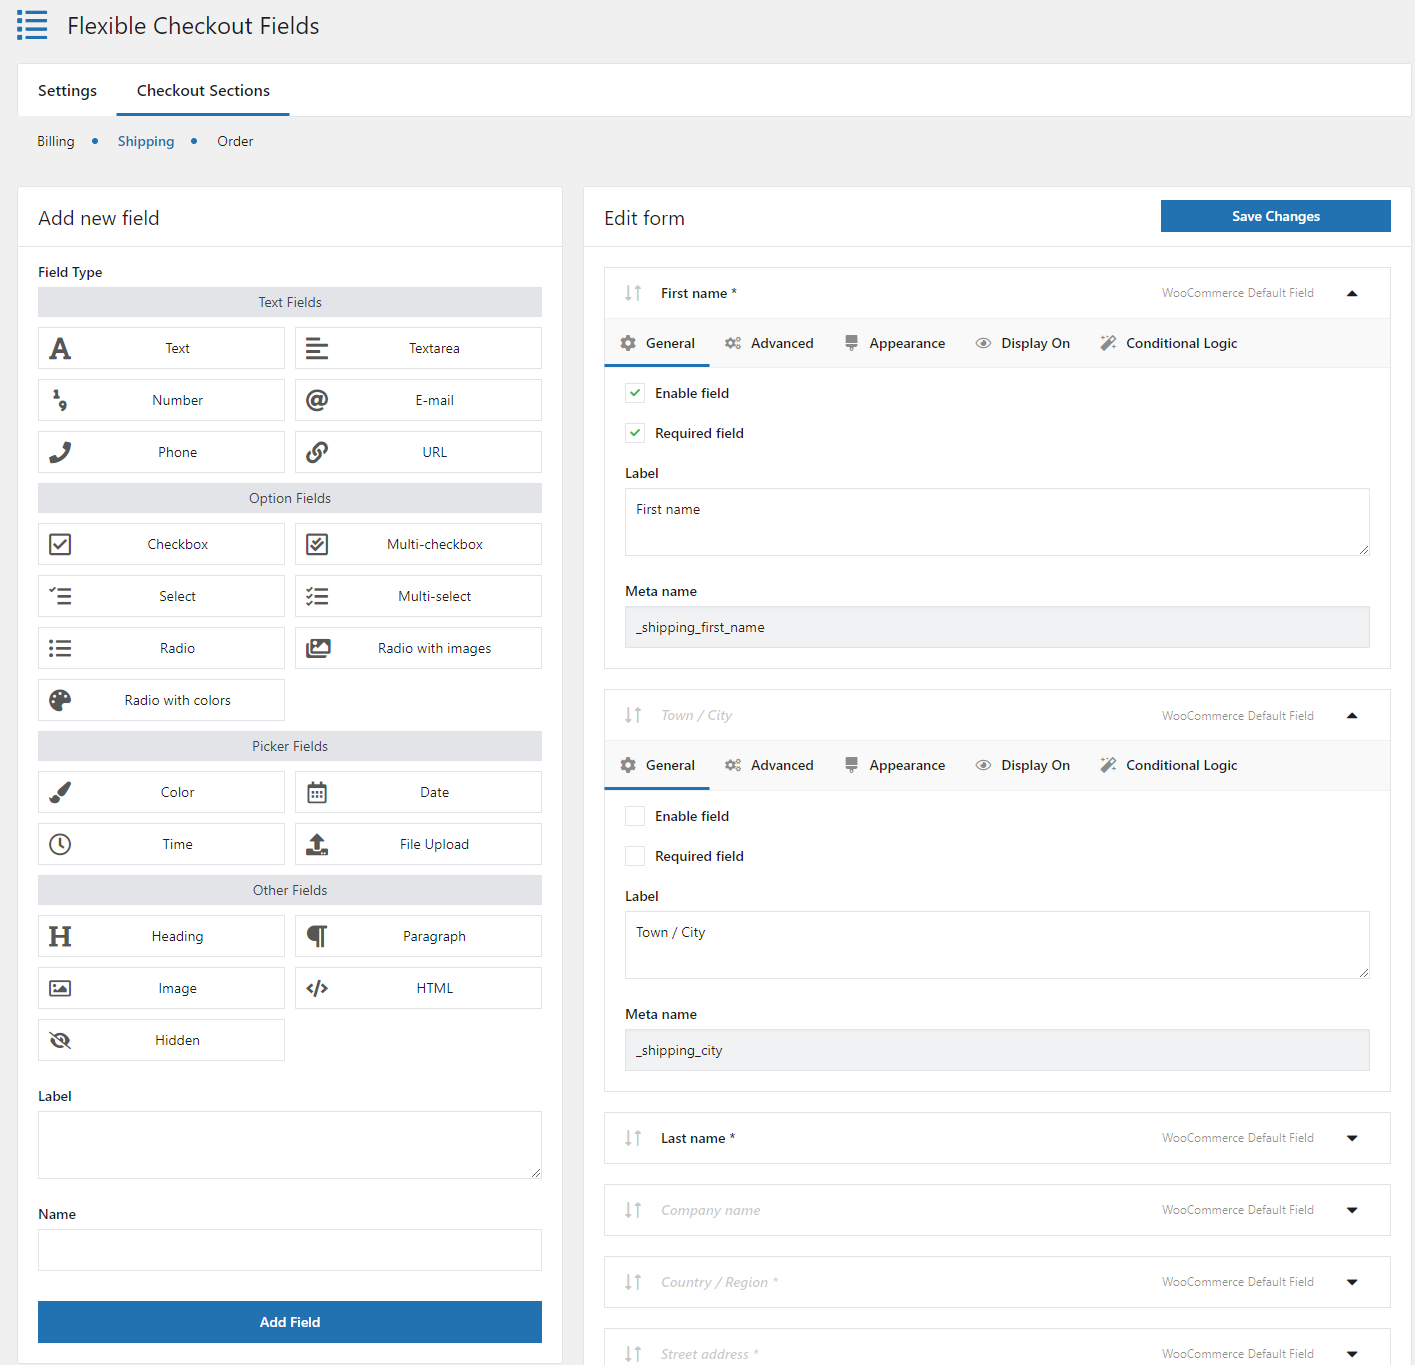
Hide or show checkout fields
Enable fields chosen by you

On the other hand, you may want to add some fields to the WooCommerce checkout. Let's say you want to collect some information about your customers, i.e. VAT number or what they do professionally.

Here at WP Desk, we get some very valuable information about our customers that we use to streamline our plugin experience, how do our customers use the plugins:
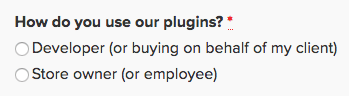
WooCommerce Checkout Survey
WooCommerce Checkout - Quick Question

👉🏻 By asking this question we know who are our customers and what's more important how much each group spends and how much revenue we make.

This simple but powerful feature is unfortunately not available in WooCommerce.

Get a FREE plugin for managing WooCommerce checkout fields

When we first started using WooCommerce we were certain that managing woocommerce_checkout fields would be a crucial feature and we created a plugin for that: Flexible Checkout Fields.

Flexible Checkout Fields WooCommerce

Edit, add new or hide unnecessary fields from the WooCommerce checkout form. Add pricing to fields and use conditional logic. It's all about conversions and better user experience. NEW: now you can set multiple conditions (OR) under one or more condition groups (AND).

💾 Active Installations: 80,000+ | WordPress Rating:

Download for free or Go to WordPress.org
WP Desk
80,000+ Active Installations
Last Updated: 2026-08-19
Works with WooCommerce 10.7 - 11.1

Watch this video to check what the free version can do:

The checkout manager is available both in the free and in the PRO version.
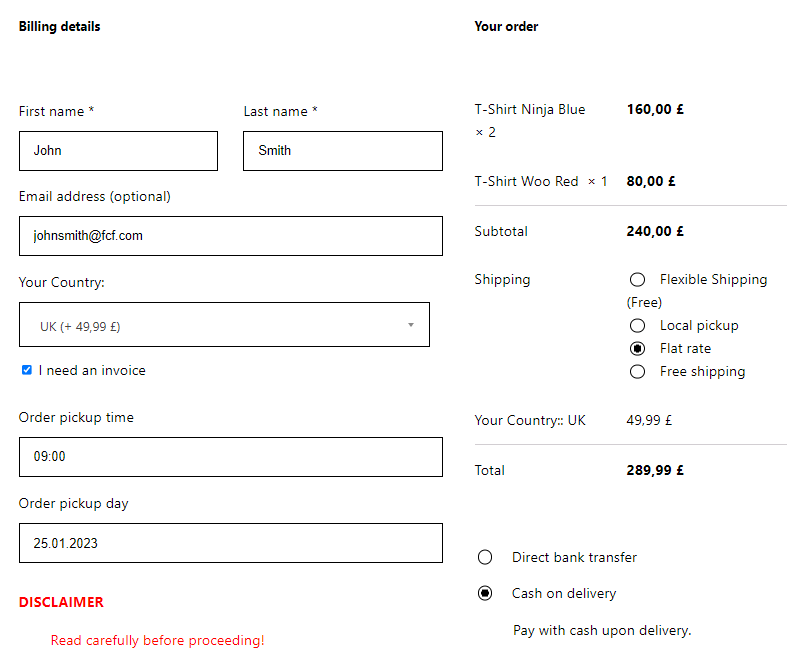
✅The extension lets you manage your checkout fields by hiding unnecessary woocommerce_checkout fields, adding new ones, and making them required or optional. In Flexible Checkout Fields PRO, you can also add more field types, manage custom sections, or use conditional logic. Make sure to check out the plugin by clicking the button below.
Pictures say more than a million words. See screenshots showing how the plugin works:


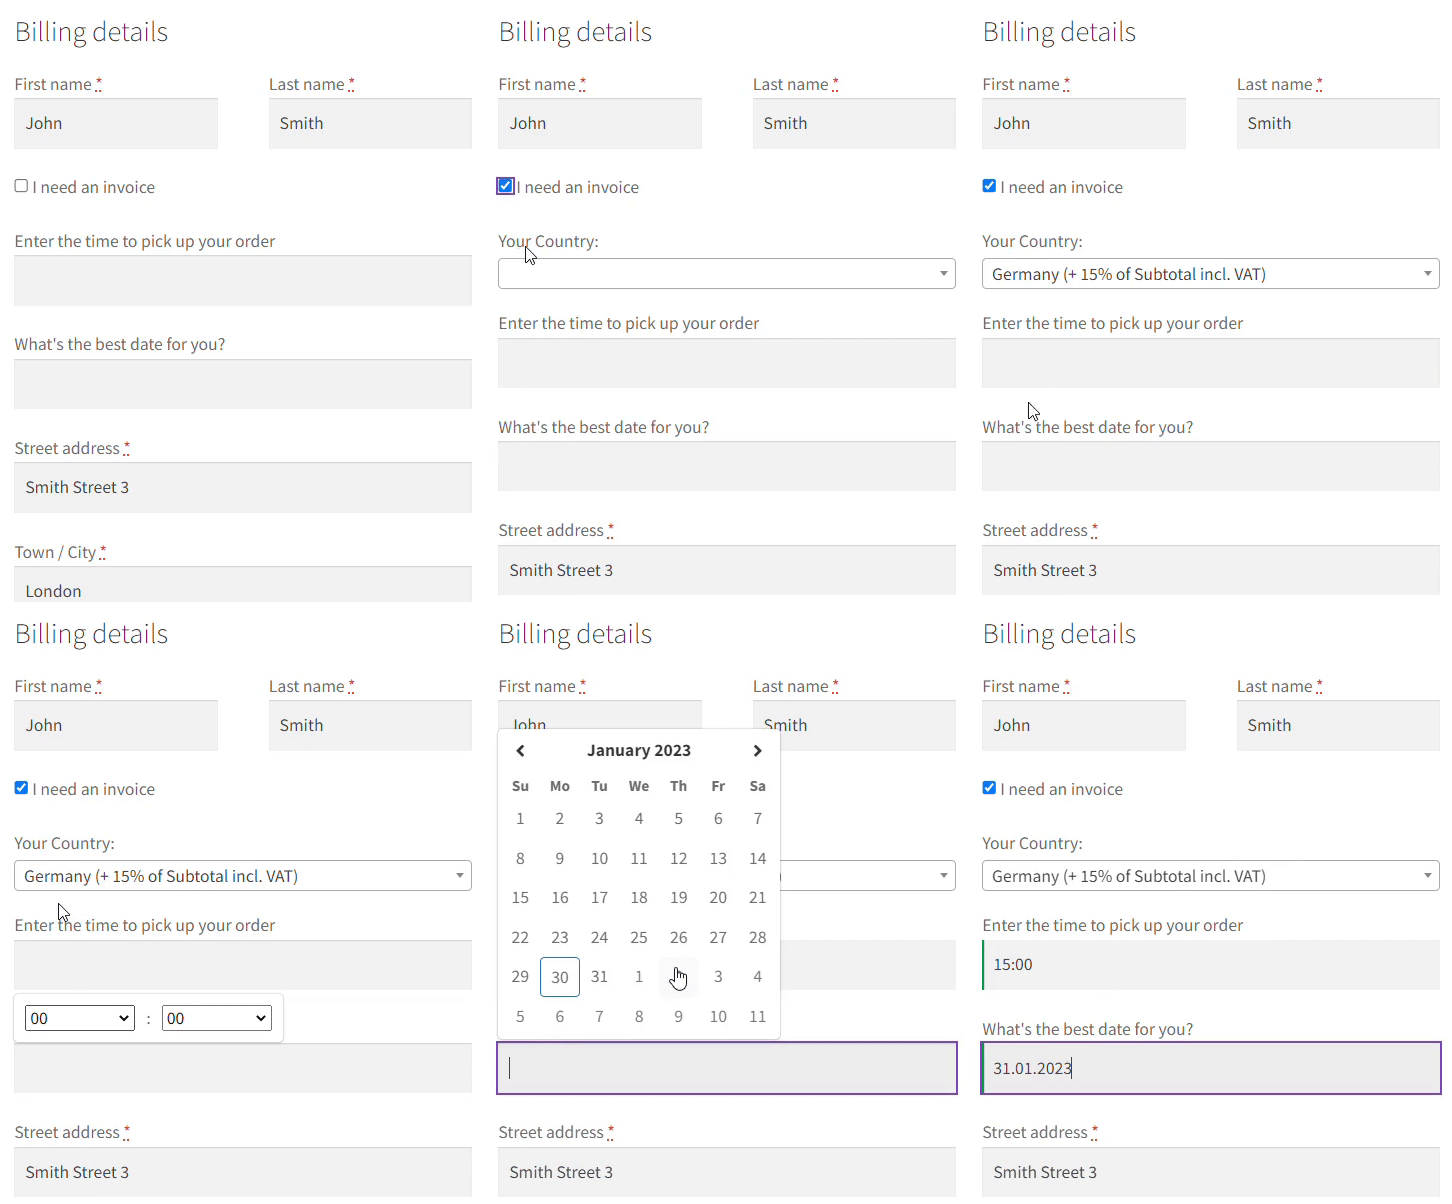
Flexible Checkout Fields - checkout
Custom fields added to WooCommerce checkout
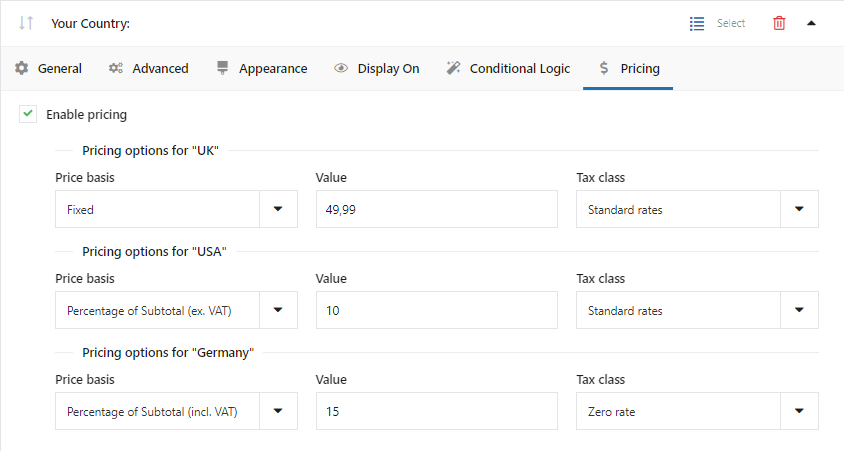
adding pricing to checkout fields
Setting prices for each checkout field [PRO]
New WooCommerce checkout fields
Examples of fields added with Flexible Checkout Fields
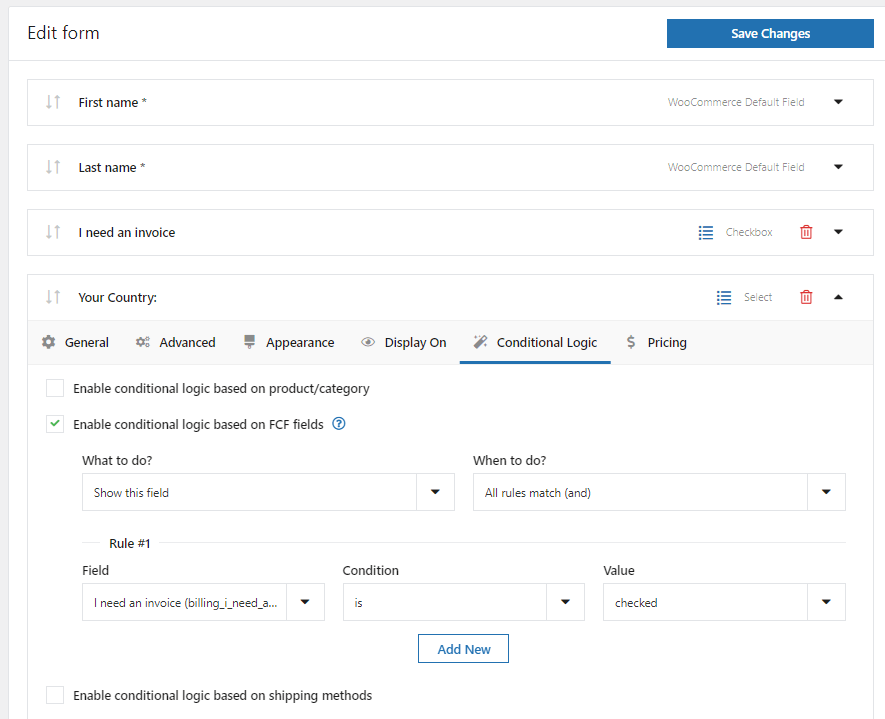
Add Conditional Logic to Checkout Fields
Conditional logic for WooCommerce checkout fields [PRO]


Customize WooCommerce checkout page design (free plugin)

Start with the free version of the plugin!

You may see all options and available settings for your customized WooCommerce checkout form in the plugin documentation ➡️

WooCommerce checkout - summary

Today, you've learned how to set up the WooCommerce checkout page and customize the checkout design and its fields with a plugin! The [woocommerce_checkout] shortcode enables the WooCommerce checkout on a page, and there are a lot of additional settings influencing checkout. Finally, with the Flexible Checkout Fields plugin it's possible to customize the WooCommerce checkout fields.

If you have any questions contact us!

Related Articles

Custom checkout page WooCommerce

Customize the WooCommerce Checkout Page: Tips & Tools for Success

The WooCommerce Checkout Page is simple by default for there is no built-in option to customize the form in the WooCommerce plugin. So, how to edit, c...
WooCommerce add custom field to the checkout page with a plugin and the woocommerce_checkout_fields filter

Customize the WooCommerce Checkout Page: Top Tips for a Seamless Experience

I don’t have to convince you that the checkout page is one of the most important parts of every WooCommerce store. The possibility to fully adjust it ...
WooCommerce checkout settings

WooCommerce Checkout Page: settings, missing options & errors

Today, I will guide you through all WooCommerce options, missing settings, and FAQ about the checkout page and common error messages. You need to set ...
WooCommerce checkout field editor showing how to add, edit, and remove billing fields

WooCommerce Checkout Field Editor: How to Add, Edit & Remove Billing Fields

Billing fields fill the default section of the WooCommerce checkout page. Learn how to add, edit, and remove billing address fields in the WooCommerce...
How to customize the WooCommerce My Account page with the woocommerce_my_account shortcode, custom fields & free plugin

My Account in WooCommerce - Settings, Shortcode & Custom Fields

In this quick guide, I'll show you how to set the My Account page in WooCommerce using built-in settings and a shortcode. You will also see how to add...

6 minutes read41406 views

Reader Interactions

Comments

  1. Endri Dh says

    2020-04-02 at 14:51

    Hi there, I am using WordPress and WooCommerce to crate an online marketplace. I am very new at this technology. I have a question to ask: When I change the quantity of a product, after I have added that product on my cart, the subtotal doesn’t change accordingly to the new quantity. Subtotal changes only after I click UPDATE CART button. Any idea how to make it update automatically as the quantity change? Many thanks Endri

    Reply

Leave a Reply Cancel reply

Your email address will not be published. Required fields are marked *

Maciej Swoboda

...

Powered by WP Desk

WP Desk brings you great WooCommerce plugins. We strive to save your time and money by speeding up your processes. Use our plugins to build a better store. Awesome support included in the package.

Premium WooCommerce Plugins →
WP Desk › Blog › WooCommerce tutorials › WooCommerce Checkout - Settings, Shortcode & Configuration Guide

Primary Sidebar

Contents

    • Flexible Checkout Fields WooCommerce
  • WooCommerce Checkout Settings
    • General
    • Coupons Settings
    • Tax
    • Prices settings
    • Shipping
    • Payments
    • Accounts & Privacy
    • Guest checkout in WooCommerce settings
    • Account creation settings
    • Privacy policy settings
    • Advanced
    • Page setup settings
    • Checkout endpoints settings
    • Account endpoints settings
  • WooCommerce checkout – troubleshooting
    • There is no woocommerce_checkout shortcode
    • How to adjust the woocommerce_checkout shortcode?
    • How to use woocommerce_checkout to modify the checkout process?
    • How to show privacy information at checkout?
    • woocommerce_checkout – classic vs block-based form
  • How to manage WooCommerce checkout fields
  • Get a FREE plugin for managing WooCommerce checkout fields
    • Flexible Checkout Fields WooCommerce
    • Customize WooCommerce checkout page design (free plugin)
  • WooCommerce checkout – summary

Flexible Checkout Fields PRO WooCommerce $59

Edit, add new or hide unnecessary fields from the WooCommerce checkout form. Add pricing to fields and use conditional logic. It's all about conversions and better user experience. NEW: now you can set multiple conditions (OR) under one or more condition groups (AND).

💾 Active Installations: 80,000+ | WordPress Rating:

Add to cart or View Details
WP Desk
80,000+ Active Installations
Last Updated: 2026-08-20
Works with WooCommerce 10.7 - 11.1

Stay updated on our how-to articles

WP Desk news, WooCommerce tips, promo codes - right to your inbox.

By entering your e-mail, you agree to our Terms & Conditions and Privacy Policy.

By entering your e-mail, you agree to our Terms & Conditions and Privacy Policy.

Footer

WP Desk - WooCommerce Plugins

At WP Desk we create great WooCommerce plugins with awesome support. Save time and money with our e-commerce solutions. See how we can help you improve your e-store →

Secured by Comodo

WP Desk

  • About us
  • Giving Back
  • Blog
  • Get Support
  • Contact us

Products

  • Premium Plugins
  • WP Desk Care
  • Documentation
  • WooCommerce Invoices
  • Email Marketing
  • PDF Coupons

Legal

  • Terms & Conditions
  • Refund Policy
  • Support Policy
  • Privacy Policy

© 2026 WP Desk

We value your privacy

We use necessary cookies to make our site work. We'd also like to set additional cookies to understand site usage, enhance your browsing experience, and serve personalized ads or content. By clicking ‘Accept All,’ you consent to our use of additional cookies.

Functional Always active
The technical storage or access is strictly necessary for the legitimate purpose of enabling the use of a specific service explicitly requested by the subscriber or user, or for the sole purpose of carrying out the transmission of a communication over an electronic communications network.
Preferences
The technical storage or access is necessary for the legitimate purpose of storing preferences that are not requested by the subscriber or user.
Statistics
The technical storage or access that is used exclusively for anonymous statistical purposes. Without a subpoena, voluntary compliance on the part of your Internet Service Provider, or additional records from a third party, information stored or retrieved for this purpose alone cannot usually be used to identify you. The technical storage or access that is used exclusively for anonymous statistical purposes. Without a subpoena, voluntary compliance on the part of your Internet Service Provider, or additional records from a third party, information stored or retrieved for this purpose alone cannot usually be used to identify you.
Marketing
The technical storage or access is required to create user profiles to send advertising, or to track the user on a website or across several websites for similar marketing purposes.
  • Manage options
  • Manage services
  • Manage {vendor_count} vendors
  • Read more about these purposes
View preferences
  • {title}
  • {title}
  • {title}