Contents
How does it work?
The primary features of the plugin are to allow the user to:
- create wishlists
- add products to these wishlists
- and manage them in the My account tab
Adding a product to the list
The plugin requires no configuration and works from the moment it is activated. New elements for adding a product to the list will appear in the store:
- ♡ icon below the Add to cart button
- ♡ icon and Add to wishlist text on product pages
Both elements are editable in the plugin settings.
Read more: Position of the icon on the shop page
Read more: Position of the icon on the product page
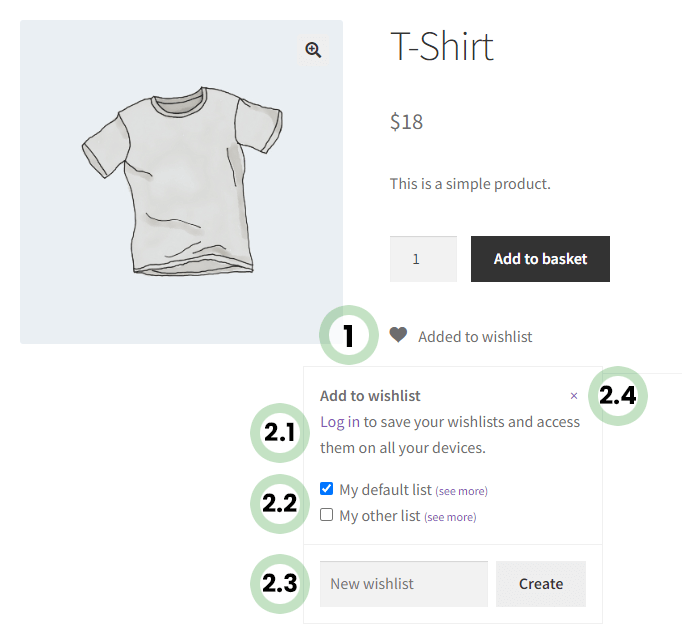
- The user clicks the icon in the product photo or above/below/next to the Add to Cart button. The product is added to the primary list (if set).
Read more: Set as primary - A pop-up with additional elements appears.
- If the user is not logged in - then a message appears encouraging to create an account and log in.
- Below there are checkboxes with the names of the available lists. The primary list is selected. If the user selects a different checkbox - then the product will also be added to that list. There is a link to it next to each list.
- There is a text box at the bottom to enter the name of the new list. If the user needs a new list - then he enters its name and clicks the Create button. The number of lists is unlimited.
- The user closes the pop-up window - clicks the x icon or another area outside the po-up window.
Editing the list
User wishlists are available in several places in the store:
- after clicking on the link in the pop-up window (then a specific list is shown)
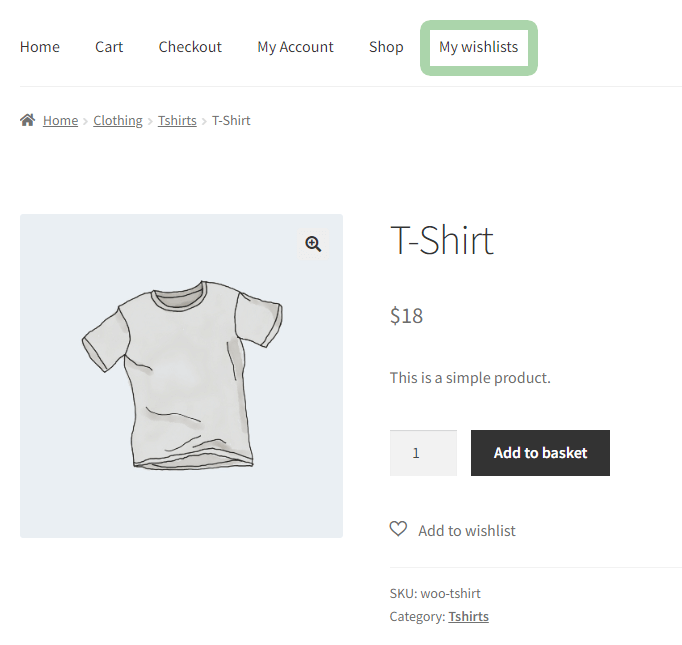
- after clicking the My wishlists link in the My account tab (option available after logging in)
- after clicking the My wishlists link in the menu
Read more: Menu settings
My wishlists table
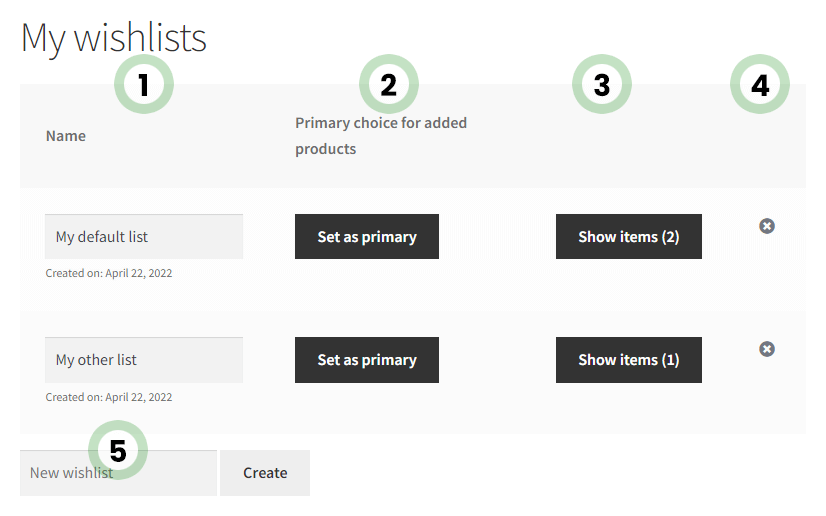
Lists are shown as rows in a 4-column table.
- The first column contains the names of the lists and their creation dates.
- The Set as primary button is used to set the primary list. If the list is set as primary then products will be added to it without the need to select its checkbox in the pop-up window. Only one list can be primary.
- The Show items button is used to show a specific list.
- The icon in the last column is used to delete lists.
- There is a text box at the bottom to enter the name of the new list. If the user needs a new list - then he enters its name and clicks the Create button. The number of lists is unlimited.
Product overview
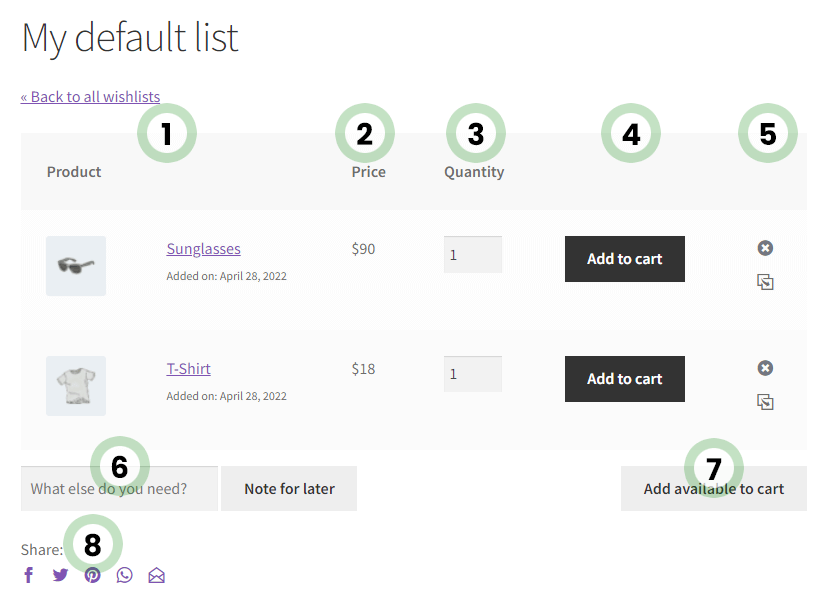
The products are shown as rows in a table with 5 columns at the start.
- The first column contains a thumbnail with the name of the product and the date it was added.
- The second column shows the price of the product.
- The field in the Quantity column allows the user to add several items to the cart. It is possible to disable this column in the settings.
Enable the Quantity column - Clicking the Add to cart button will add the product to the cart in the number set in the Quantity column. The product will not be removed from the list.
- The icons in the last column are used to remove a product from the list or to copy it to another list.
- There is a text box at the bottom to enter a name for the new idea (note). If the user needs a new note - then he enters its name and clicks the Note for later button. It is not possible to add a note to the cart as it is not a product. The number of notes is unlimited.
- Clicking the Add available to cart button will add all available (for purchase) products to the cart. Products will not be removed from the list.
This option will only work if the option:
Enable AJAX add to cart buttons on archive pages
is enabled in:
WooCommerce > Settings > Products - The icons at the bottom are for sharing the lists on social media. It is possible to enable or disable a specific icon in the settings.
Active social media icons
Settings
The plugin settings are available in the left WordPress menu in the Flexible Wishlist tab and are divided into sections.
The plugin does not create a separate subpage in the Pages tab. But it makes it possible to add a new item to the WordPress menu.
Decide where to display the My wishlists item
Select the WordPress menu where the My wishlists item will be visible.
The menu settings are also available in the Appearance > Menus tab.
- Click the Appearance > Menus tab.
- Select the menu to edit and click Select.
- Go to the left and click on WooCommerce Endpoints and check the item representing the wishlist page. The default name is My wishlists but it will be different if changed in the plugin settings in the Text settings section.
- Click the Add to menu button. The item will be added to the menu on the right. Set its position in the menu (drag and drop).
- Click the Save Menu button.
Basic settings
This section handles the basic settings related to adding a product to the list.
Position of the icon on the shop page
Choose a place on the shop page where the icon for adding a product to the list will appear.
- Product image overlay
The icon will be shown in the top left corner of the product image. - Above the Add to cart button
The icon will be shown just above the Add to cart button. - Below the Add to cart button
The icon will be shown just below the Add to cart button (default setting) - On the left side of the Add to cart button
The icon will be shown to the left of the Add to cart button. - On the right side of the Add to cart button
The icon will be shown to the right of the Add to cart button.
Position of the icon on the product page
Choose a place on the product page where the icon for adding a product to the list will appear.
- Above the Add to cart button
The icon will be shown just above the Add to cart button. - Below the Add to cart button
The icon will be shown just below the Add to cart button (default setting).
Icon type
Select the icon for adding a product to the list.

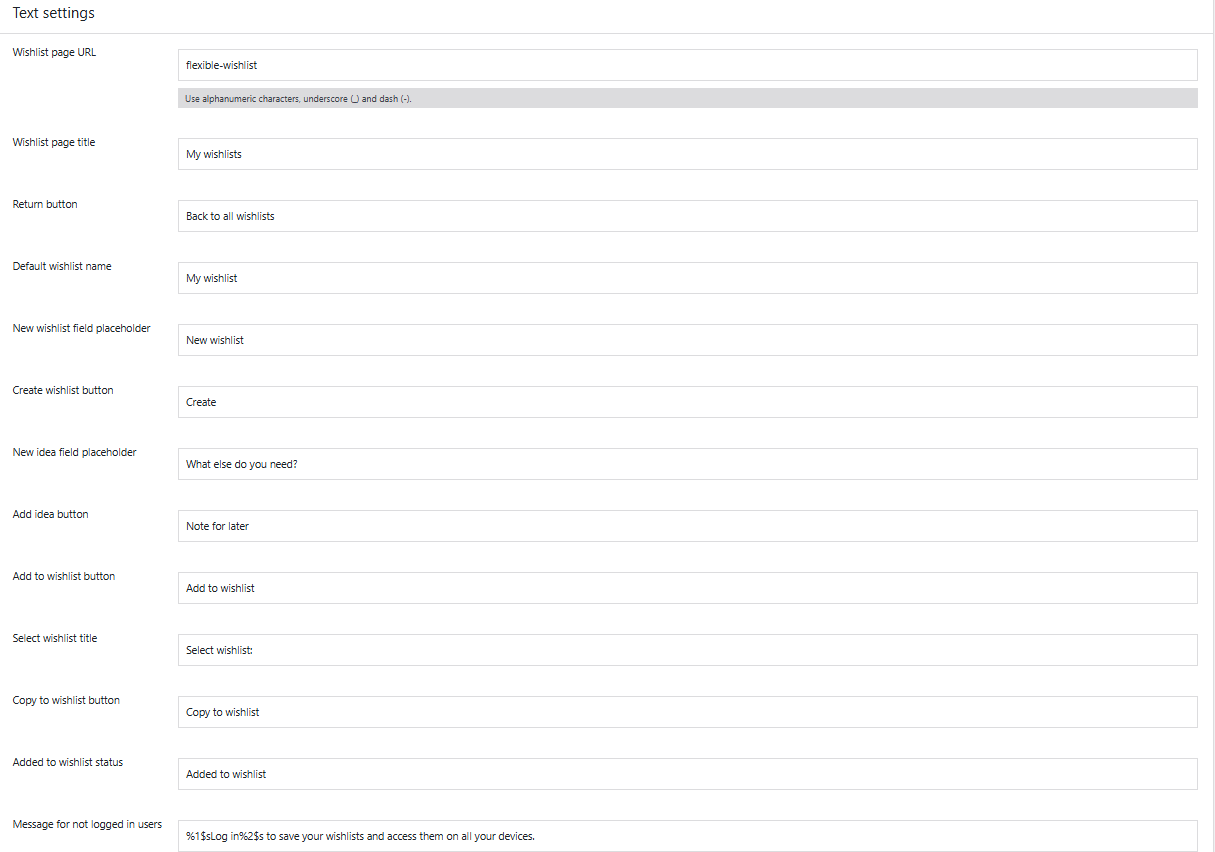
Text settings
This section handles the settings of the texts visible to the store user. Here it is possible to adapt these texts to better fit the assortment of the shop. The texts can be translated into other languages using a plugin that supports string translations e.g. Loco Translate or Polylang.
- Wishlist page URL
Enter the address (slug) of the page with user lists. Use alphanumeric characters, underscore (_) and dash (-). - Wishlist page title
Enter the title of the page with user lists e.g. My wardrobes. - Return button
Enter the title of the link button to the page with user lists e.g. Go back to my wardrobes. - Default wishlist name
Enter a title for the button to set the default list e.g. My wardrobe. - New wishlist field placeholder
Enter the field placeholder to create a new list e.g. New wardrobe. - Create wishlist button
Enter a title for the button to create a new wishlist. - New idea field placeholder
Enter the field placeholder for adding new notes to the list. - Add idea button
Enter a title for the button to create a new idea. - Add to wishlist button
Enter a text encouraging the user to add a product to the list e.g. Add to wardrobe. - Copy to wishlist button
Enter the title of the button to copy the product to the list. - Added to wishlist status
Enter the text confirming that the product has been added to the list e.g. Added to the wardrobe. - Message for not logged in users
Enter the text of the message that appears when the user is not logged in. Text entered between %s will be clickable (link to login page).
Wishlist page settings
This section handles the settings related to the page with user lists.
Enable the Quantity column
Decide whether the Quantity column (showing the number of items of the product) will be visible in the table.
Active social media icons
Decide what social media icons will be shown under the table. Icons are used to share lists on social media.
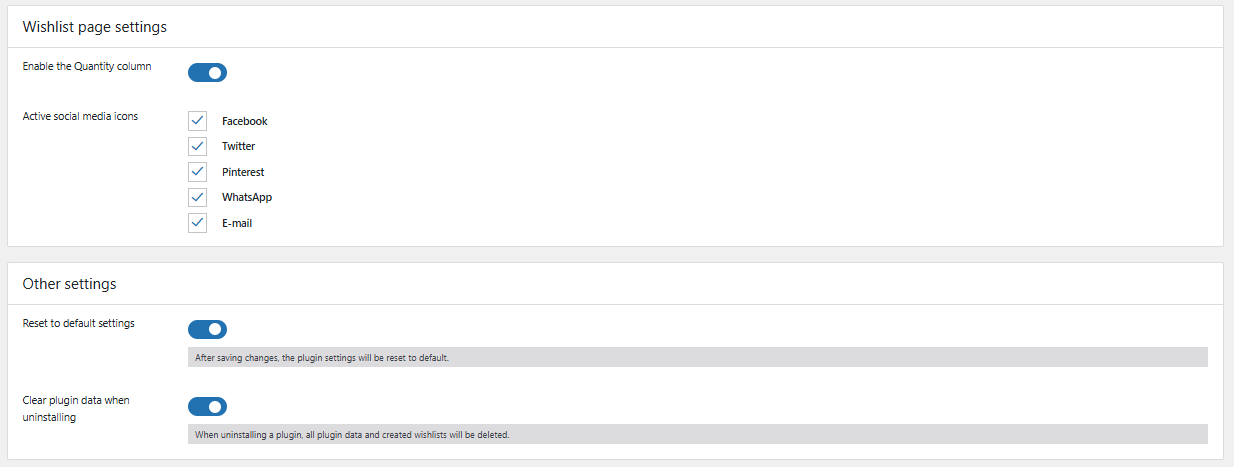
Other settings
This section handles all other settings.
Reset to default settings
Select this option and save changes to reset all plug-in settings to default values.
Clear plugin data when uninstalling
Select this option and save changes to delete all plugin data and wishlists when the plugin is removed.
Most popular
The main function of this PRO feature is to collect information about products (and their categories and tags) that store customers add to their lists. This data is located in Flexible Wishlist > Most popular and is divided into further tabs in the menu.
Popular products
The table in this tab contains information about the products.
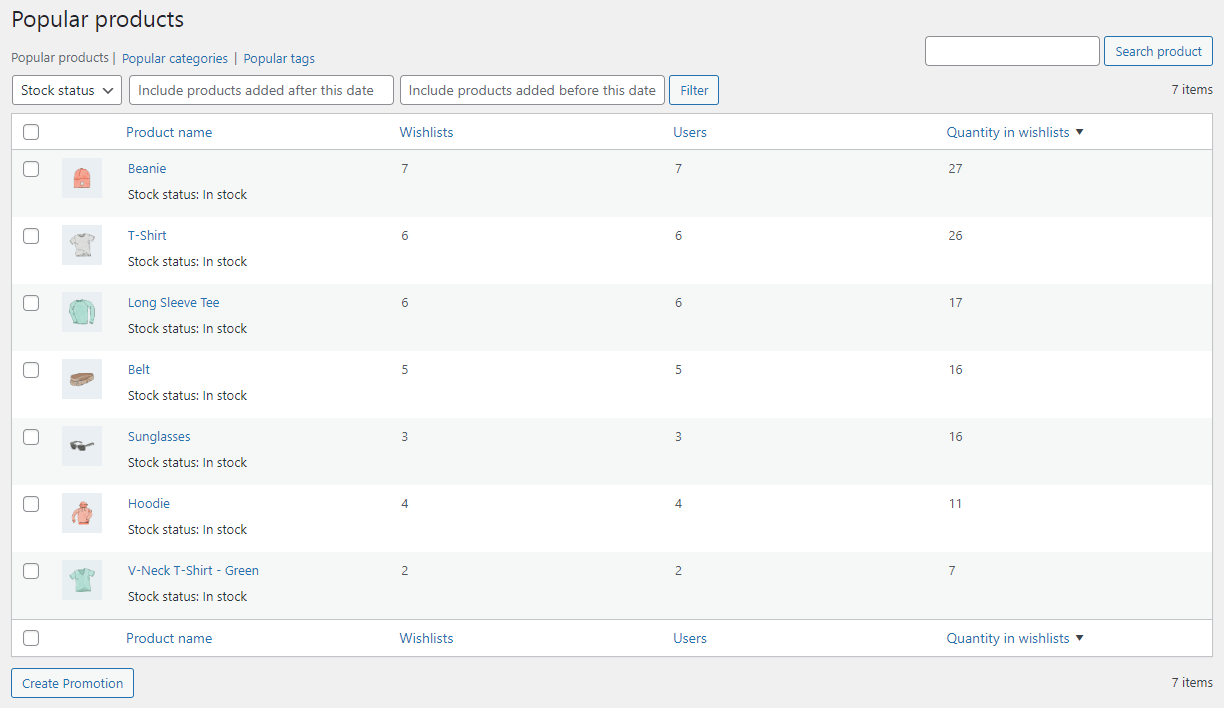
- The first element is the table switching menu.
- Below is a row with filters such as Stock status and Date the product was added to the list. The Filter button triggers the filter.
- The first column in the table is used to select products to create a promotion. Check one or more checkboxes and then click the Create Promotion button under the table.
- The Product name column contains a thumbnail of the product as well as its name and stock status.
- The Wishlists column shows the number of lists the product is on.
- The Users column shows the number of users who added the product to their list.
- The Quantity in wishlists column counts the number of times a product has been added to the lists (sometimes one list contains several items of a given product).
Popular categories
The table in this tab contains information about the categories.
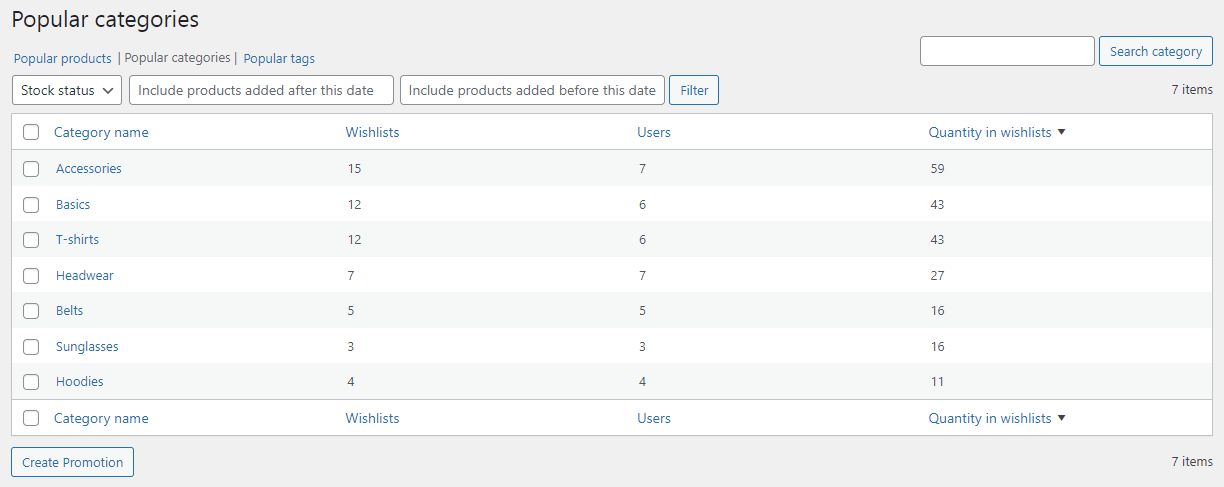
- The first element is the table switching menu.
- Below is a row with filters such as Stock status and Date the product was added to the list. The Filter button triggers the filter.
- The first column in the table is used to select categories to create a promotion. Check one or more checkboxes and then click the Create Promotion button under the table.
- The Category name column contains the name of the category.
- The Wishlist column shows the number of lists with the product assigned to the category.
- The Users column shows the number of users who added a product with a tag to their list.
- The Quantity in wishlists column counts the number of times a product from a category has been added to the lists (sometimes one list contains several items of a given product).
The table in this tab contains information about the tags.
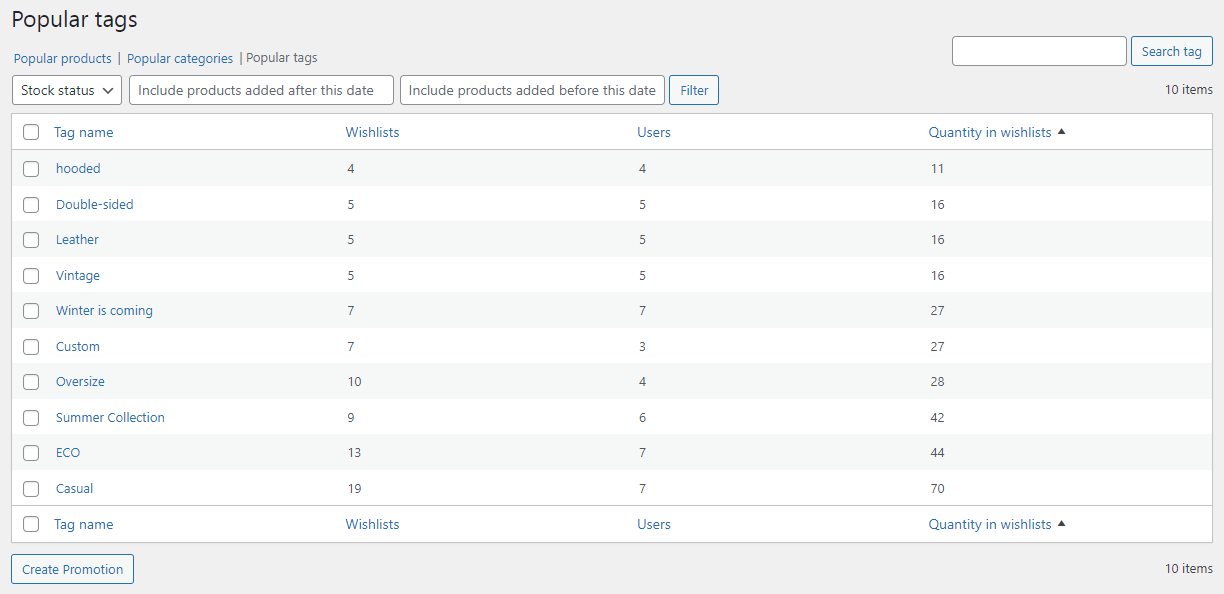
- The first element is the table switching menu.
- Below is a row with filters such as Stock status and Date the product was added to the list. The Filter button triggers the filter.
- The first column in the table is used to select tags to create a promotion. Check one or more checkboxes and then click the Create Promotion button under the table.
- The Tag name column contains the name of the tag.
- The Wishlists column shows the number of lists the product with a tag is on.
- The Users column shows the number of users who added a product from the category to their list.
- The Quantity in wishlists column counts the number of times a product with a tag has been added to the lists (sometimes one list contains several items of a given product).
All wishlists
Another function of the PRO version is to manage all wishlists that customers have created in the store. These lists are located under Flexible Wishlist > All wishlists and are presented in the form of a table.
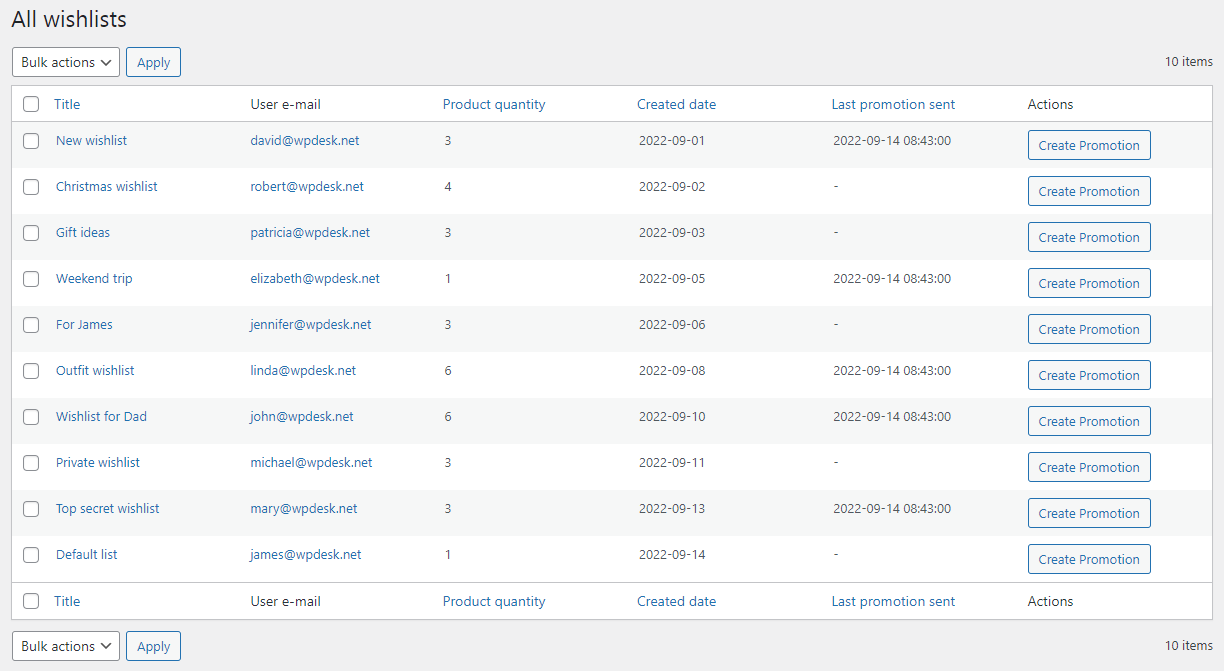
- The first element is the row for deleting wishlists. Check one or more checkboxes and then select the Delete option and click the Apply button.
- The first column in the table is used to select wishlists (or several of them) for deletion.
- The Title column contains the name of the wishlist.
- The User e-mail column shows the e-mail address of the user that was assigned when creating the wishlist.
- The Product quantity column counts all products added to the wishlist.
- The Created date column shows the date the wishlist was created.
- The Last promotion sent column shows the date when the last promotion was sent.
- The Actions column contains the Create Promotion button to create a promotion.
Promotions
Information about promotions is available in Flexible Wishlist > Promotions and is presented in the form of a table.
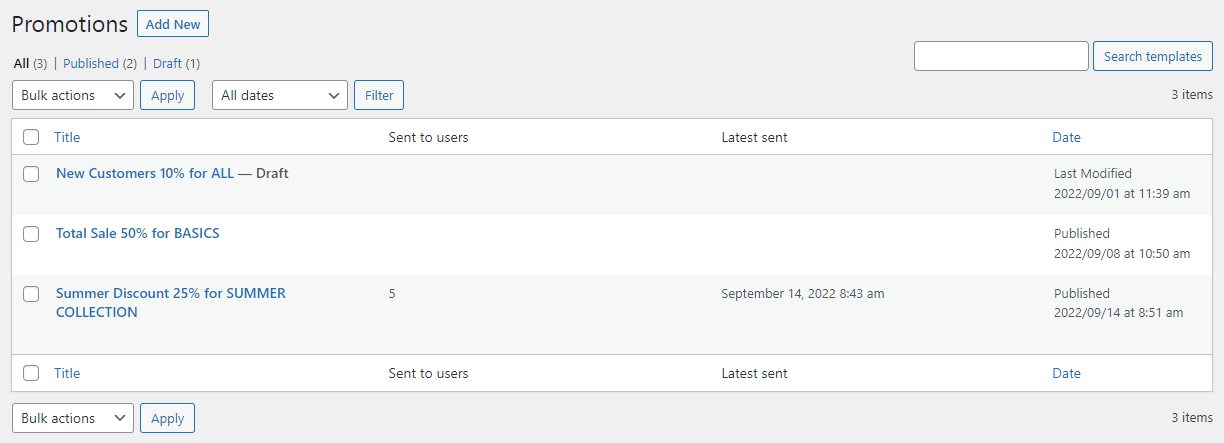
- The first element is the row for deleting and editing a promotion. It also allows the admin to filter them.
- Check one or more checkboxes and then select Edit or Move to Trash and click Apply.
- Select a month from the drop-down list and click Filter.
- The first column in the table is used to select promotions in order to Edit them or Move to Trash.
- The Title column contains the name of the promotion.
- The Send to users column shows the number of users to whom the promotion was sent.
- The Latest sent column shows the date when the promotion was sent.
- The Date column shows the date the promotion was modified or published.
Adding a new promotion
The most important purpose of collecting information about wishlists is to prepare a promotion for them. Promotion means mass mailing to a specific target group. The set filters define the target group.
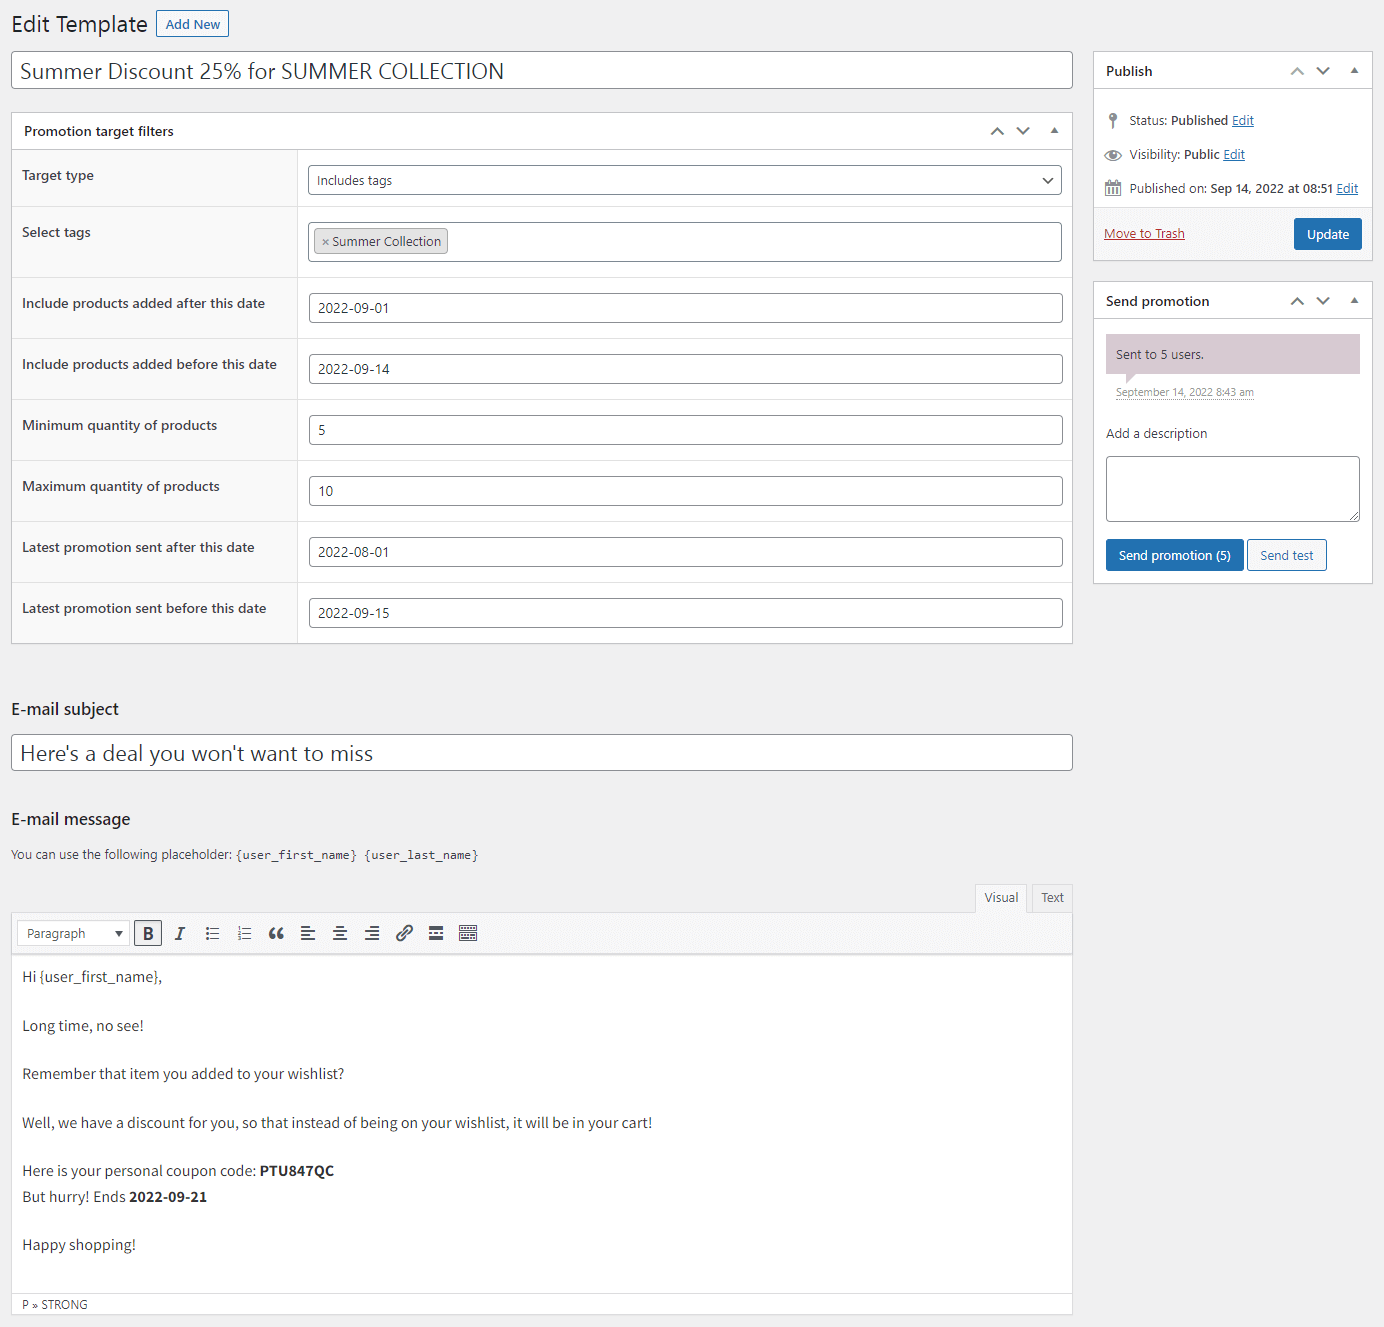
- Select Flexible Wishlist > Promotions and click the Add New button.
- Enter the name of the promotion.
- Set Promotion target filters. Setting each filter results in a narrowing of the target group.
- Target type
- Includes products/Select products
The target group will include users with selected products on their wishlists. - Includes categories/Select categories
The target group will include users who have products from selected categories on their wishlists. - Includes tags/Select tags
The target group will include users who have products tagged with selected tags on their wishlists. - Includes wishlist users/Select e-mails
The target group will include users of the wishlists assigned to specific emails.
- Includes products/Select products
- Include products added after this date/Include products added before this date
The target group will include users who have products added to their wishlists in the selected time period.
- Minimum quantity of products/Maximum quantity of products
The target group will include users who have products in the selected quantity range on their wishlists. - Latest promotion sent after this date/Latest promotion sent before this date
The target group will include users who are recipients of the last promotion in the selected time period.
- Target type
- Enter E-mail subject.
- Enter E-mail message. It is possible to insert variables.
- {user_first_name}
Using this variable will insert the first name in its place. - {user_last_name}
Using this variable will insert the last name in its place.
- {user_first_name}
- Click the Send test button to send a test email to the address assigned to the WordPress account.
- Add a note in the Add a note field if needed. It will be saved when the promotion is sent.
- Click the Send promotion button to send the email to the target group. The number in brackets indicates the size of the target group.
Free vs. PRO Feature Comparison
To make it even easier for you to see the difference between the free and pro versions of the Flexible Wishlist for WooCommerce plugin, we've prepared for you a summary table of all the features. Take a look and decide which version you choose.
| Feature | FREE → | PRO → |
| Unlimited number of wishlists | ✅ | ✅ |
| Unlimited number of products on wishlists | ✅ | ✅ |
| Customizable Add to wishlist icon | ✅ | ✅ |
| Display and manage the number of products on the wishlist | ✅ | ✅ |
| Add a product to the wishlist by using a popup window | ✅ | ✅ |
| Edit all the visible text inputs | ✅ | ✅ |
| Enable/disable wishlist social sharing button | ✅ | ✅ |
| Allow all users to create a list | ✅ | ✅ |
| Name/rename the wishlist | ✅ | ✅ |
| Name/rename the wishlist | ✅ | ✅ |
| Remove items from the wishlist | ✅ | ✅ |
| Show the Add to Cart button in the wishlist | ✅ | ✅ |
| Allow to move all available items to the cart by just one click | ✅ | ✅ |
| Identify most frequently added products to the wishlists | ❌ | ✅ |
| Identify most frequently added product categories to the wishlists | ❌ | ✅ |
| Identify most frequently added product tags to the wishlists | ❌ | ✅ |
| Manage all wishlists that customers have created in the store | ❌ | ✅ |
| Create promotional e-mails, which will increase sales of products from wishlists | ❌ | ✅ |
| Customers' wishlists preview | ❌ | ✅ |
