
The WooCommerce shipping and billing address sections are the most important of the checkout. It works well by default. Sometimes you need something more. You can't change the field order or add more shipping fields to the WooCommerce checkout, can you? I'll teach you in this article how to customize these checkout sections the way you want ⭐!
Contents
- How to Personalize the Shipping and Billing Address Section in WooCommerce?
- WooCommerce Checkout - Billing & Shipping Fields
- Free WooCommerce checkout customization plugin
- Checkout Fields Configuration
- WooCommerce Checkout Fields Editor
- Customize the Shipping and Billing Address section in WooCommerce emails
- WooCommerce Checkout Page Customization - Q&A
- What are the key elements of the checkout process?
- How can I add custom fields to my WooCommerce checkout?
- Add custom code to add a field on the WooCommerce checkout
- What plugins can help with checkout customization in a WooCommerce store?
- WooCommerce shipping fields
- How to Add Shipping Address Fields to the WooCommerce Checkout Page?
- How do I enable the shipping address field?
- How to turn on/off the Ship to a different address section?
- What should I consider when adding shipping fields?
- What are the options for multiple Shipping Addresses?
- How to troubleshoot Shipping Address not showing issues?
- Checkout experience optimization
- How to improve the checkout experience with shipping address customization?
- What impact does shipping method and shipping customization have on cart abandonment?
- How can shipping options enhance customer satisfaction and checkout experience?
- How to optimize checkout - more tips
- How to set up billing and shipping addresses in WooCommerce?
- WooCommerce checkout field manager
- WooCommerce shipping fields
- What are the differences between shipping address and billing?
- How to ensure shipping details match customer billing address?
- WooCommerce Checkout Page: Add Shipping Address Fields - Summary
- WooCommerce Checkout Field Editor: How to Add, Edit & Remove Billing Fields
- How to Remove Billing Fields in WooCommerce Checkout - Easy Guide
- Customize the WooCommerce Checkout Page: Top Tips for a Seamless Experience
- Customize the WooCommerce Checkout Page: Tips & Tools for Success
- WooCommerce Checkout - Settings, Shortcode & Configuration Guide
How to Personalize the Shipping and Billing Address Section in WooCommerce?
This extension for WooCommerce lets you modify the form by adding, removing, or rearranging checkout fields.
👉🏼 Would you like to add a custom shipping field in WooCommerce? Maybe shipping address fields are not showing correctly in the WooCommerce checkout form? Or you'd like to swap the billing and shipping address fields on the WooCommerce checkout page?
What if I tell you that all these things are possible to set up with one FREE plugin 😊?
WooCommerce shipping fields
Edit, add new or hide unnecessary fields from the WooCommerce checkout form. Add pricing to fields and use conditional logic. It's all about conversions and better user experience. NEW: now you can set multiple conditions (OR) under one or more condition groups (AND).
💾 Active Installations: 80,000+ | WordPress Rating:
WooCommerce Checkout - Billing & Shipping Fields
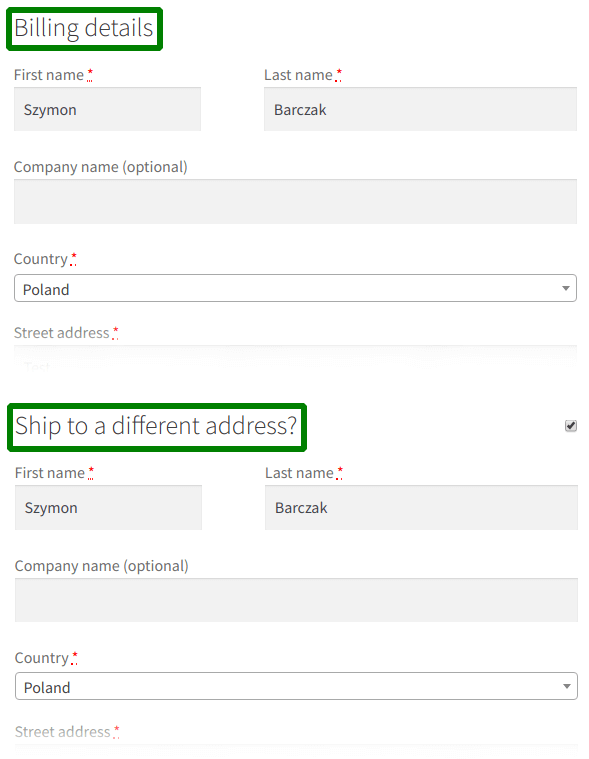
Your customers have to provide their billing details while placing an order. There is an option to set a different shipping address too. A customer just needs to mark one checkbox on the checkout page.
It works very well by default. In most cases, there is no need to change that page. I guess you're here because you need something more 🙂!
🎉 So, you CAN personalize the checkout page the way you want:
- set some fields as not required
- disable any fields (eg. for digital goods)
- change the field order (for example, swap the billing and shipping address fields)
- and add your additional custom fields.
Free WooCommerce checkout customization plugin
👉🏼You'll need a simple FREE plugin: Flexible Checkout Fields to do so. Over 80,000 WooCommerce stores use it daily.
Watch this video and see yourself what this plugin can offer you in the free version:
Start customizing your WooCommerce billing and shipping fields & checkout form for FREE and download this plugin ⬇️
WooCommerce shipping fields
Edit, add new or hide unnecessary fields from the WooCommerce checkout form. Add pricing to fields and use conditional logic. It's all about conversions and better user experience. NEW: now you can set multiple conditions (OR) under one or more condition groups (AND).
💾 Active Installations: 80,000+ | WordPress Rating:
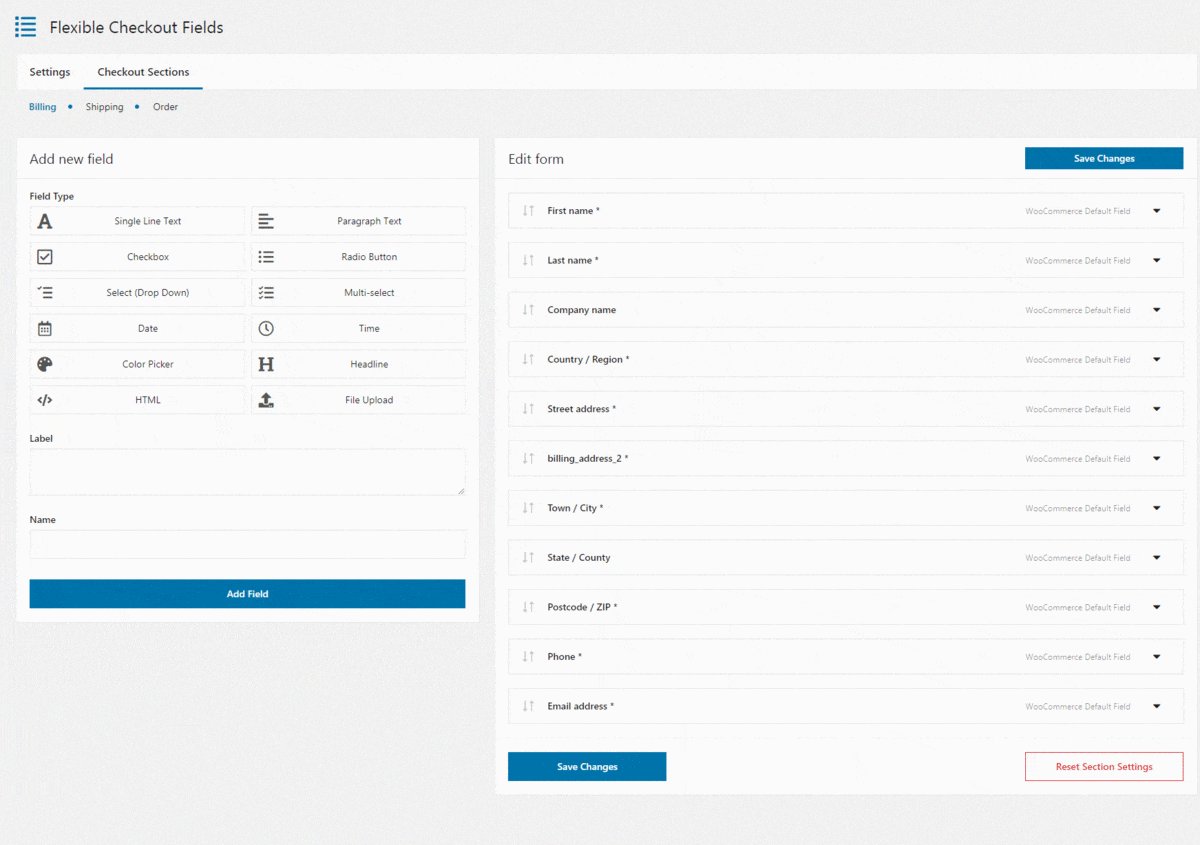
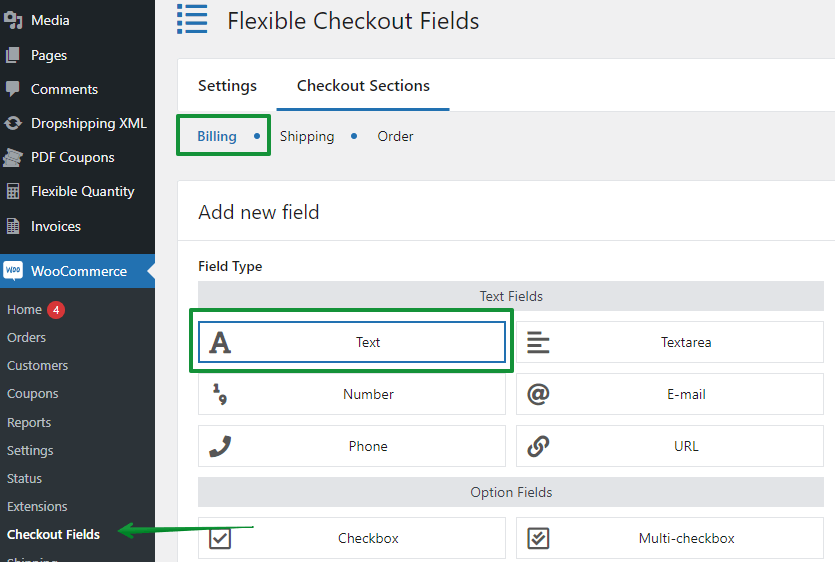
Once you install it, you can configure the fields in the WooCommerce shipping and billing address checkout sections.
First, go to the WooCommerce → Checkout Fields menu. Here, you can switch between them using the tabs on the top of the screen (Billing and Shipping):
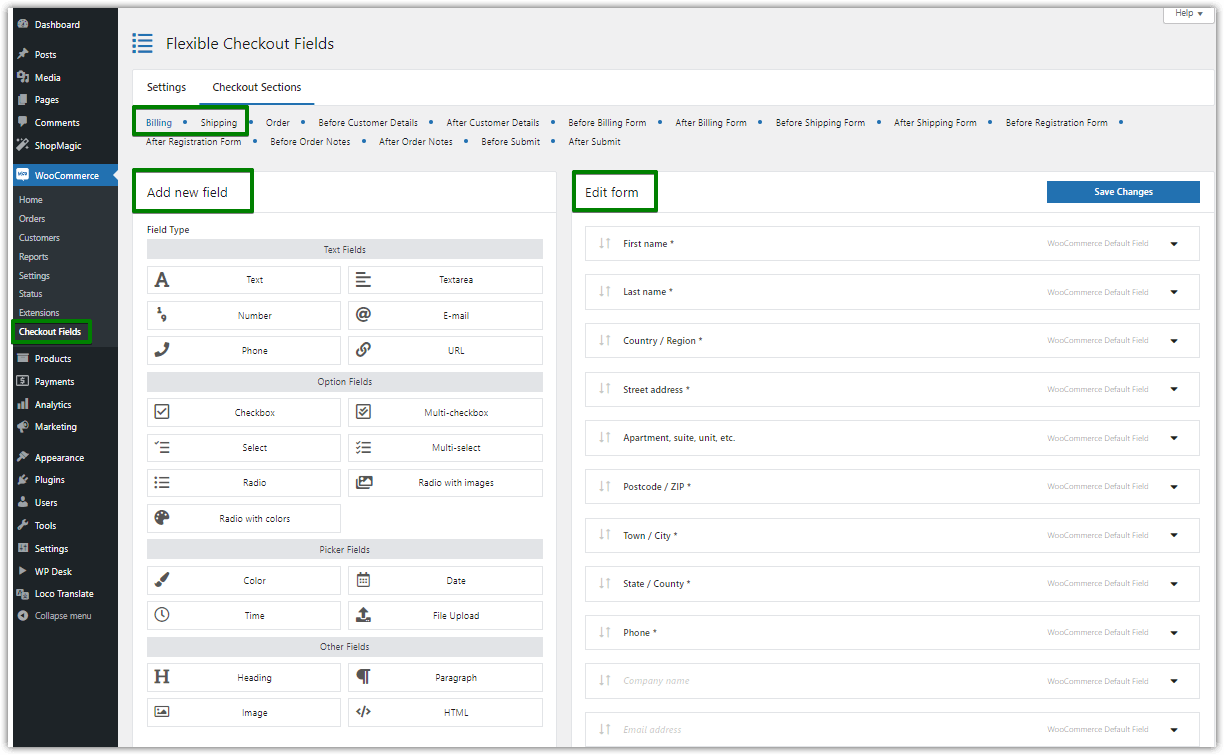
👉🏼As you see, you can easily use the Add New Field or Edit Section options. You have such options as:
- Enable Field
- Required Field
- Label
- Validation
👉🏼There are many more features under the Appearance, Display On, and Advanced tabs. You can check them out by yourself. If you want to read more about them, then continue with this article.
Checkout Fields Configuration
Let's look at the configuration options.
1. Required Fields
Some fields in the Shipping and Billing Address sections are required. You can easily change that. Look:
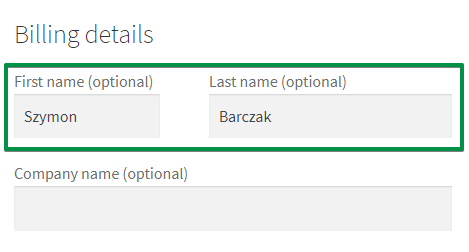
As you see, these fields are optional. You can also create new custom fields and set them as required:
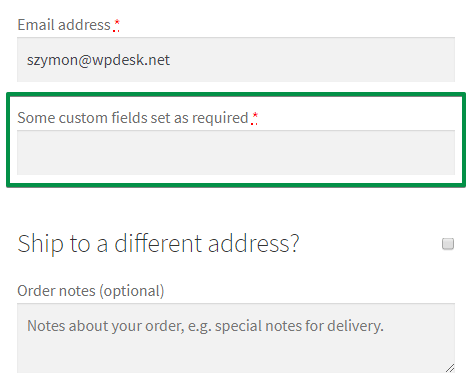
👉🏼How? Simply mark or unmark the Required Field option:

2. Validation
You can use the default WooCommerce validation or your custom one.
Validation is very useful:

👉🏼If you want to add validation to your shipping and billing address sections, use our WooCommerce Checkout Validation Guide →
3. Display On
👉🏼You can configure where to display a field in there. By default, the plugin displays the field in all the locations:
- Thank You Page
- My Account Page - address section
- My Account Page - orders section
- in Emails
You can change it.
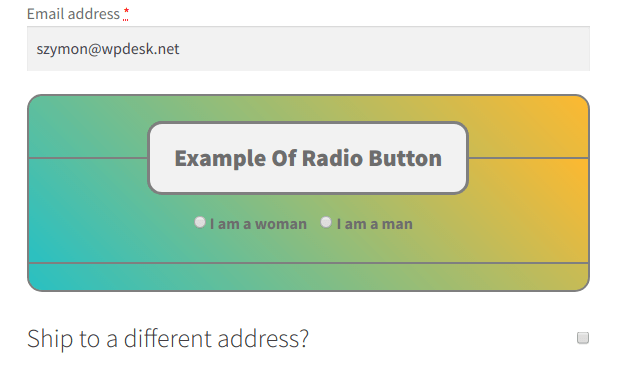
4. Appearance
Change the way your fields from WooCommerce shipping and billing sections look like.
👉🏼Set your custom class for a field:
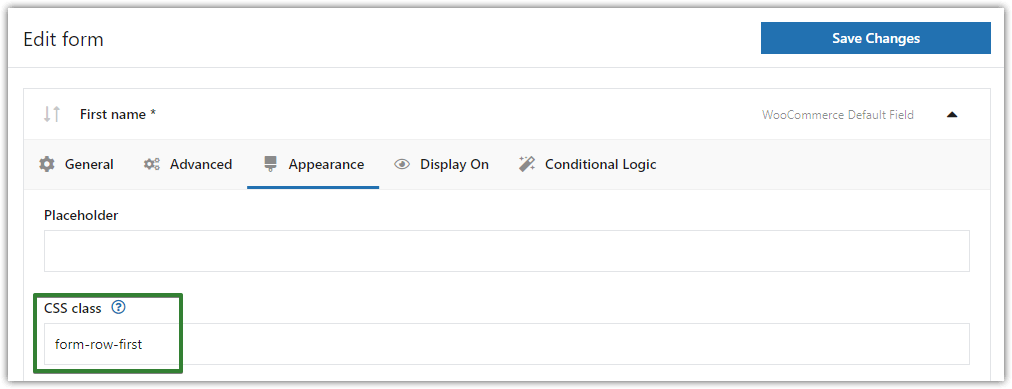
👉🏼This way you can change any field from this:
Into this (or anything you want):
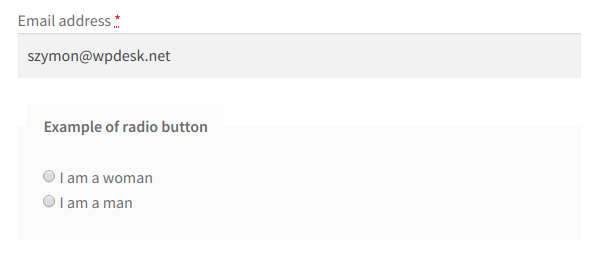
5. Conditional Logic
You can implement conditional logic to shipping and billing address sections.
So what is an example of conditional fields in WooCommerce? Taka a look:

A customer needs to mark I want an invoice checkbox. After this action, new fields pop up.
👉🏼There are a lot of scenarios where you can use conditional logic. You can set up conditional logic for fields...
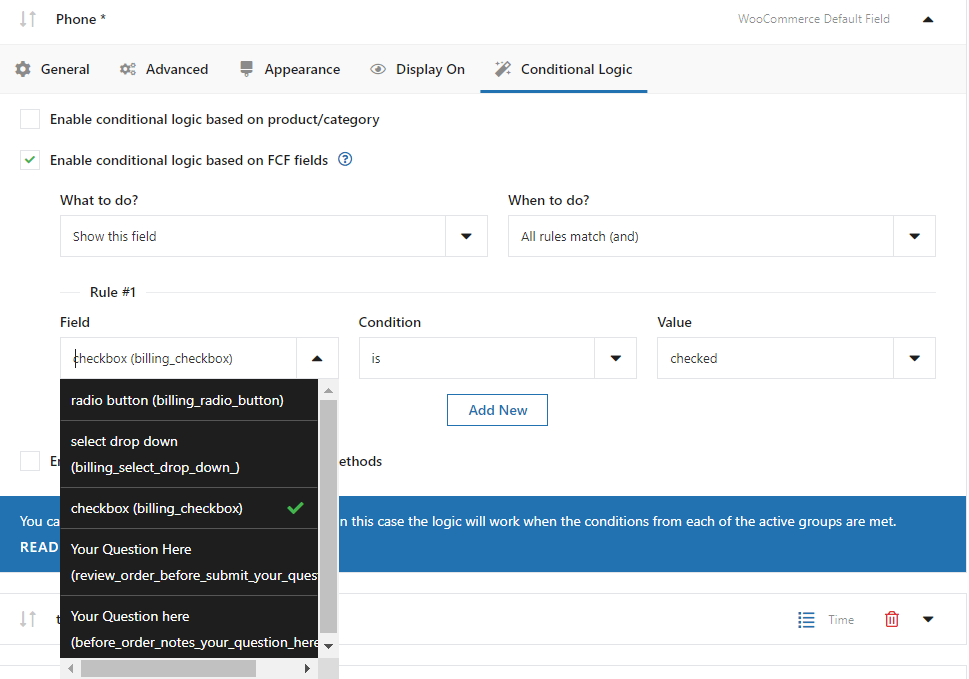
...the products/category...
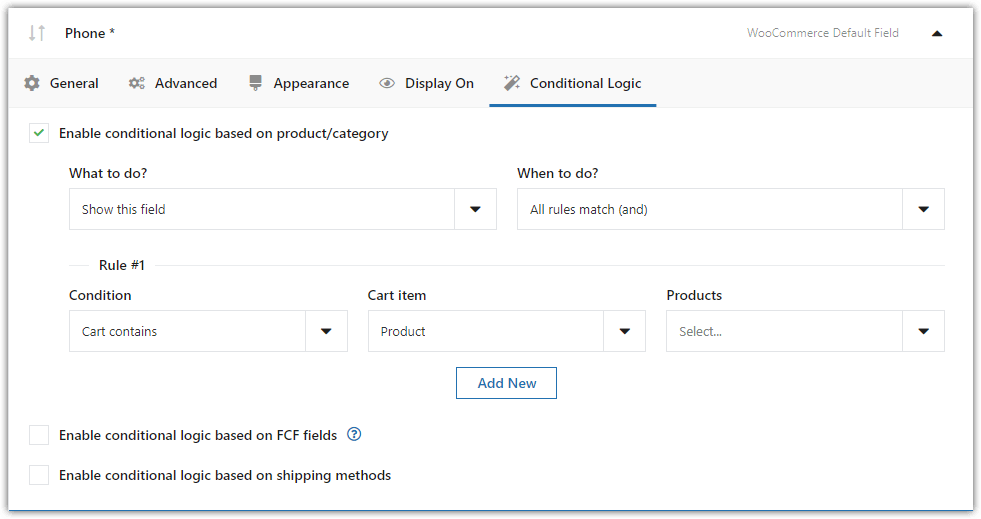
...or selected shipping method.
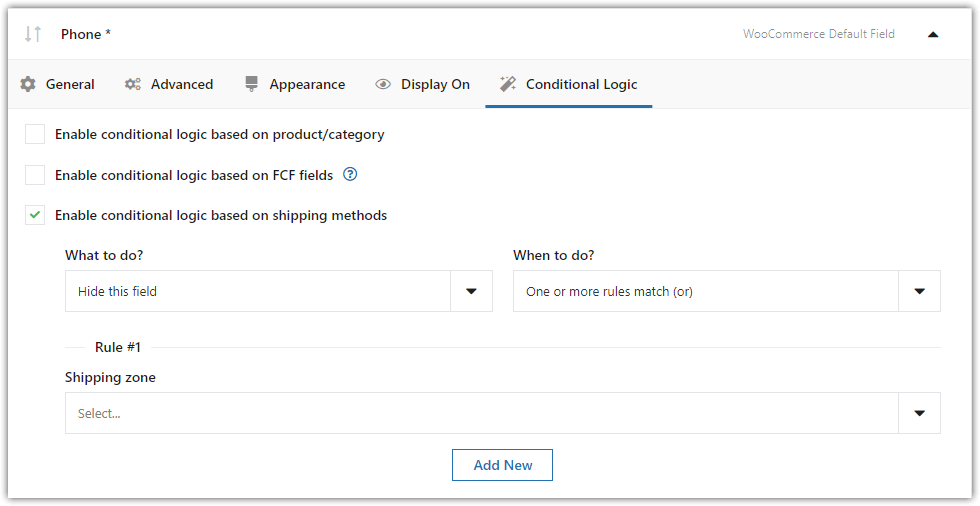
As you see, you need to go to the Advanced tab. You'll find all the options there.
Learn more about WooCommerce Checkout Conditional Fields →
6. Other settings
The Flexible Checkout Fields plugin lets you add custom fields to other sections such as:
- Order Notes
- Customer Details
- or Registration Form
WooCommerce Checkout Fields Editor
As you see, the Flexible Checkout Fields plugin is very powerful. For us (the developers) this plugin is the best on the market 🙂
But don't just take our word for it, over 80,000 WooCommerce stores worldwide use it every day.
We often add new features or fix bugs in this plugin. And people appreciate it!
This plugin also utilizes the WordPress look & feel and is very easy to use due to the clean interface.
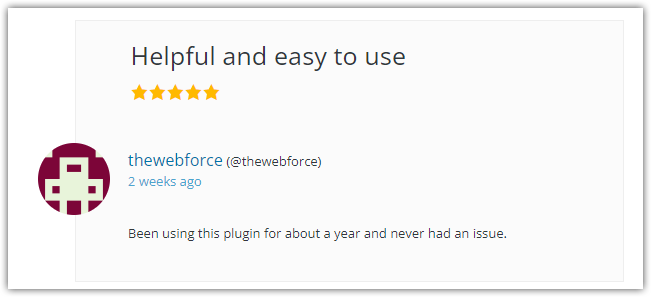
You can find many more positive reviews like the one above! However, you don't have to take my word for it. You can download this plugin for free and check it out yourself!
WooCommerce shipping fields
Edit, add new or hide unnecessary fields from the WooCommerce checkout form. Add pricing to fields and use conditional logic. It's all about conversions and better user experience. NEW: now you can set multiple conditions (OR) under one or more condition groups (AND).
💾 Active Installations: 80,000+ | WordPress Rating:
Customize the Shipping and Billing Address section in WooCommerce emails
In order to customize the shipping and billing section in Woo email templates, you will need a third party plugin called YayMail. You can download it for free and design the emails in a drag and drop email builder.
The premium version of this WooCommerce email customizer supports Flexible Checkout Fields. It helps show your added custom fields in the order email templates and localize the section as you like it.
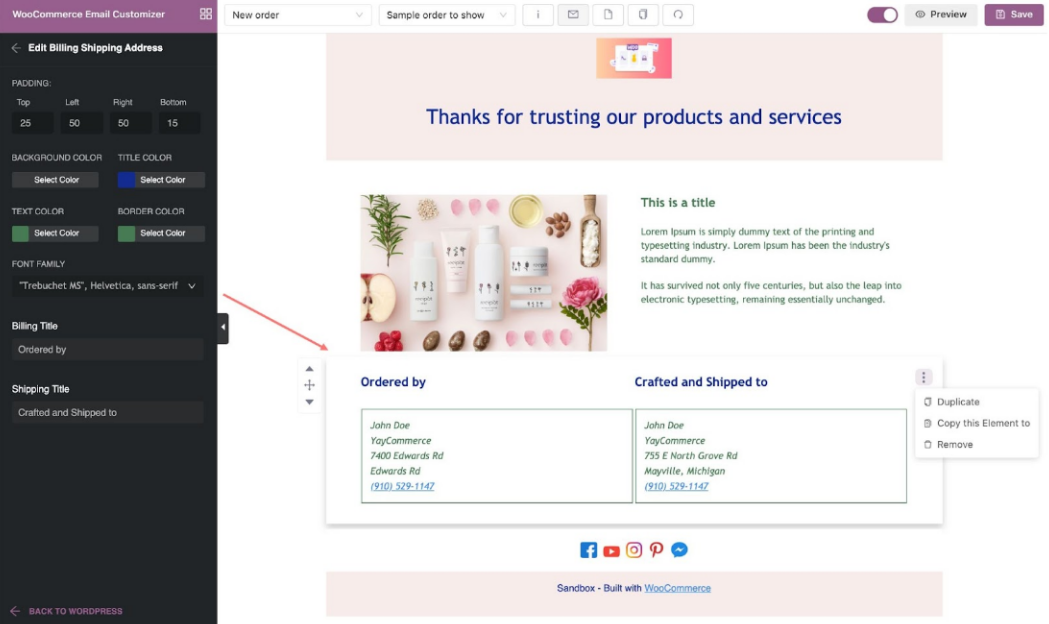
Built-in design options to help you beautify the email including:
- Billing title
- Shipping title
- Font family
- Background/box border/text color
Free Follow-Up Emails & Marketing Automation for WooCommerce – ShopMagic
To customize the shipping and billing section in custom email templates, you may also use a free plugin called ShopMagic. You can download it for free and design the emails in a drag-and-drop email builder.
The plugin lets create newsletters, follow-up emails, or messages to rescue abandoned carts. What's more, you can add there any custom fields because the Flexible Checkout Fields plugin is compatible with ShopMagic.
Add custom fields to your new email templates!
WooCommerce Checkout Page Customization - Q&A
What are the key elements of the checkout process?
The key elements include a user-friendly interface with navigation through the purchase process:
- Billing information: Users need to give those information to place an order.
- Secure payment options: They are essential, as they build trust and ensure the safety of sensitive financial information.
- Shipping options: Showing shipping methods with final costs helps customers make informed decisions before finalizing their purchase.
- Summary of the order: Displaying item details and total costs increases trust and reduces the likelihood of cart abandonment.
- Discount codes and upsell: It's also possible to inform about discounts, upgrades or cross-sell products. Such information in the checkout can raise the cart value or strengthen the purchase decision.
How can I add custom fields to my WooCommerce checkout?
You can add a custom code or use a plugin.
Add custom code to add a field on the WooCommerce checkout
You may add a custom field using PHP code (added to theme's functions.php) and the `woocommerce_checkout_fields` filter.
It's also possible to use the filter to modify the existing fields. Let's see the steps to add the field with the code.
-
Step 1: Add a new checkout field
You can also define the field's properties, such as label, type, and placeholder, to ensure they meet your requirements.
Let's see a PHP code example to add an input field to the shipping section of the WooCommerce checkout form:
add_filter('woocommerce_checkout_fields', 'custom_checkout_shipping_field');

function custom_checkout_shipping_field($fields) {

$fields['shipping']['shipping_custom_field'] = array(

'type' => 'text',

'label' => __('Custom Field', 'woocommerce'),

'placeholder' => __('Enter custom value', 'woocommerce'),

'required' => true, // Set to true if the field is mandatory

'class' => array('form-row-wide'),

'clear' => true,

);

return $fields;

}
This code adds a new text input field labeled "Custom Field" to the shipping section of the WooCommerce checkout form.
-
Step 2: Validate the custom field
Next, validate the input from the custom field when the checkout form is submitted. You can do this with the `woocommerce_checkout_process` action:
add_action('woocommerce_checkout_process', 'validate_a_custom_checkout_field'); function validate_a_custom_checkout_field() { if (isset($_POST['shipping_custom_field']) && empty($_POST['shipping_custom_field'])) { wc_add_notice(__('Please enter a value in the custom field.', 'woocommerce'), 'error'); } }
-
Step 3: Save the Custom Field Value to Order Meta
Finally, save the value of the custom field to the order meta when the order is created. You can do this with the `woocommerce_checkout_update_order_meta` action:
add_action('woocommerce_checkout_update_order_meta', 'save_a_custom_checkout_field'); function save_a_custom_checkout_field($order_id) { if (!empty($_POST['shipping_custom_field'])) { update_post_meta($order_id, '_shipping_custom_field', sanitize_text_field($_POST['shipping_custom_field'])); } }
-
Step 4: Display the Custom Field Value in the Admin Order Page
If you want to display this custom field value in the order details in the admin area, you can use the following code:
add_action('woocommerce_admin_order_data_after_shipping_address', 'show_custom_field_in_admin_order', 10, 1); function show_custom_field_in_admin_order($order) { $custom_field = get_post_meta($order->get_id(), '_shipping_custom_field', true); if (!empty($custom_field)) { echo '
' . __('Custom Field', 'woocommerce') . ': ' . esc_html($custom_field) . '
'; } }
Adding a custom checkout field using the `woocommerce_checkout_fields`filter is the first option. But you can also speed up your work and use a plugin to manage the WooCommerce checkout fields.
What plugins can help with checkout customization in a WooCommerce store?
There are some free plugins in the WordPress repository for checkout management.
You can use the WP Desk free plugin (used by 90000+ users) that does the job for you.
WooCommerce shipping fields
Edit, add new or hide unnecessary fields from the WooCommerce checkout form. Add pricing to fields and use conditional logic. It's all about conversions and better user experience. NEW: now you can set multiple conditions (OR) under one or more condition groups (AND).
💾 Active Installations: 80,000+ | WordPress Rating:
How to Add Shipping Address Fields to the WooCommerce Checkout Page?
The process is the same for billing and shipping section.
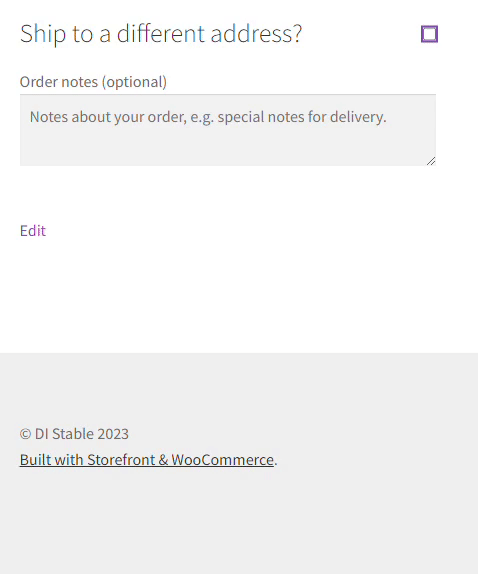
How do I enable the shipping address field?
By default, the shipping section will appear for physical products. After the user clicks the "Ship to a different address section" checkbox, the fields for shipping will unfold.
Of course, you may turn off the section and add a custom field in the billing section using a custom code or a plugin.
How to turn on/off the Ship to a different address section?
If you don't want the additional fields, you can turn off the shipping section entirely.
To do that, go to WooCommerce → Settings → Shipping → Shipping settings → Shipping destination and check the Force shipping to the customer billing address option.

What should I consider when adding shipping fields?
First, the user experience. Don't add too many fields. Add clear labels and tooltips to guide users. Finally, think about design (spacing, font, colors, and graphics).
Add fields that serve the purpose so you don't get additional questions or wrong input.
Also, think if you really need the shipping fields.
All these factors can help during the checkout process and may increase the conversion rate.
What are the options for multiple Shipping Addresses?
How can customers ship to a different address?
In WooCommerce, customers can easily ship their orders to a different address by filling out the shipping information fields during the checkout process.
They simply need to select the option for a different shipping address and fill out additional shipping fields. That's it.
What are the benefits of multiple shipping?
Multiple shipping options allow customers to choose the convenient and cost-effective delivery method.
Also, they may order the shipping delivery to more destinations with certain conditions (time, packacking, delivery method, recipient, etc.).
How to configure multiple shipping addresses in WooCommerce?
To configure multiple shipping addresses in WooCommerce, you can use custom fields.
Additional shipping addresses can be added to billing or shipping sections.
Make sure to add appropriate labels and clear placeholders to guide through the form.
How to troubleshoot Shipping Address not showing issues?
What are common reasons for shipping address issues?
Common reasons for shipping address issues in WooCommerce include incorrect or incomplete customer input during checkout. That can delay orders. Make sure to add tooltips, labels, placeholders, and headings to help users navigate.
Flexible Checkout Fields can help you with better checkout form structure as well.
How can I fix shipping address not displaying?
To fix the shipping address not displaying in WooCommerce, first ensure that the shipping calculation is enabled in WooCommerce → Settings → Shipping locations.
The setting should not be set on "Disable shipping & shipping calculations".

If the issue persists, check for conflicts with your theme or plugins by temporarily switching to a default theme like Storefront and deactivating other plugins to identify the cause.
Finally, if you added new checkout fields or modified the form with a custom code, try to comment it to check the form without the custom code.
What can I do if shipping address fields are missing?
Make sure products are not virtual. Then, go to WooCommerce → Settings → Shipping → Shipping settings → Shipping destination.
Make sure, the checkbox is not set on the Force shipping to the customer billing address option.

Checkout experience optimization
How to improve the checkout experience with shipping address customization?
- Enable Address Autocomplete: Implement an address autocomplete feature to help customers fill in their shipping information quickly and accurately. This reduces input errors and speeds up the checkout process, leading to higher conversion rates. The autocomplete option may also be available by default inside web browsers.
- Customizable Address Fields: Allow customers to customize the shipping address fields according to their needs. This can include options for adding specific delivery instructions, selecting alternate contact methods, or providing a company name for business addresses. You can add new fields with the Flexible Checkout Fields plugin.
- Save Multiple Addresses: Introduce a feature that allows customers to save multiple shipping addresses within their accounts. This is particularly useful for returning customers who may want to ship to different locations without re-entering their information each time.
- Real-Time Shipping Rate Calculation: Integrate real-time shipping rate calculations based on the entered address. This transparency helps customers understand shipping costs upfront, reducing cart abandonment rates due to unexpected fees at checkout.
- Mobile Optimization and Page Speed: Ensure that the shipping address customization process is mobile-friendly. With a significant number of shoppers using mobile devices, a streamlined, responsive design will enhance usability and make it easier for customers to complete their purchases on the go. Also, make sure the page is fast with a clear form.
What impact does shipping method and shipping customization have on cart abandonment?
Shipping customization can significantly reduce cart abandonment in WooCommerce by allowing customers to select options that best fit their needs, such as preferred delivery dates or shipping methods.
When shoppers see a lighter checkout form they are more likely to complete their purchase, increasing overall conversion rates and customer satisfaction.
How can shipping options enhance customer satisfaction and checkout experience?
By allowing customers to choose delivery methods you can increase the user experience and number of paid orders.
Additionally, think about offering real-time tracking and transparent shipping costs.
These things can build trust and improve the overall shopping experience.
And trust can lead to increased loyalty and repeat purchases.
How to optimize checkout - more tips
Make sure that the complete the checkout experience for your customers is only the first step when optimizing WooCommerce store's quality.
You can also think about guest checkout to let customers place orders without an account.
These are only some options to your customers when they go to WooCommerce checkout. Of course, you can think of some customization for the cart page too.
Try to add multiple options to learn what works better for WooCommerce dashboard results (orders, ecommerce ROI).
How to set up billing and shipping addresses in WooCommerce?
You may use the article about basic settings for billing and shipping in WooCommerce.
Basically, WooCommerce lets you add a new shipping zone and use shipping destination options.
Read the guide to learn how to navigate to WooCommerce settings to add the shipping to the order.
WooCommerce checkout field manager
Then, use the free field manager to customize your checkout page. For example use different billing fields or modify the default classic form to raise the average order value.
Use a free plugin and you're be able to add custom fields and display the shipping section with the classic version of WooCommerce checkout form. Without a line of code.
WooCommerce shipping fields
Edit, add new or hide unnecessary fields from the WooCommerce checkout form. Add pricing to fields and use conditional logic. It's all about conversions and better user experience. NEW: now you can set multiple conditions (OR) under one or more condition groups (AND).
💾 Active Installations: 80,000+ | WordPress Rating:
What are the differences between shipping address and billing?
Shipping addresses are used for delivery purposes, while billing addresses are associated with the payment method and invoicing.
How to ensure shipping details match customer billing address?
To ensure that shipping details match the customer’s billing address, you can enable the option in WooCommerce → Settings → Shipping → Shipping settings → Shipping destination.
It’s important to communicate the differences between these two types of addresses to avoid any confusion for customers.
WooCommerce Checkout Page: Add Shipping Address Fields - Summary
In this short article, I've shown you the simplicity of customizing WooCommerce shipping and billing address sections. How do you like it? Let me know in the comments section below.
Once you're here, you may need a guide through the WooCommerce checkout configuration. We have already created an awesome guide about WooCommerce Checkout Settings →


Will the new added fields be accessible in emails like New Order, Order Confirmation emails etc? As I am unable to find shortcodes for new fields added in billing/shipping forms?
No value addition. Didn’t get what i was looking for. My simple question why 2 different type of address?
Is it possible to have the billing address auto populate the shipping address unless the ship to different address option is clicked. I use a 3rd party shipping company that is approved by woocommerce but it requires a shipping address. Currently if the customer wants the billing and shipping address the same they only fill in the billing and leave the shipping blank. The system does not automatically populate the shipping address. I looked and can not find anyplace to force the billing to be placed into the shipping.