
Billing fields fill the default section of the WooCommerce checkout page. Learn how to add, edit, and remove billing address fields in the WooCommerce checkout with a free plugin! Let's begin 🚀
Customizing your billing fields and checkout process can boost shopping experience, conversions, and customer loyalty. Discover how to create a seamless checkout experience using a free checkout manager plugin for WooCommerce!
Contents
- What Is the WooCommerce Checkout Field Editor (Free Plugin Guide)
- Default WooCommerce Billing Fields Overview
- How to Edit Billing Fields in WooCommerce Using a Checkout Field Editor
- How to Add Custom Checkout Fields in WooCommerce (Free Plugin)
- How to Remove Billing Fields in WooCommerce (Disable, Hide, Delete)
- How to Make WooCommerce Checkout Fields Required or Optional
- WooCommerce Conditional Checkout Fields (Show/Hide with Rules)
- How to Test & Optimize Your WooCommerce Checkout Form
- WooCommerce Checkout Optimization: UX Tips & Best Practices
- Customize your WooCommerce checkout page - use a field editor
- Customize WooCommerce checkout page - think about users
- Customize the checkout - more customization tips
- Core fields, custom checkout field, placeholder, and SEO
- Mobile Responsiveness in WooCommerce Checkout Page Design
- Add custom checkout fields or remove checkout fields - User Experience Tips
- Summary: Customize WooCommerce Checkout Fields Easily (Free Plugin)
- Customize the WooCommerce Checkout Page: Tips & Tools for Success
- Customize the WooCommerce Checkout Page: Top Tips for a Seamless Experience
- How to Remove Billing Fields in WooCommerce Checkout - Easy Guide
- WooCommerce Checkout Page: Add Shipping Address Fields - WooCommerce shipping field customization
- How to Add and Display WooCommerce Custom Fields on the Checkout & Order Pages
What Is the WooCommerce Checkout Field Editor (Free Plugin Guide)
Understanding WooCommerce billing fields is essential when customizing the WooCommerce checkout page. With the WooCommerce checkout page editor (WordPress plugin) you can easily manage core fields, remove checkout fields, or add a custom field.
To further tailor your checkout page, you can use custom code or custom CSS to modify field values and ensure the thank you page reflects the necessary order details. Learning how to customize your checkout page allows you to create a seamless one page checkout experience.
By using WooCommerce effectively, you can optimize checkout fields for WooCommerce to meet your business needs. For example, show as few fields as possible.
Or add new checkout fields to gather more information about the order.

Understanding the checkout is crucial to improving the customer experience. Equipped with the right tools, you can easily customize the WooCommerce checkout.
But why does it matter?
⛔ Sometimes you may lose some of the buyers because of too many billing fields in the WooCommerce checkout form 😔!
✅ Let's manage the billing address section of the checkout easily with a FREE plugin 😊!
Free WooCommerce Checkout Field Editor Plugin
Flexible Checkout Fields WooCommerce
Edit, add new or hide unnecessary fields from the WooCommerce checkout form. Add pricing to fields and use conditional logic. It's all about conversions and better user experience. NEW: now you can set multiple conditions (OR) under one or more condition groups (AND).
💾 Active Installations: 80,000+ | WordPress Rating:
WooCommerce Checkout Field Editor Features (Free & PRO)
👉🏽 Have a quick look at the most loved features of the Flexible Checkout Fields plugin:
Obviously, the plugin lets you customize the WooCommerce Checkout page including the Billing address section.
But you can also remove certain fields in the shipping section (or the entire section). Read how to disable shipping in the WooCommerce checkout →
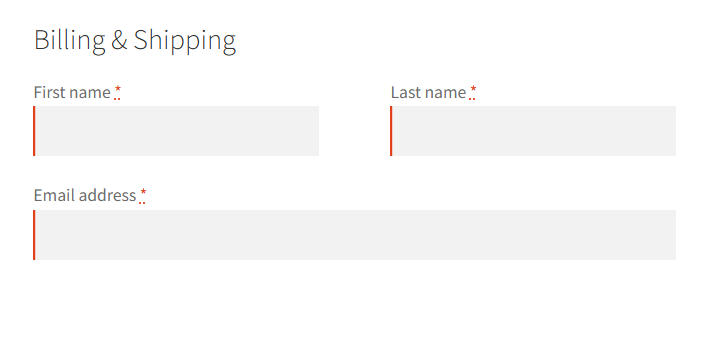
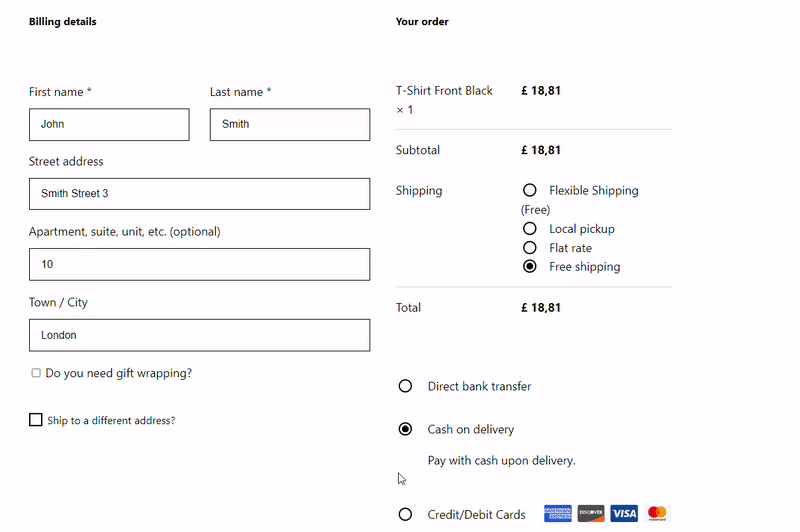
Default WooCommerce Billing Fields Overview
Let's see the default Billing in the checkout:
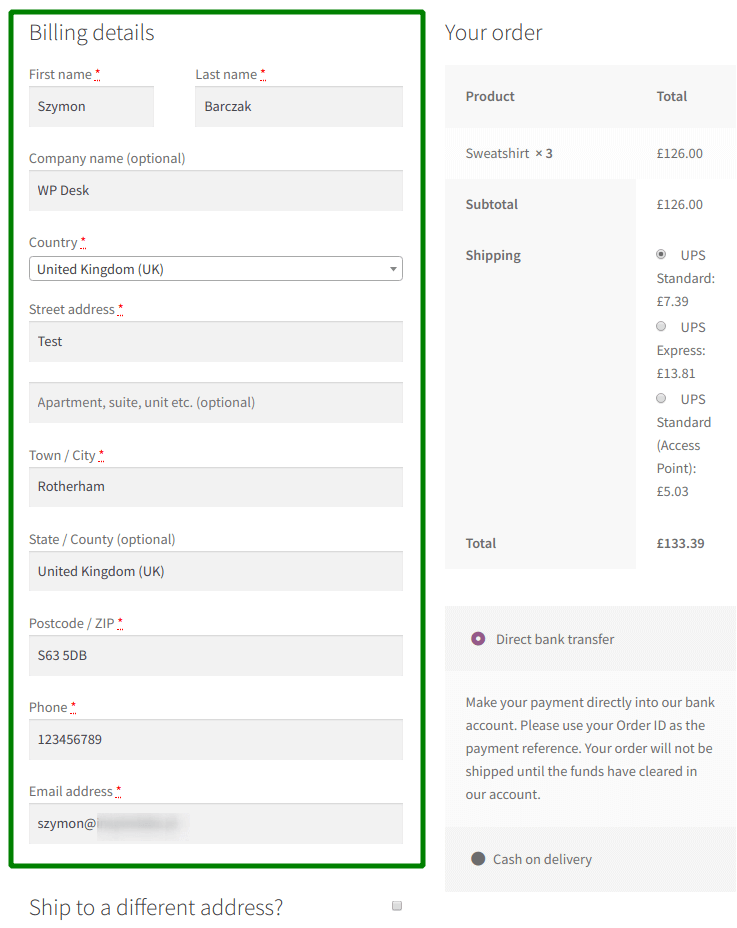
It's quite obvious you may want to change a few things, for example:
- edit the existing billing fields,
- make a field required or optional,
- add new fields,
- remove some of the billing fields,
- or simply reorder the fields.
Let's see how to do each thing with a free plugin 😊!
How to Edit Billing Fields in WooCommerce Using a Checkout Field Editor
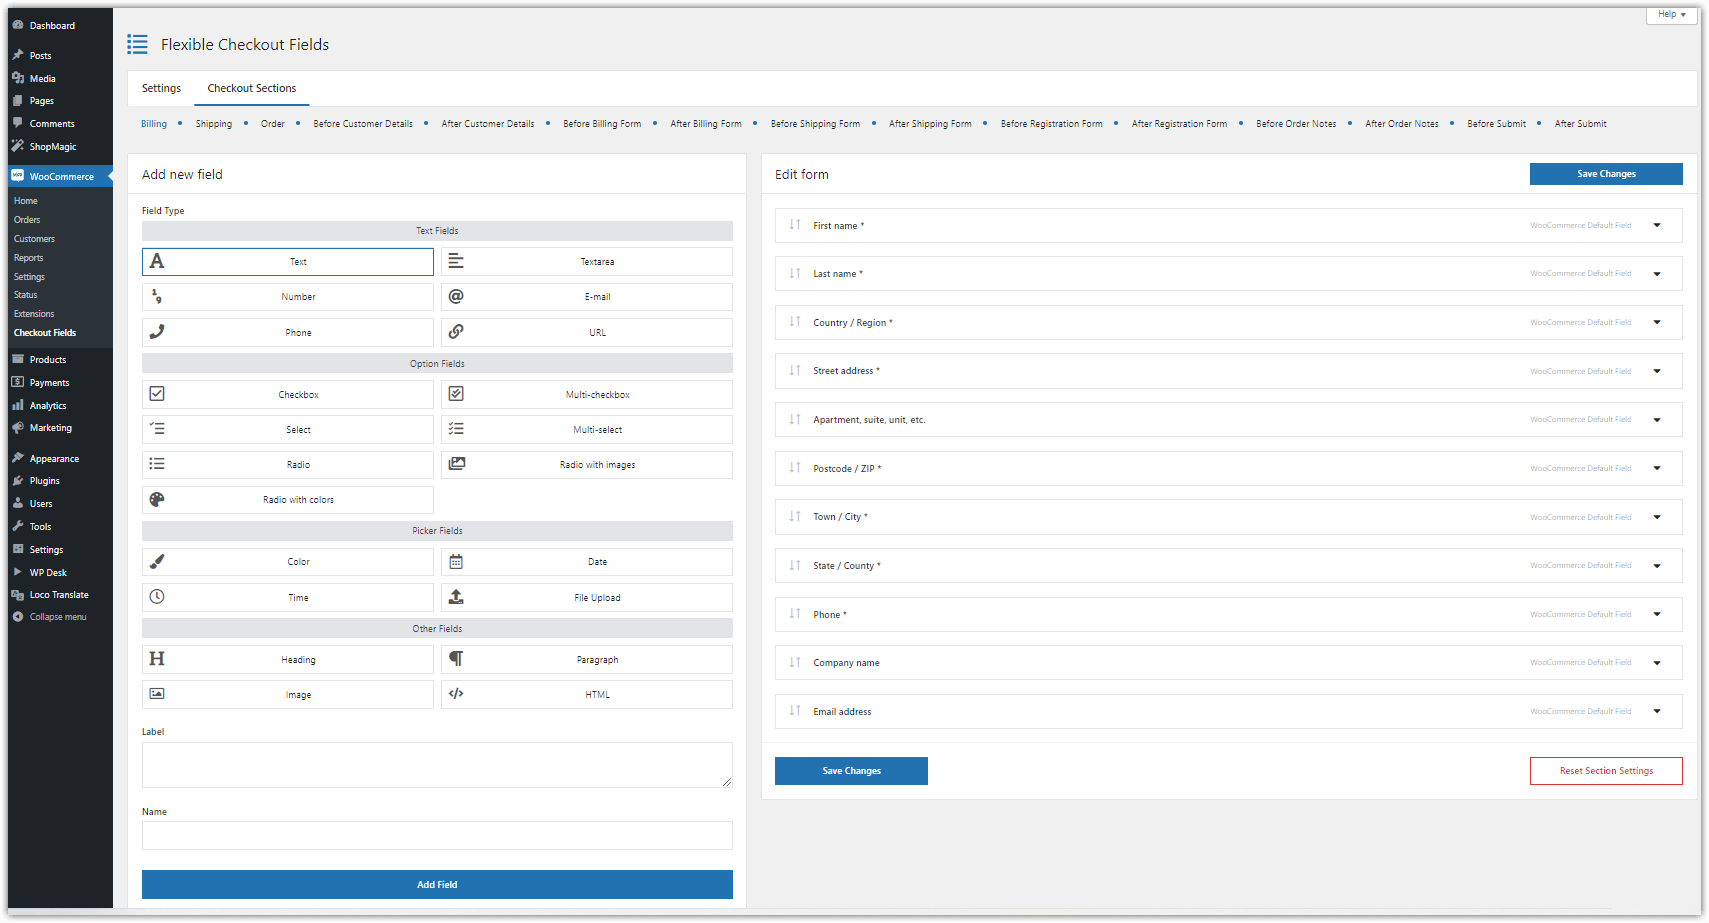
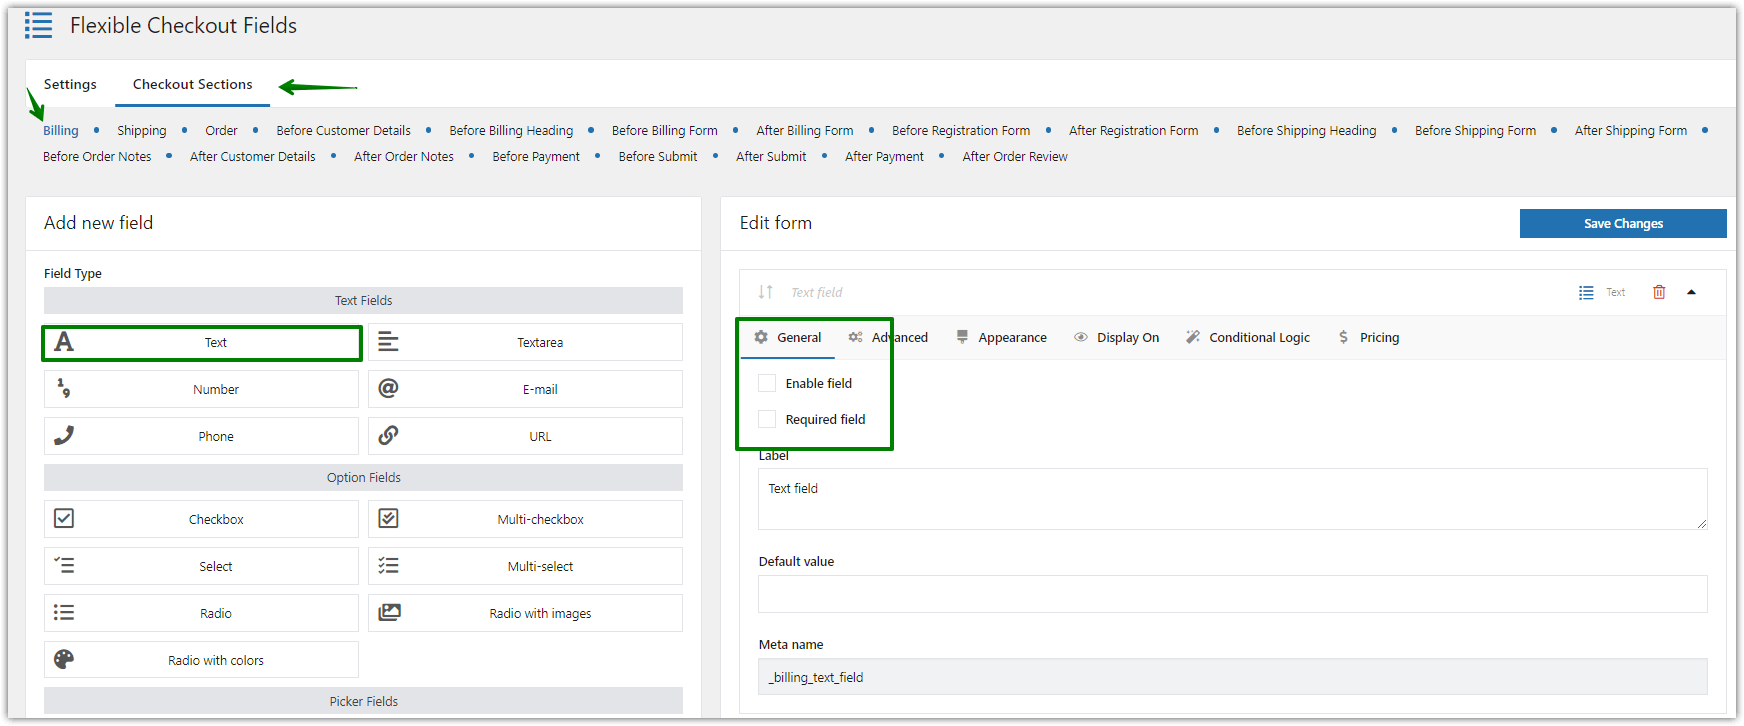
After installing and activating the plugin, go to WooCommerce → Checkout Fields.
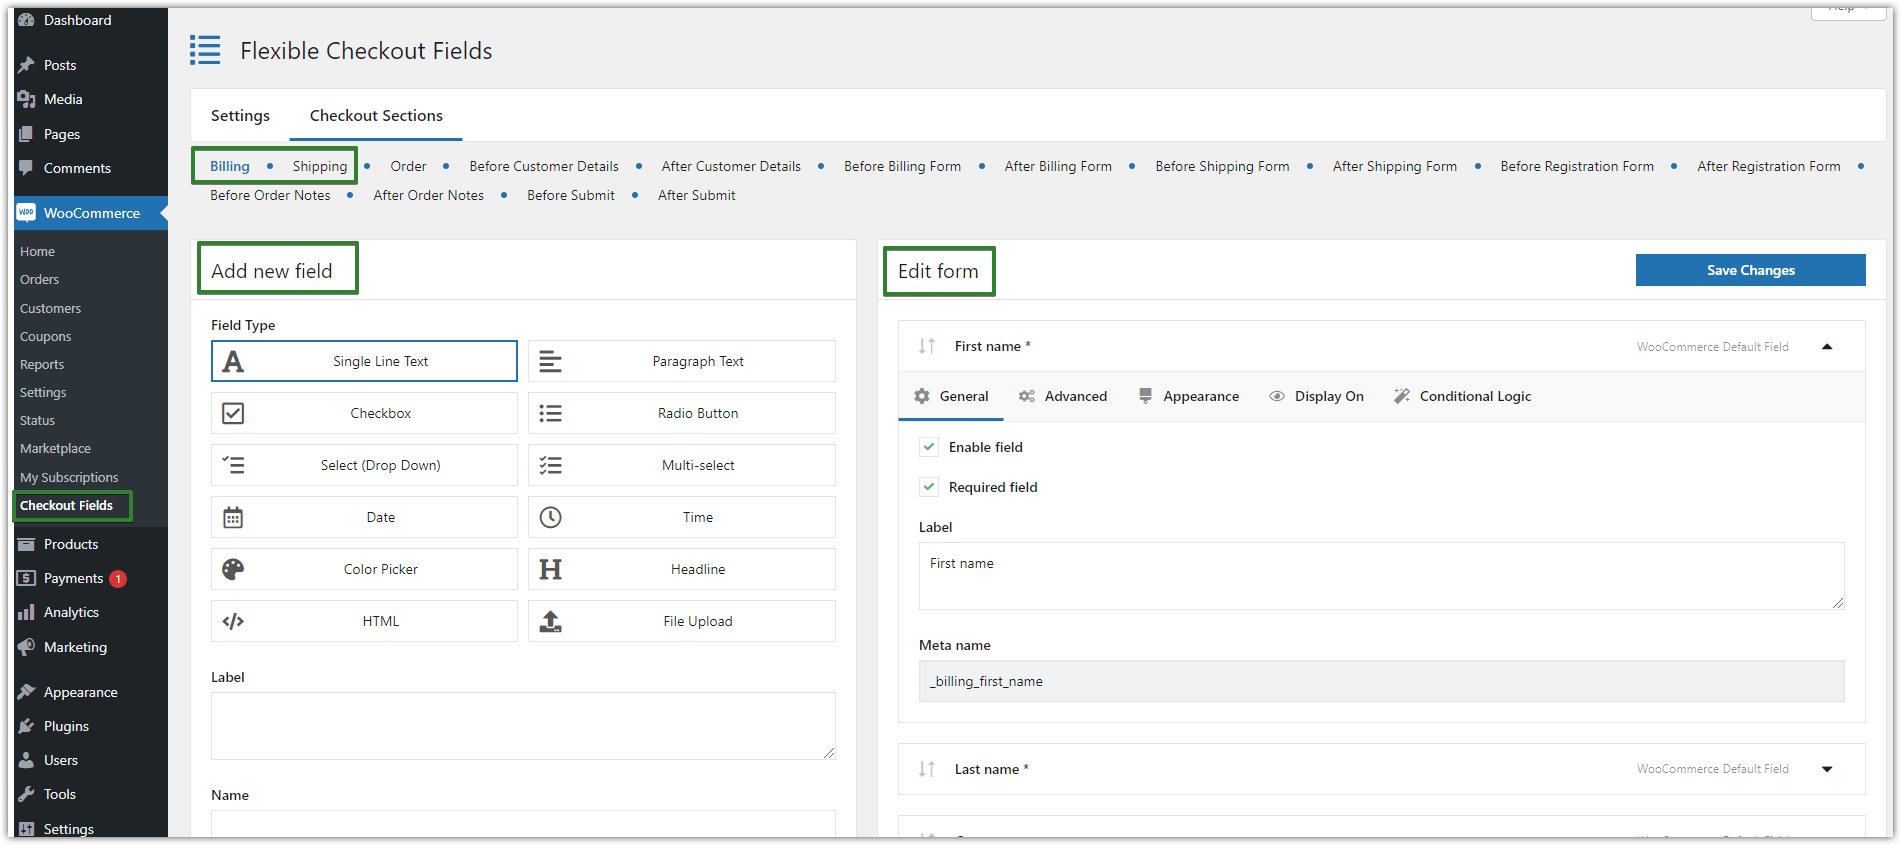
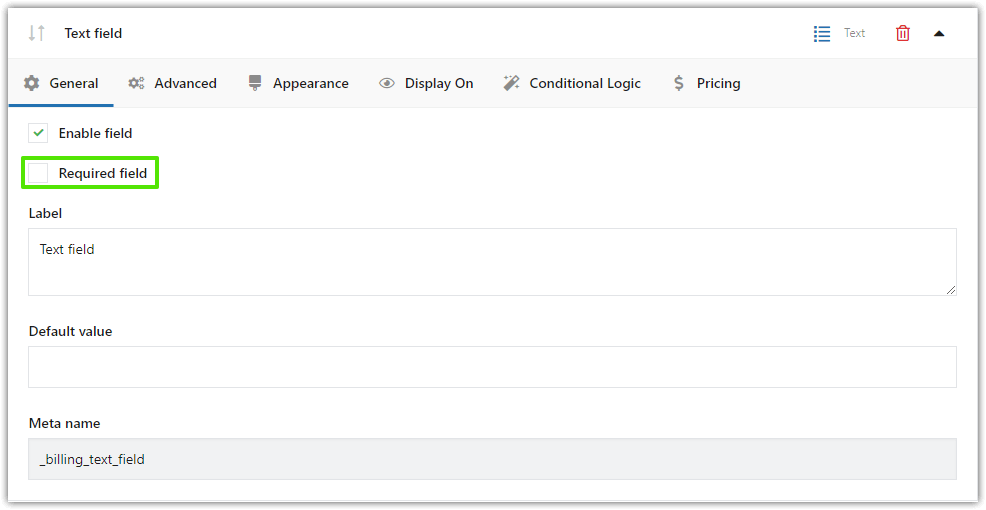
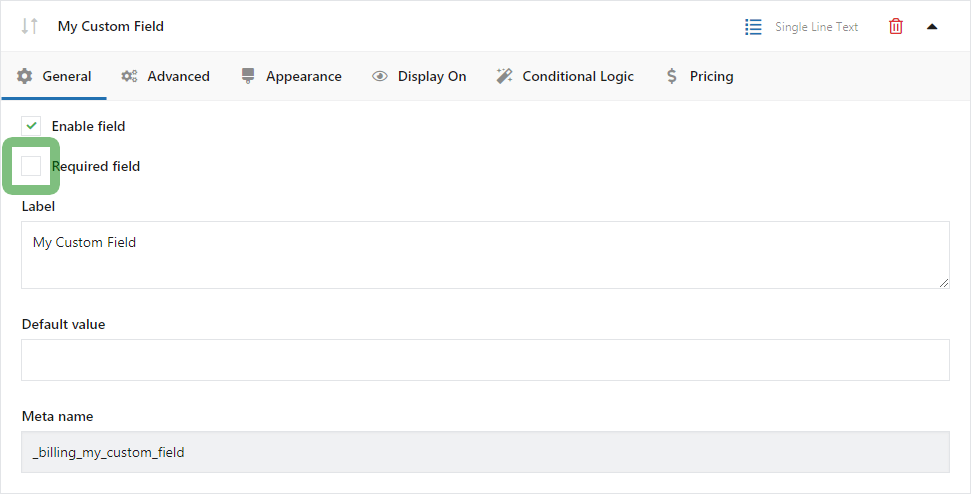
Choose a field and edit its properties. You can rename the field label and save changes.
It is also possible to make a WooCommerce billing field not required, for example, a state or address.
How to Add Custom Checkout Fields in WooCommerce (Free Plugin)
You can also add new fields.
To do that, go to WooCommerce → Checkout Fields. In the Billing section, select Field type, enter a Label, and click the Add Field button:
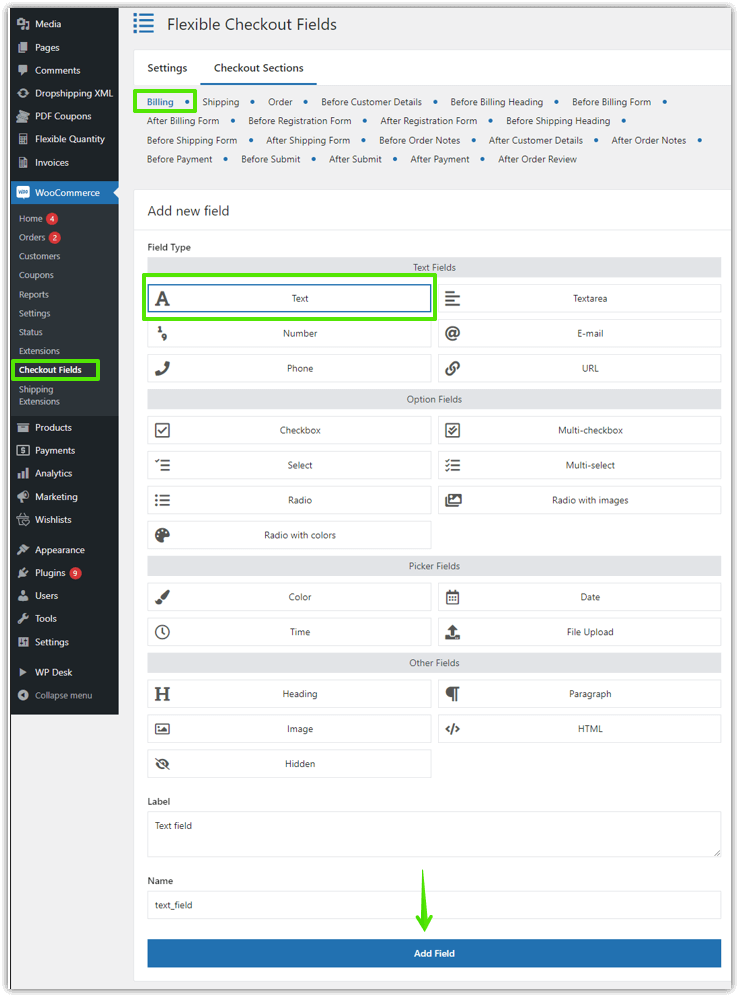
👉🏽 Now you can configure the field you have just added.
You can set the field as required if you want a customer to have to provide some value to the field. It won't be possible to place an order without filling in the field.
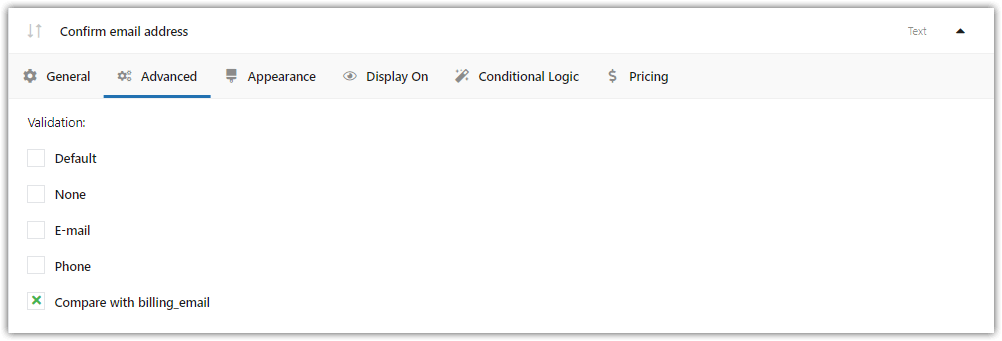
👉🏽 Go to the Advanced tab to select the validation you need. In my case, I have chosen None.
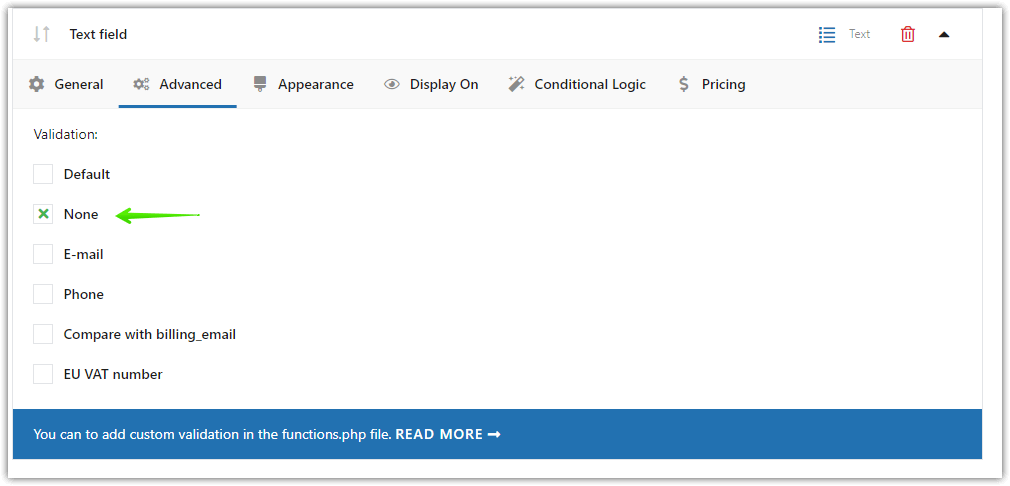
This option lets you validate what a customer provides to the field.
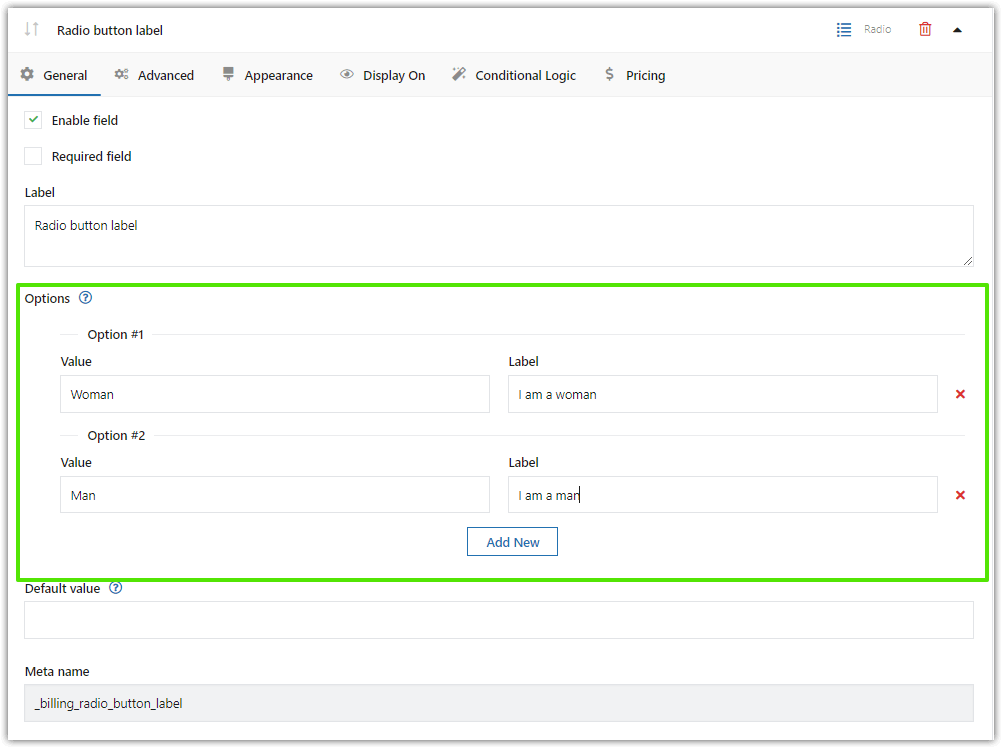
Radio & Select Fields Configuration
These custom fields have an additional setting - Options:
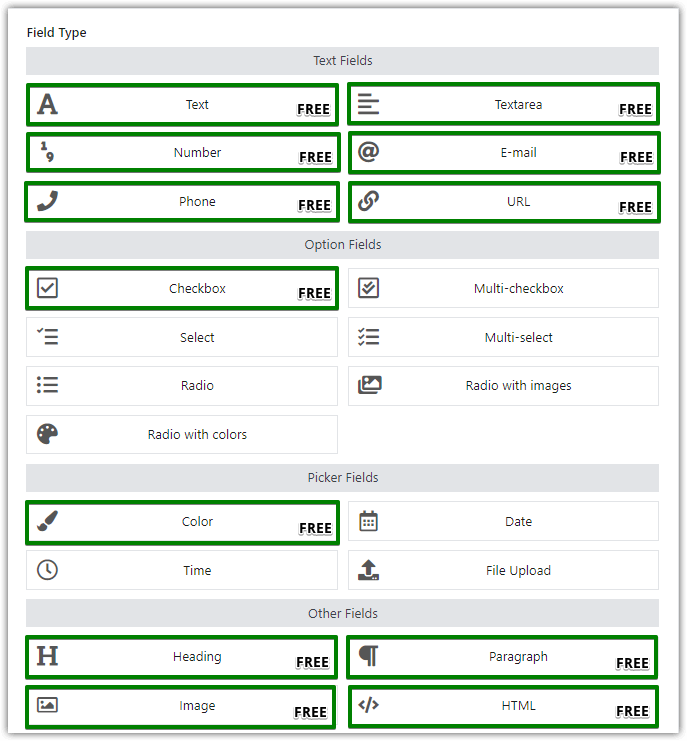
Field types
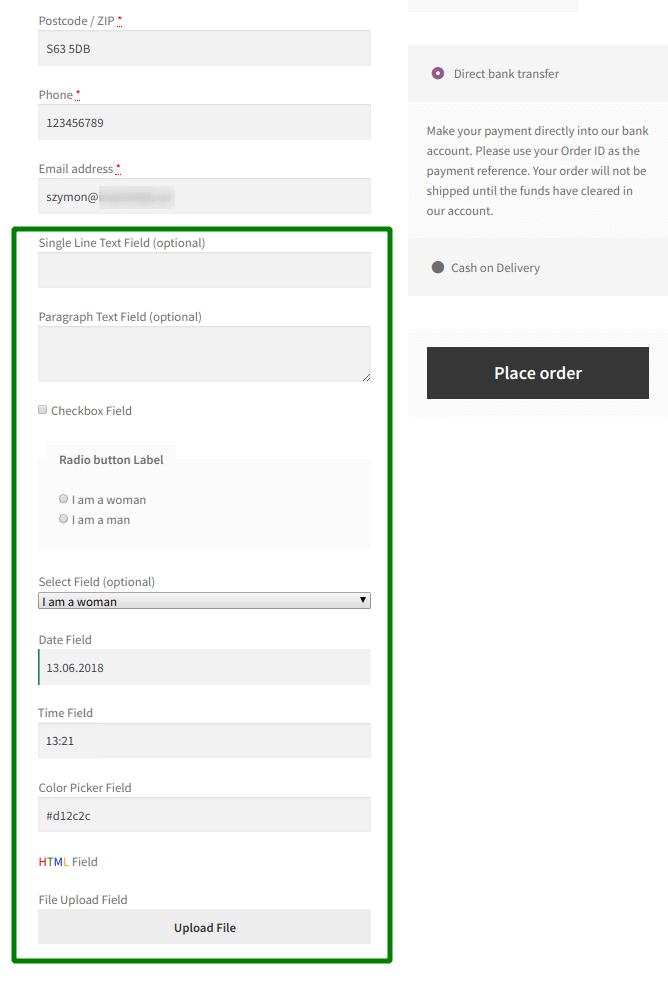
👉🏽 You can place a lot of custom fields of different types in the billing section. These are some examples:
- Text
- Textarea
- Number
- Phone
- URL
- Checkbox
- Color
- Headline
- Paragraph
- Image
- HTML
- Multi-checkbox (PRO)
- Select (PRO)
- Multi-select (PRO)
- Radio (PRO)
- Date (PRO)
- Time (PRO)
- Radio with images (PRO)
- Radio with colors (PRO)
- File Upload (PRO)
- Hidden (PRO)
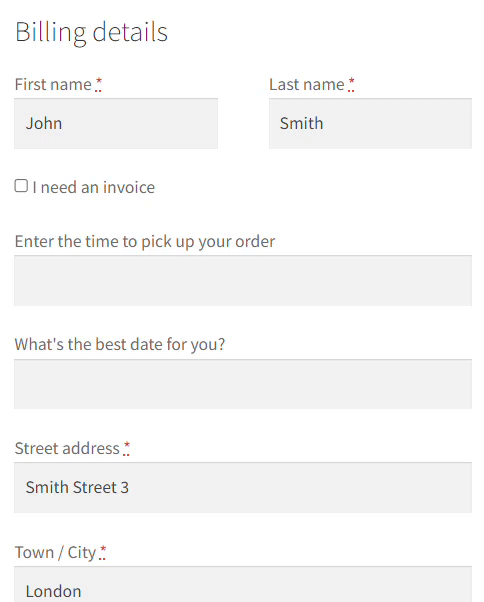
That's what they look like:
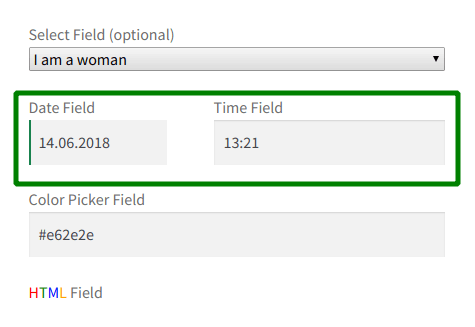
Also, you can place two custom fields in one line:
You can download this plugin for free, if you need more types of custom fields just upgrade to the PRO version.
Flexible Checkout Fields WooCommerce
Edit, add new or hide unnecessary fields from the WooCommerce checkout form. Add pricing to fields and use conditional logic. It's all about conversions and better user experience. NEW: now you can set multiple conditions (OR) under one or more condition groups (AND).
💾 Active Installations: 80,000+ | WordPress Rating:
Advanced Billing Field Settings (Styling, Display Rules, Validation)s
That is just the beginning.
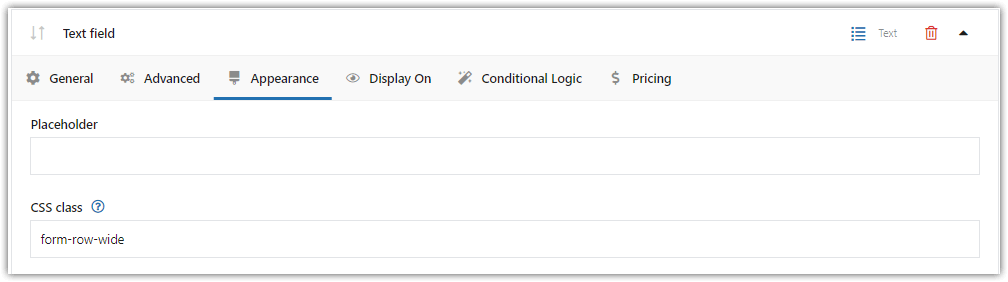
✅ You can style the fields:
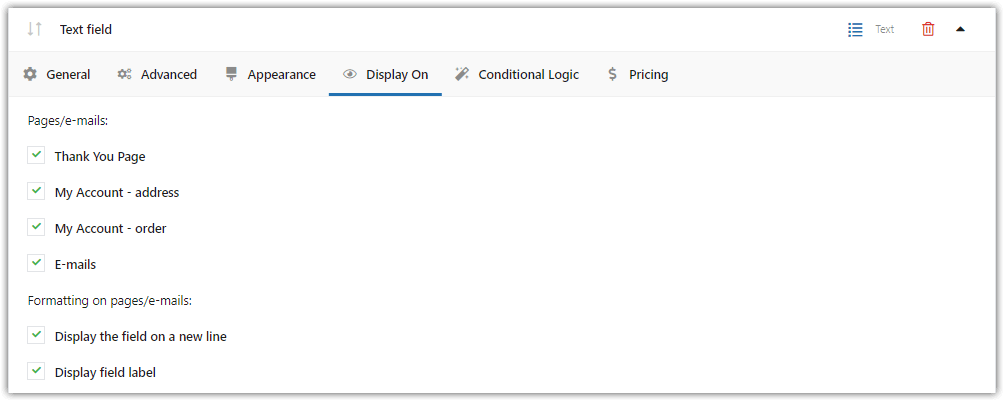
✅ You can also manage where to show the fields with the Display On feature:
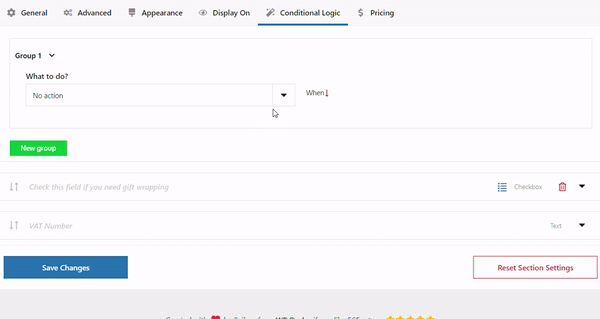
✅ Finally, you may use Conditional Logic to customize your checkout even more (in PRO):
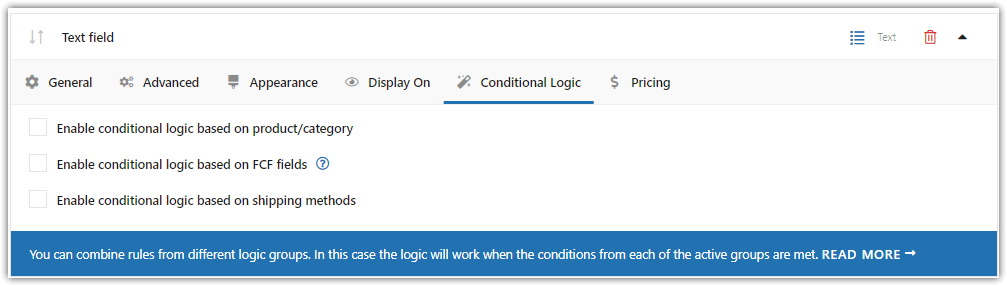
Also, find out a dedicated guide on WooCommerce Checkout Conditional Logic →
How to Remove Billing Fields in WooCommerce (Disable, Hide, Delete)
In the plugin settings, open the Billing section to manage the fields in that part of the checkout form.
1. You can simply disable the field:
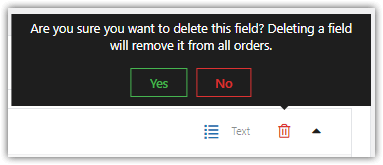
2. You can remove the new WooCommerce checkout fields, you've added to the Billing section, with the trash icon:
3. Finally, you may also hide the field based on some conditions (with Conditional Logic in the PRO version of the plugin):
How to Make WooCommerce Checkout Fields Required or Optional
Flexible Checkout Fields allows easy management of fields that customers must fill out before completing their purchase.
Conversely, optional fields can be used to get additional information or insights without overwhelming customers, thus reducing cart abandonment rates.
The right balance between required and optional fields can optimize the checkout process leading to higher conversions.
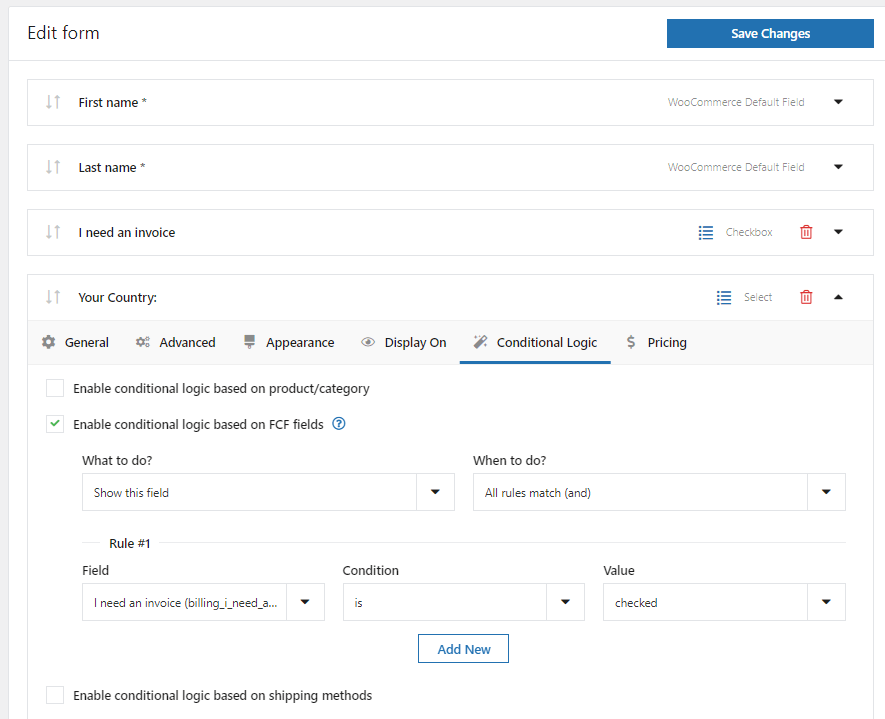
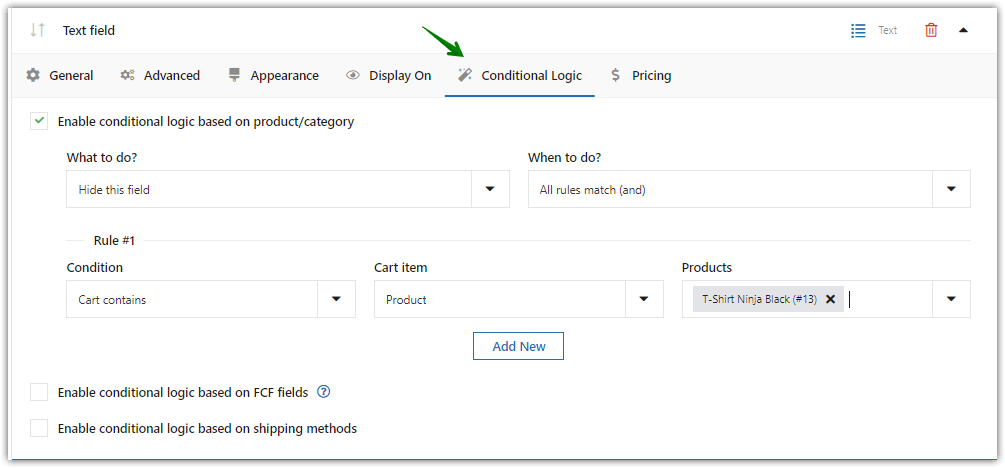
WooCommerce Conditional Checkout Fields (Show/Hide with Rules)
Conditional logic in the plugin allows customization of the checkout form fields based on specific criteria.
For example, certain fields can be shown or hidden depending on the selections made by the customer, enhancing the user experience.
Examples:
- if a customer selects a specific country, additional VAT/ company fields relevant to European clients can appear
- showing the paid options for certain locations (extra delivery, time picker)
- hiding or displaying checkout fields after a customer ticks a checkbox
- not overwhelming forms with too many fields upfront
The PRO version of the plugin comes with a lot of customization based on conditions:
How to Test & Optimize Your WooCommerce Checkout Form
Testing the checkout process is crucial. The common issues that arise during checkout include slow loading times, broken links, and complicated navigation, which can lead to cart abandonment.
To troubleshoot these problems, it's essential to conduct regular usability tests and gather feedback from real users. Think about the checkout design and if the purchase process is simple.
WooCommerce Checkout Optimization: UX Tips & Best Practices
Let's see best practices for checkout optimization:
Customize your WooCommerce checkout page - use a field editor
- Simplifying fields in the checkout
- Add additional fields using the editor plugin
- Optimize the default checkout with new fields (documentation of the plugin gives you examples)
- Adjust the checkout page design for a better user experience
- Consider adding a label for each field to describe complicated checkout process
- A good checkout field editor provides new options for order details page in the default WooCommerce checkout form
- Customize WooCommerce checkout page with the WooCommerce plugin without compromising site's performance
- Minimize the number of fields required
Customize WooCommerce checkout page - think about users
- New checkout using classic form is possible (no need for checkout block based solution yet)
- Customize your WooCommerce checkout based on customer feedback and real data
- Only add the field to the checkout that is really a must-have
- Using the checkout should be easy, try the WooCommerce checkout manager to adjust the form
- Think about guest checkout
- Provide clear progress indicators to enhance user experience
- Inform customers of their current stage in the checkout process
- Offer discounts in the checkout
- Add multiple payment options that are secure to build trust and encourage users to complete their purchases
Customize the checkout - more customization tips
- The checkout process is one of the things you should concentrate on if conversion rates are low (take a look where you lose customers)
- Sometimes multi-step checkout is a solution, but the default checkout page with fewer fields that need less time can help
- Skip the cart page - that's the part of the WooCommerce that you don't really need
- Choose WooCommerce extensions (including a WooCommerce checkout field manager) that are reliable and fast
- Optimize the checkout for mobile devices (smartphones)
- Cache the page to boost the overall user experience and the site's speed
- Monitor analytics and conversion rates for further improvement
Core fields, custom checkout field, placeholder, and SEO
Adding labels and placeholders to the default fields and custom ones can guide users during filling out the form. That allows reducing errors and improving conversion rates.
Additionally, describing these fields helps enhance visibility in search engines, potentially leading to improved rankings and increased traffic.
Mobile Responsiveness in WooCommerce Checkout Page Design
Optimizing the layout and functionality for smaller screens can reduce cart abandonment rates and enhance customer satisfaction on smartphones and tablets.
Add custom checkout fields or remove checkout fields - User Experience Tips
Adding custom fields can gather the information needed for the store.
On the other hand, hiding non-essential ones can ensure that the checkout process remains quick and intuitive for users.
- Minimize Steps: Reduce the number of fields required to complete a purchase. Aim for a single-page checkout with as few fields as possible. Users should be able to enter all necessary information without navigating through the page too much.
- Guest Checkout Option: Allow users to check out as guests without requiring account creation. This can significantly reduce friction for first-time buyers who may be hesitant to create an account. You can set this in WooCommerce → Settings → Accounts & Privacy.
- Provide Clear and Transparent Information: Display shipping costs and estimated delivery times early in the checkout process. Unexpected costs at the end can lead to cart abandonment.
- Progress Indicators: Use progress indicators to show users how far along they are in the checkout process. That is useful for multi-step checkout as it gives clear indication about how much longer the purchase will take.
- Autofill and Mobile Payment Options: Implement autofill features for address and payment information, and offer mobile payment options like Apple Pay or Google Pay to streamline the process for users on mobile devices.
By focusing on these areas, you can create a more user-friendly checkout experience.
Customizing the WooCommerce checkout page by removing, adding, or rearranging the fields can help in getting additional conversions and reducing cart abandonment.
Summary: Customize WooCommerce Checkout Fields Easily (Free Plugin)
You have already learned how to edit, add, and remove fields in your WooCommerce checkout page.
With the Flexible Checkout Fields free editor for WooCommerce, you can also add custom checkout fields.
If you have any questions, feel free to reach out — we always appreciate your feedback.


Leave a Reply