In this guide, you will learn how to validate WooCommerce checkout fields with the Flexible Checkout Fields plugin and create your own custom validation rules for core WooCommerce or custom fields.
Built-in Validation Rules
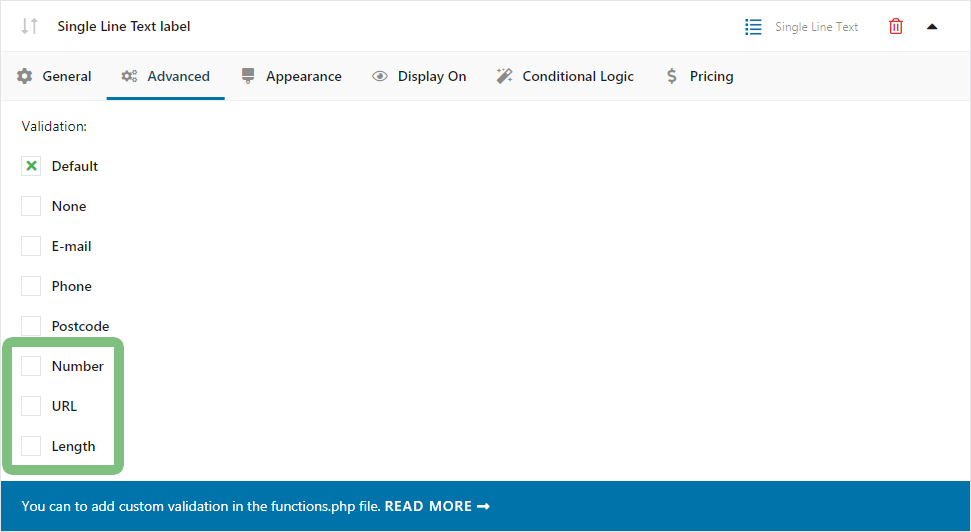
Validation rules available in Flexible Checkout Fields:
- Default - default validation, if WooCommerce sets a validation for the core field it will be used, if there is no validation by WooCommerce, no validation checks will be made.
- None - disable validation.
- Email - email validation.
- Phone - phone validation.
- Postcode - postcode validation, works only when the country field is enabled and uses country-specific validation rules.
For email, phone, and postcode validation Flexible Checkout Fields utilizes the core WooCommerce functions. If they are not enough for your needs, you can create your own custom validation rules for every field.
Custom Validation Rules
If you are familiar with hooks you will find this Flexible Checkout Fields feature great. We developed the ability to create your own custom validation rules for the checkout fields.
How does it work?
- Create your custom validation method (using the examples below). In this example, we'll use the URL method.
- Add a validation function to your functions.php file.
- Select any field and the Advanced tab. Besides the built-in validation rules, you will also see your own rules: Number, URL, and Length.

- Add a Website field and choose the URL validation method.
- Go to WooCommerce checkout, enter an invalid URL in the field and place the order.
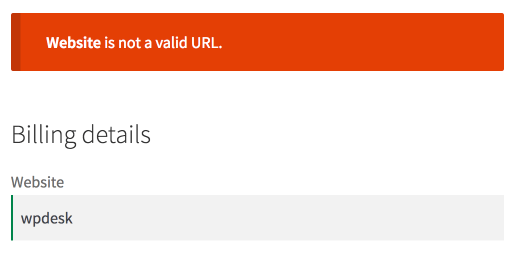
- You will get a validation error. You will not be able to place an order until you enter a valid URL:

How to Create Custom Validation Rules?
To create custom validation methods use the filter: flexible_checkout_fields_custom_validation.
To explain how to validate WooCommerce checkout fields with custom validation rules we'll use the URL example that you'll find below.
Step 1 - Create a function to validate the URL
First of all, we will need a function to validate the URL and display the validation error. It will be called wpdesk_fcf_validate_url.
To validate the entered value, we'll use the PHP FILTER_VALIDATE_URL.
Then if the URL is not valid we will use the core WooCommerce function wc_add_notice to display the validation error: [Field label] is not a valid URL.
Step 2 - Use the filter to add a new validation method to Flexible Checkout Fields
We'll use the flexible_checkout_fields_custom_validation filter to add a new validation method to Flexible Checkout Fields. It will be a function wpdesk_fcf_custom_validation_url.
In this function we create a meta name for the custom validation: $custom_validation['url'] - it is very important to keep this unique if you add multiple validation methods.
Next, we create a name visible in the settings: 'label' => 'URL'.
Finally, we add a callback to the previously created validation function: 'callback' => 'wpdesk_fcf_validate_url'. It is a very important part and the function name has to be exactly the same as we created in step 1.
Step 3 - Go to Flexible Checkout Fields settings and select the newly created validation method.
You will find the full code for URL validation below.
Ready to use Custom Validation Examples
Below we prepared some examples to get you started.
Built-in Email validation
The plugin allows you to use email field verification in WooCommerce.
Confirm the email address field
You can add a field for email address confirmation. It will compare the field value with another field (in this case email field).
If the field should be compared with another field, just change this code:
$fcf_validation_confirm_field = new WPDesk_FCF_Validation_Confirm_Field( 'billing_email' );
Change billing_email to your field, ie. billing_my_custom_field.
You can also customize the error notice, by changing the following code:
wc_add_notice( sprintf( __( 'Invalid %1$s value.', 'wpdesk' )
Change 'Invalid %1$s value.' to your custom message.
Number Validation
To validate if the customer entered a valid number, use the following code:
Website (URL) Validation
To check if the customer entered a valid website URL, use the following code:
Minimum/Maximum Character Limit Validation
The following example lets you check if the text entered by the customer is between 3 and 20 characters. If not he will see a validation error and will have to enter a valid character limit.
This example is a little bit more complicated and you can edit the minimum and maximum character limit:
- Minimum character limit, change the
$min_lengthfrom3to a desired value, i.e.7. - Maximum character limit, change the
$max_lengthfrom20to a desired value, i.e.11.
EU VAT number validation
You can use the following code to check if the EU VAT number is valid.
Read how to add the EU VAT number field and its validation in WooCommerce.
House / flat number validation
The following code checks if the user has entered at least one number in the field. This validation is useful e.g. for the Street field (billing_address_1 in the code) where the user also enters the house / flat number.
The error message is editable.
Enter the house / flat number with at least one digit.
