Dropshipping Import Products for WooCommerce is the plugin to import and update WooCommerce products. You may use the table of contents to find the documentation about specific plugin options and answers to frequent questions.
Contents
- Before you start to import products into WooCommerce
- Plugin settings
- Import manager
- Import process
- Import Log
- Advanced options
- Roadmap
- Free vs. PRO Feature Comparison
- WooCommerce import troubleshooting
- How to import products from a CSV or XML file?
- How to import WooCommerce products from Shopify or Etsy?
- Is it possible to import WooCommerce products with custom meta fields?
- How to import products with images?
- What about categories?
- How to synchronize the data?
- Is it possible to import products using FTP?
- How to handle errors with product import in WooCommerce?
- How to choose the appropriate product data columns?
- Where to find the file path for product import into WooCommerce?
- How to delete products with the importer?
- How to import WooCommerce products as drafts?
- Is it possible to import and sync WooCommerce products?
- More questions about WooCommerce product import?
Before you start to import products into WooCommerce
- The plugin requires at least a 128 MB memory limit. Find out how to increase memory limit in PHP configuration.
- The cURL library must be enabled on your server.
- wp-cron.php must be active and cron tasks must be processed automatically. Read more about setting cron.
- Server with PHP 7.4 and large memory for the script, at least 256MB.
- Server with no time limit for max_execution_time scripts.
- Server without the http server-side script execution time limit parameter (apache, nginx).
- Enable the allow_url_fopen option and the fileinfo extension for PHP.
- Server with large transfer and SSD.
- Server with HTTP/2 support.
- The libxml library at least version 2.10.0.
Plugin settings
Visit the plugin settings page by clicking the plugin submenu in your WordPress admin panel: Dropshipping XML → Settings.

Products in one batch - the plugin is splitting products from an XML/CSV file into parts. Each part is imported individually one by one to maintain efficiency. The default number of products in one part is 30. You can change this value to a lower number if you are experiencing problems with stability during the import process. If your server is strong and efficient, you can try to make this value higher to increase the speed of the import process.
Import manager
To visit the list of imported files, go to the menu: Dropshipping XML → Import Manager.
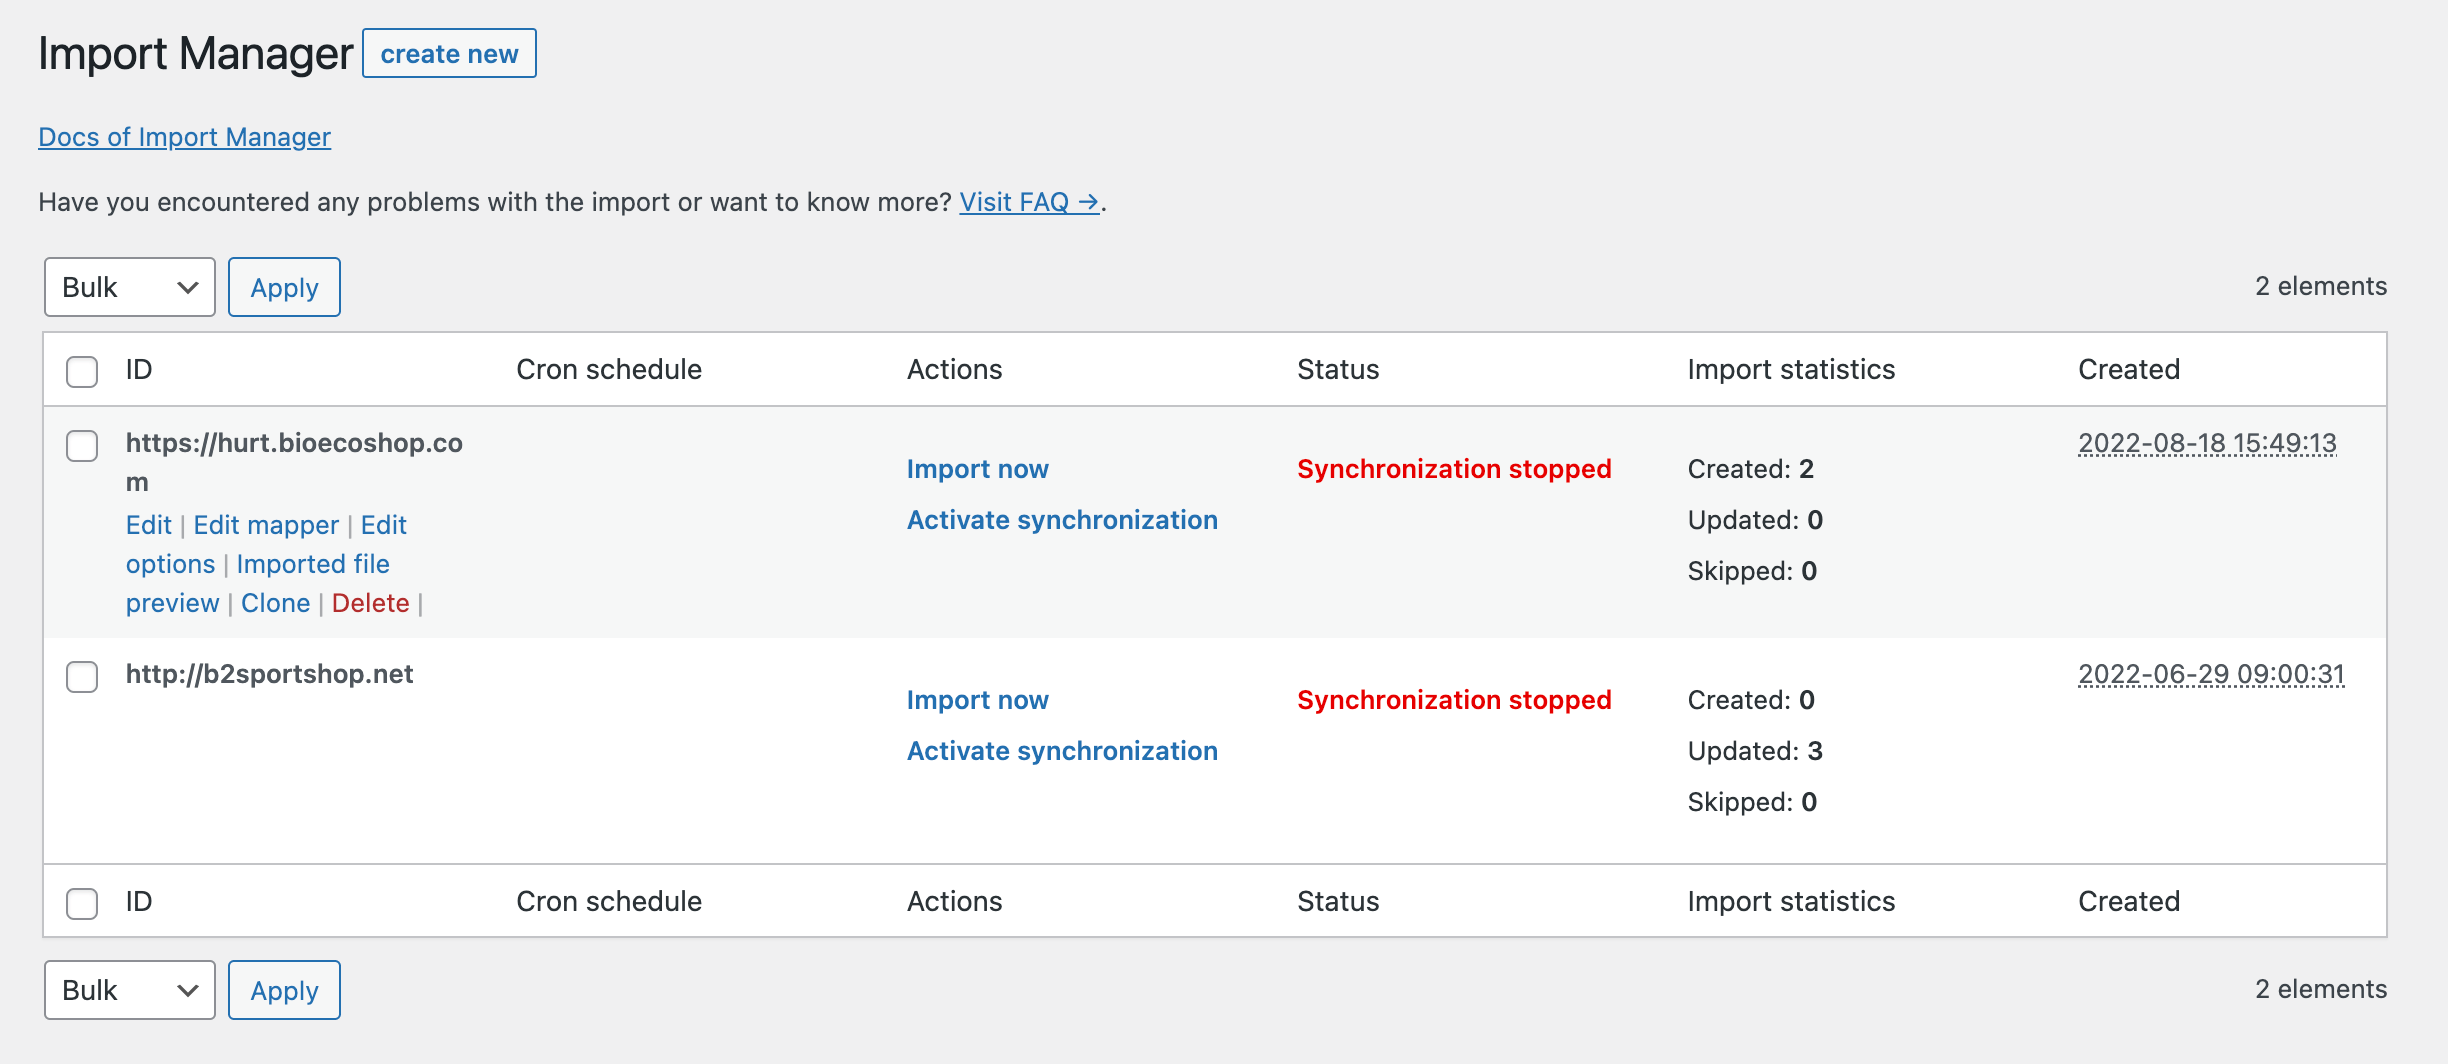
On this screen, you will see a list of all files that are being imported to your shop.
You can also make a copy of the import here.
Import clone - to create a clone of your import choose the one from the list and click Clone.
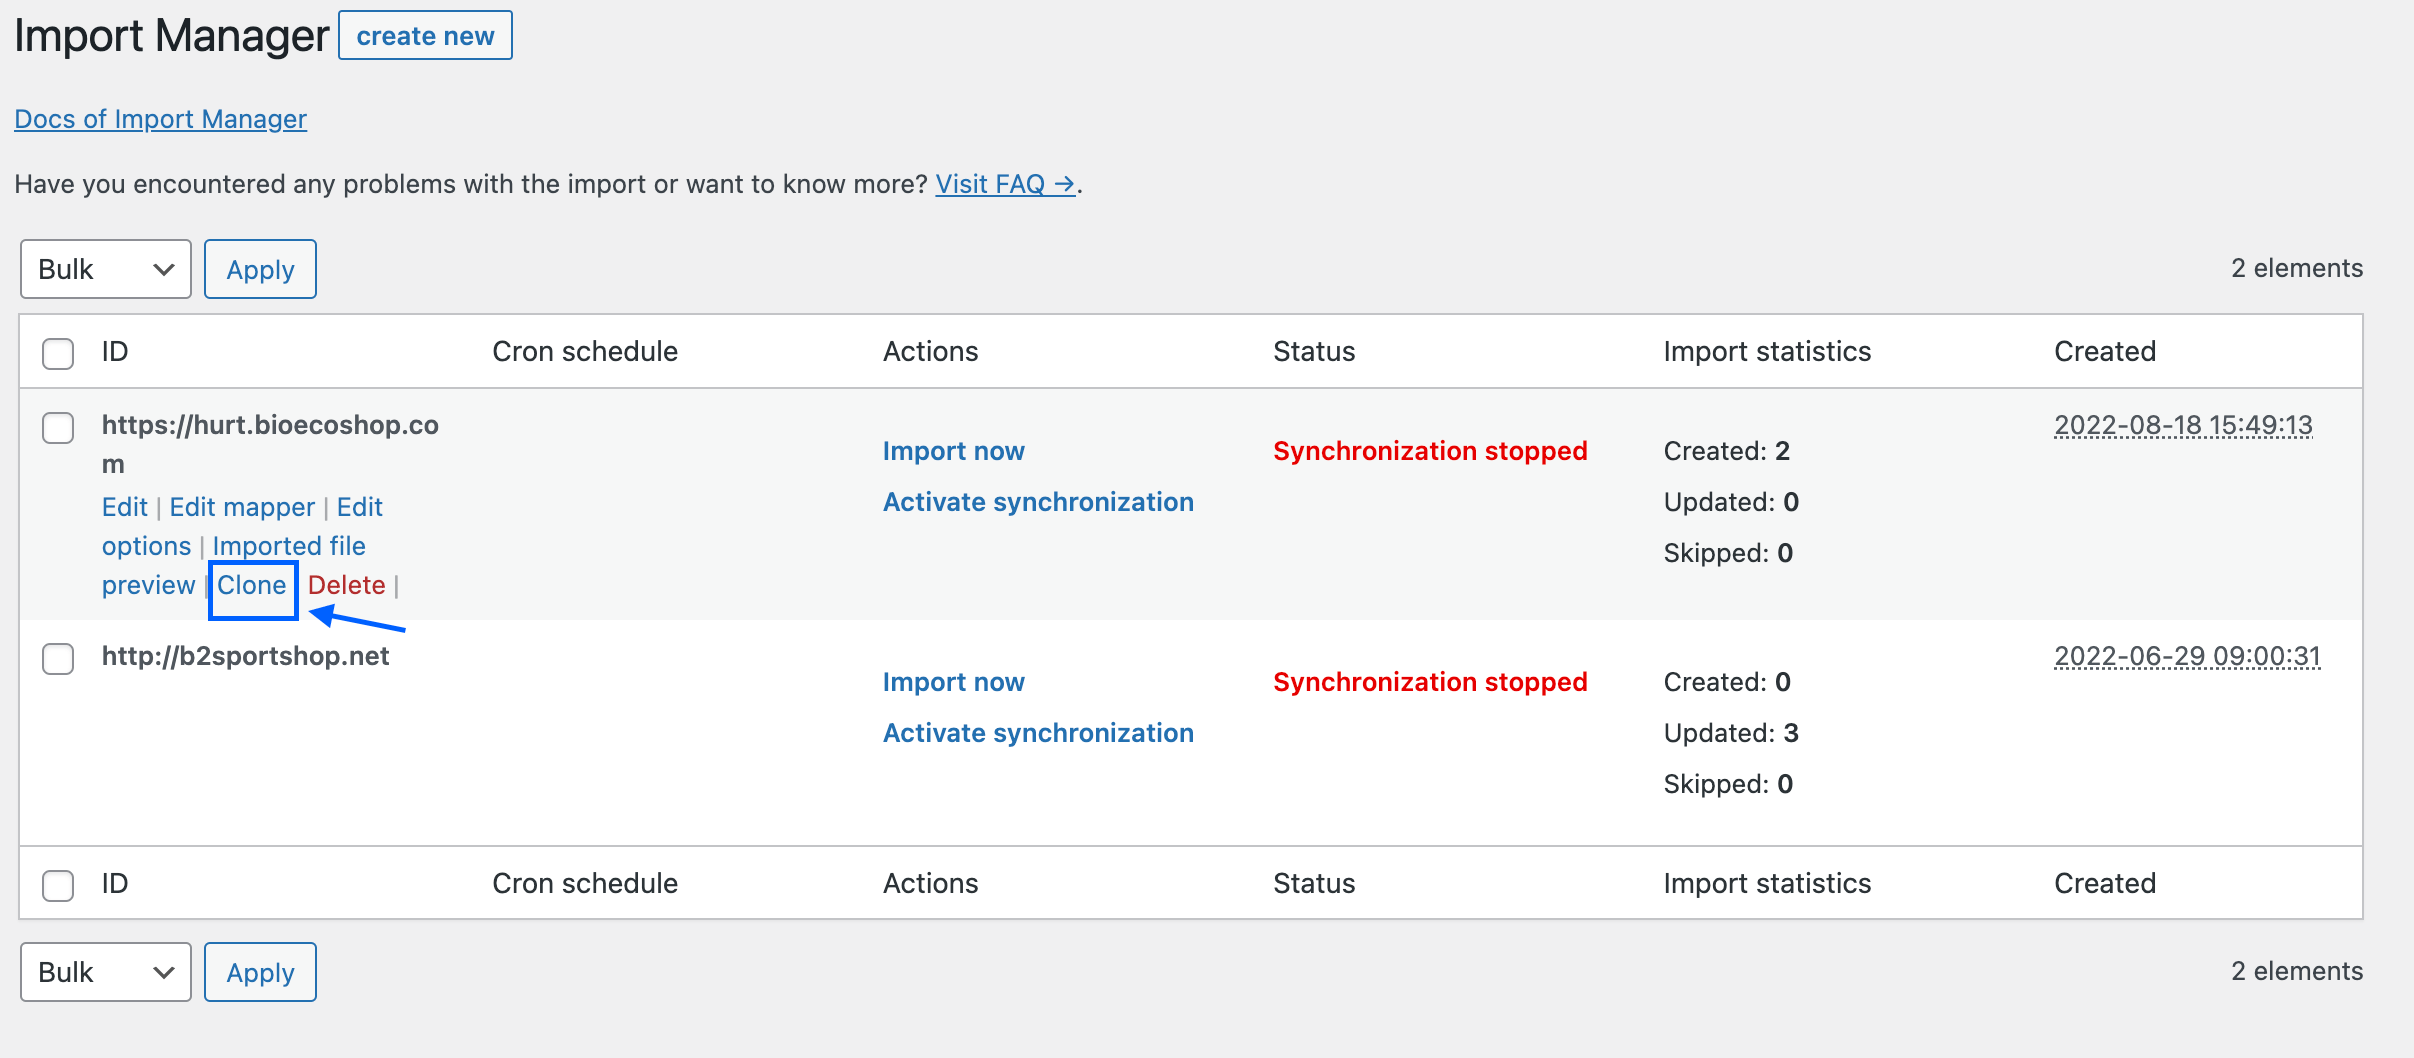
Columns description:
ID - URL of the imported file. When you hover the link, options will appear: mapper settings, synchronization options, schedule, last import log preview, file preview, and delete file.
PRO Cron schedule: Days and hours selected as a cron task schedule for the process to run automatically.
Actions:
Import now - run the import process manually. After manually running the task, you will have a preview of the Import Log which will show the products created, updated, and skipped during the import.
Stop synchronization - a link that allows you to pause the import, especially useful when initially mapping the import file. Pause import causes the file will not be automatically synchronized at the indicated times.
Activate synchronization - use this option to activate automatic synchronization of the file in the indicated periods. Link is available when automatic synchronization is disabled.
Status:
Synchronization active - the file is ready for import and will be automatically synchronized at the periods indicated in the Cron schedule settings.
Synchronization stopped - the import is paused and will not be performed automatically. You can resume it at any time. When synchronization is paused, you can still run the synchronization manually.
Synchronization in progress - the import process is running. At this point, synchronization is taking place.
Import statistics: Information about the number of products created, updated, and skipped during the import process. The import statistics show the current status of the import, when the import is completed the data is reset.
Created: Date and time when the file was initially added to the list.
Bulk - Use this option for bulk removing files from the list. Simply select the files from the list and use this option to remove them.
Import process
Go to Dropshipping XML → Import. In four steps, you can set all parameters of the import and synchronization processes that will be run recurrently in the scheduled days and hours.
Step 1 File import
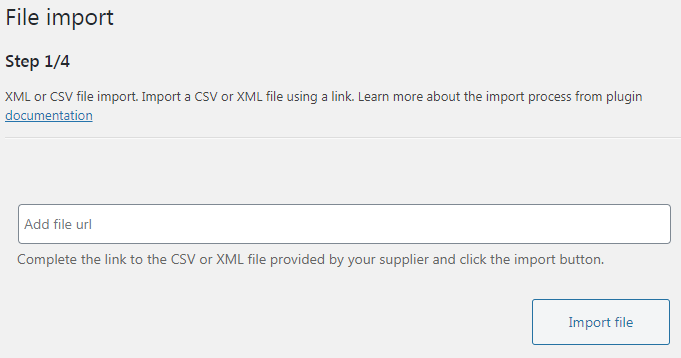
Fill in the URL address to CSV / XML file containing information about products you are about to import to your shop. Paste the URL address and click the Import file button.
After clicking the button, the file will be downloaded and you will see a notice saying that the file has been downloaded correctly. Please move to the next step by clicking the Go to the next step button.
Step 2 File preview
CSV
If you are using CSV file format, it will be previewed on the screen in a table containing all information about the products. Please make sure that all parameters and values are presented correctly. You can toggle between the products using the arrows on the left and right.
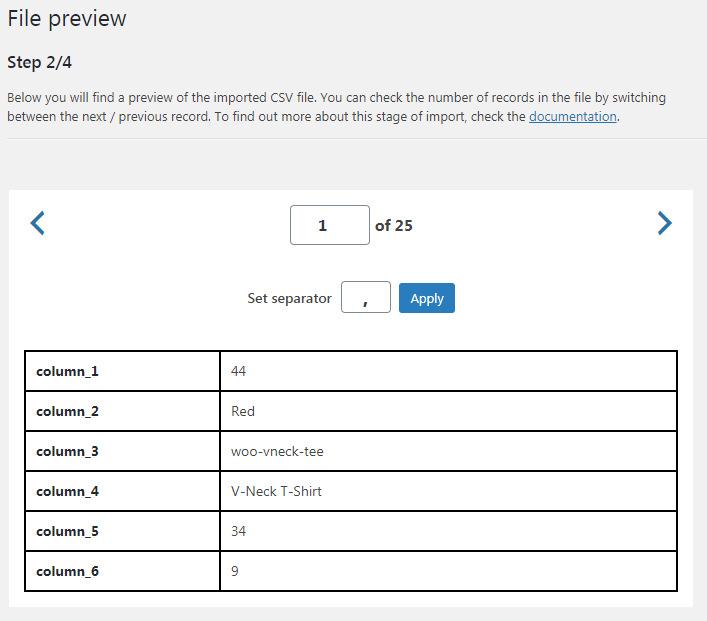
The file will automatically detect a separator used in the CSV file. If the CSV file preview is not shown correctly, enter a valid separator in the Set separator field and click the Apply button.
XML
After downloading the XML file, you can manually choose from the XML tree an element that contains all information about the product.
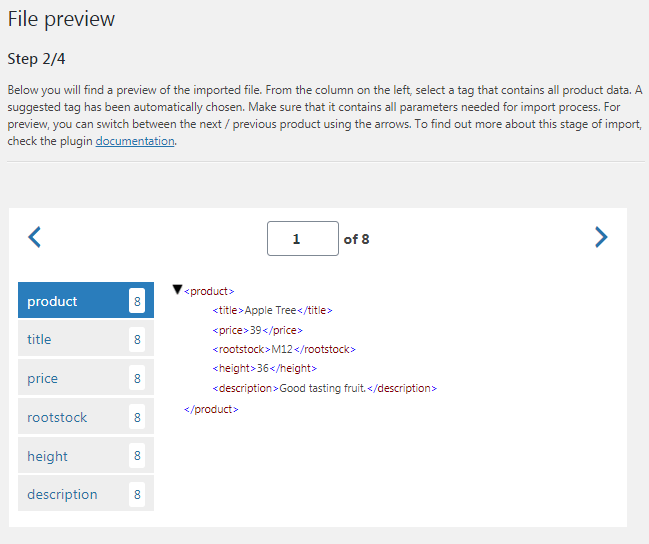
The plugin will automatically choose the suggested element. Please make sure that it contains all the parameters needed for the import process. For a preview, you can switch between the next/ previous product using the arrows on the left and right. You can also manually enter the number of the position that you want to preview.
How to find out that the chosen element is the right one?
- after selecting an element, you should see all the parameters in the preview: title, price, stock quantity, description, and so on,
- the number of appearances of the element should be the same as the number of products positions in the file,
- if you are still not sure, download and open your XML file and manually look for the repeating pattern
After choosing the right element, please continue by moving to the next step.
Step 3 Product mapper
Before starting the field mapping, you can give the import a name. Enter a specific name in the Import name field to name an import.
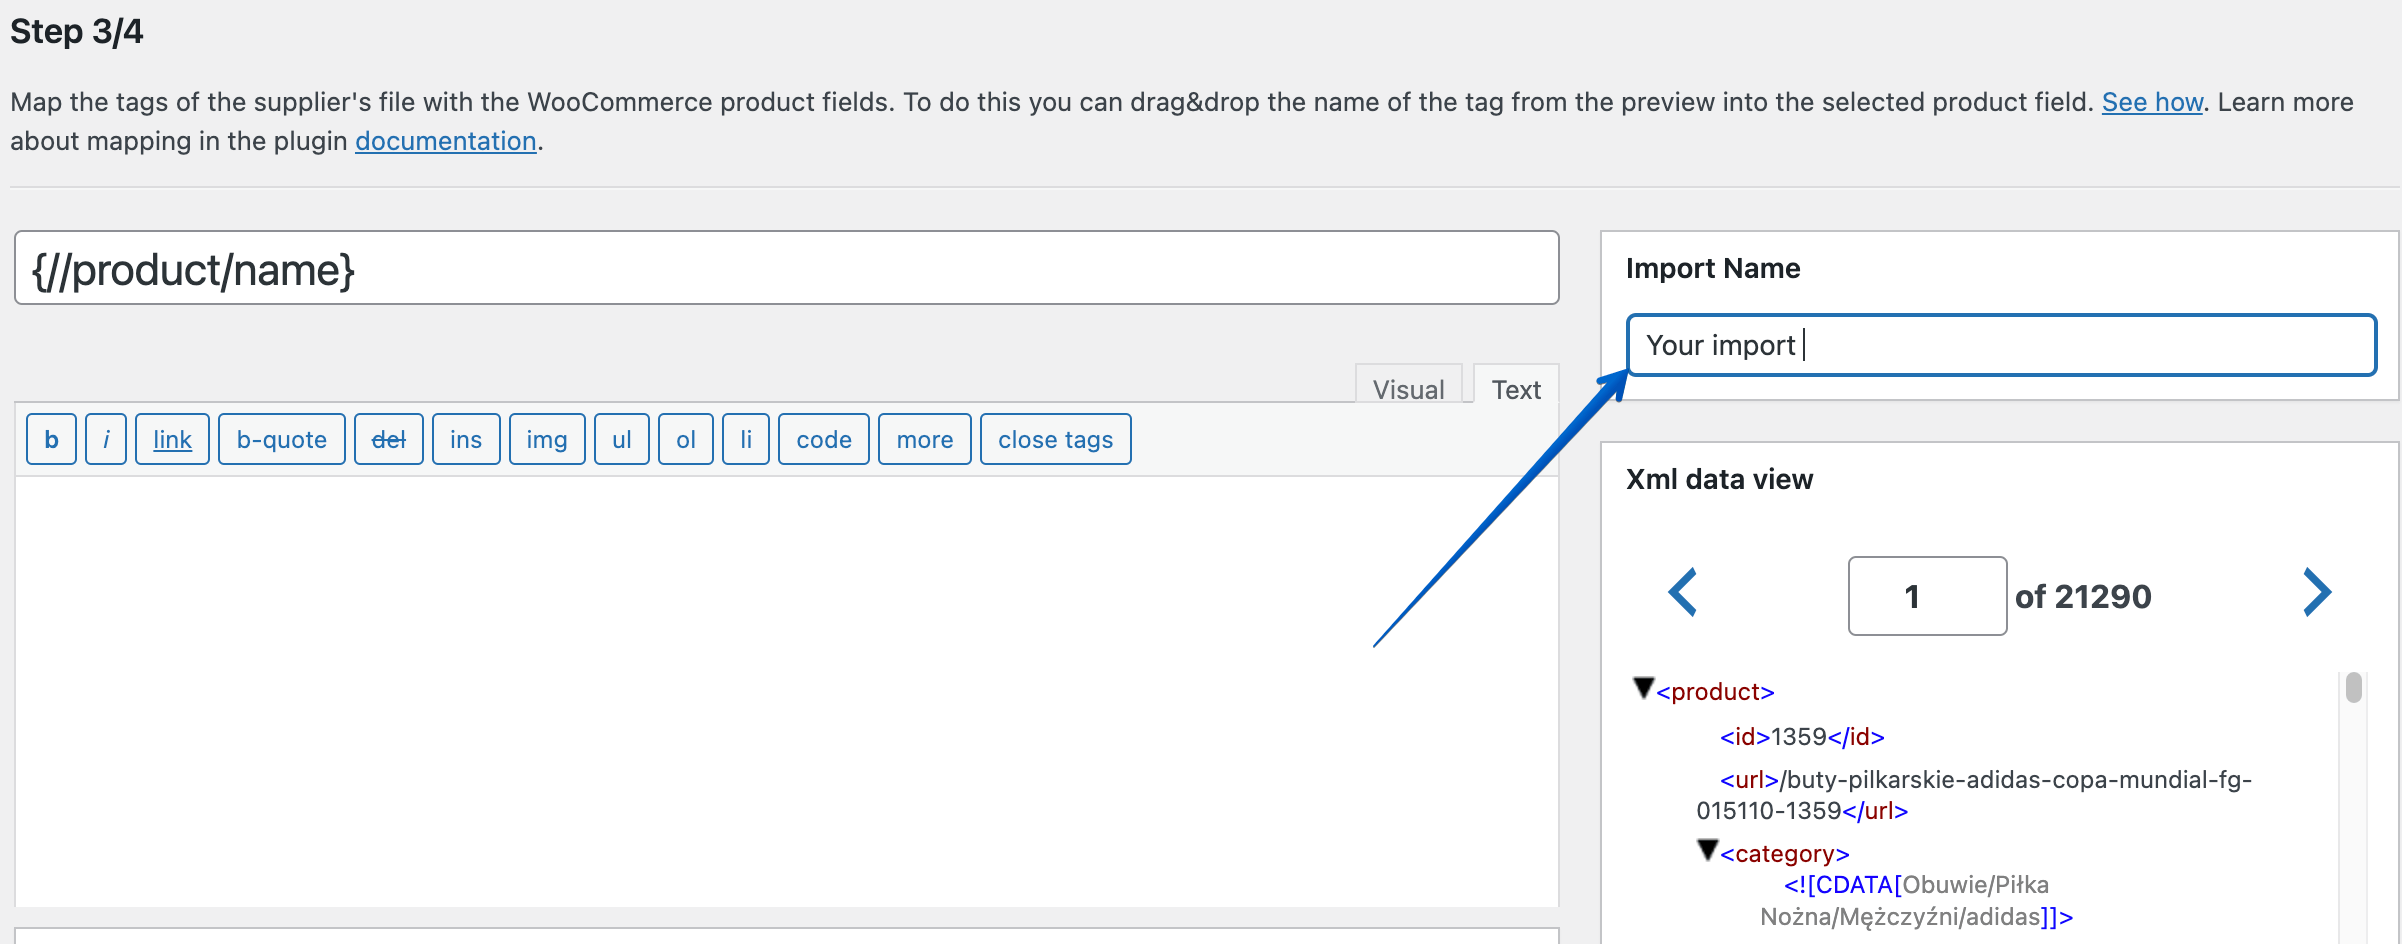
During this step, you will map WooCommerce product fields with values of the parameters used in your XML or CSV file. Use drag and drop interface to insert a specific tag from the file in the WooCommerce product field:
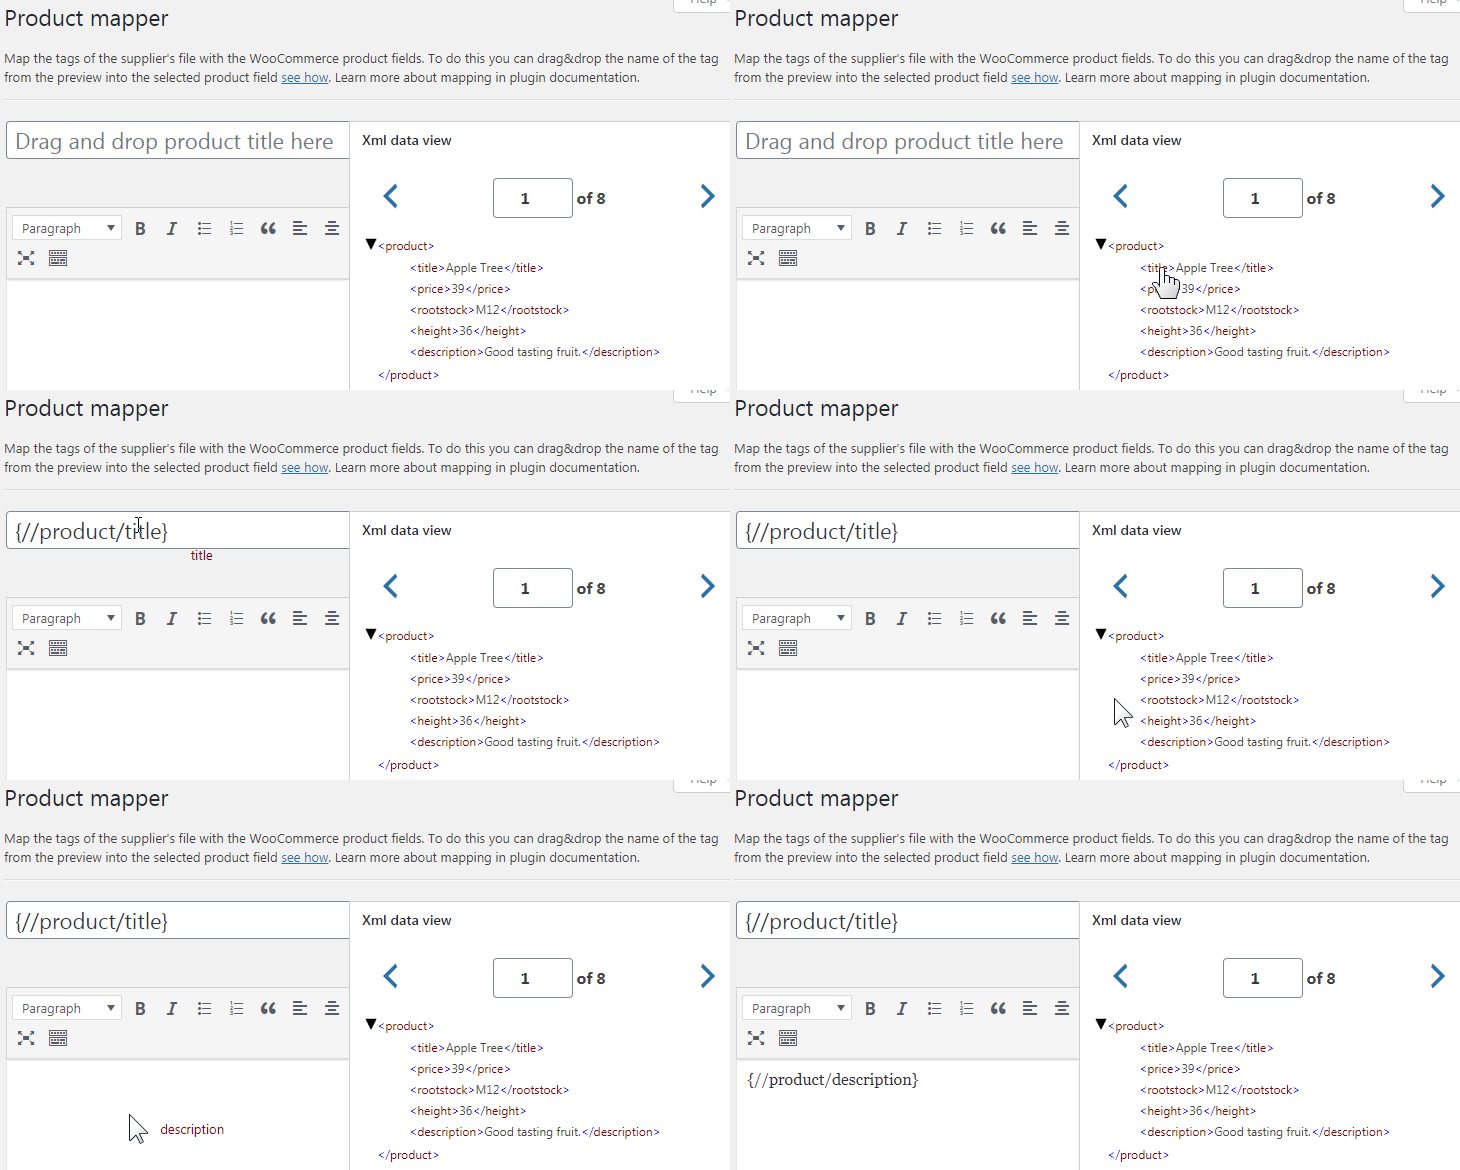
Product title
Here, enter a pattern that will be used to create and identify products in your WooCommerce store. It is best to use the tag corresponding to the product title in the file here. You can also include, for example, attributes in the title. If you want, you can add your own prefix or suffix.
Product description
Fill in the product description. For flexibility, you can use any tag you want. All parameters that you want to put there will be saved in the product description. You can add any text, your own decorations, and annotations.
Product data parameters
This screen looks similar to standard WooCommerce product settings:
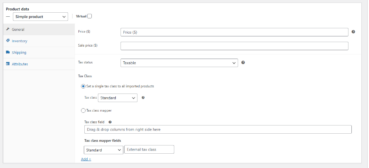
Product type
Select whether the imported products are to be created as:
- Simple product
- Variable product
- PRO External/ Affiliate products
Check the Virtual checkbox if you want the product to be created as virtual. In this case, the shipping settings will be hidden.
General
Price - drag the price tag from the metabox on the right to the price field. The price will be loaded from the product file. You can also enter a fixed value.
PRO You have the option to modify the price in flight by a fixed value or a specific percentage:
- PRO Add percentage value - the price of the product in the store will be increased by the percentage that you enter in the next field. Example: If you want the price in the WooCommerce store to be 20% higher than the price in the file, select this option and enter the number 20 in the Value field.
- PRO Add fixed value - the price of the product in the store will be increased by the fixed value that you enter in the next field. Example: if you want the price in the WooCommerce store to be $10 higher than the price in the file, select this option and enter the number 10 in the Value field.
Tax status – Taxable / Shipping only / None
Tax class – Choose which tax class should be applied
Set one tax class for all imported products - import products to one selected tax class in the store.
Tax class - select from the tax classes available in the store to which products should be assigned during import. Tax classes allow you to assign different tax rates to different product types.
Tax class mapper - This option allows you to map tax rates from a tax class file in your store. Tax class names or identifiers must be defined in the file. If the value is different, the standard rate will be set.
Tax class field - place a tag in this field from the file that corresponds to the name or identifier of the tax. If there are multiple tax fields in the file, and you want each field to be mapped, place comma-separated tags here.
The tax class mapper fields consist of the WooCommerce Tax Class field (left) and the External Tax Class field.
WooCommerce tax classes - select a WooCommerce tax class from the list. If the class you are interested in is missing from the list, add it to the list of WooCommerce tax classes.
External tax class - enter in this field the identifier of the given tax class coming from the file you are importing from, corresponding to WooCommerce tax classes.
Add more classes in the list for all classes that exist in the file. Add them using the Add button. You can delete existing entries using the Delete button.
Inventory
The inventory section allows you to manage stock for the product individually and define whether to allow back orders and more. It enables you to sell products and allow customers to add them to the cart to buy.
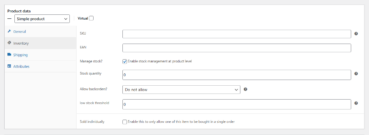
SKU - enter the unique identifier of the product in your store here. It is worth entering the code used in the file by the manufacturer or wholesaler here. This will allow you to use this field for product identification in the next step. The SKU field is not shown to buyers in the store.
EAN - flip the placeholder, which contains the EAN number of the product.
Enter the Stock Quantity, and WooCommerce auto-manages inventory and auto-updates Stock Status as Stock, Out of Stock, or On Backorder.
Select whether to Allow Backorders.
Low stock threshold – Enter a number upon which you are notified.
Tick the Sold Individually box to limit the product to one per order.
Shipping

Weight – Weight of the item.
Dimensions – Length, width, and height for the item.
Shipping Class – Shipping classes are used by certain shipping methods to group similar products.
Attributes
In the Attributes section, you can define the product's attributes. They will be added to the product during import.
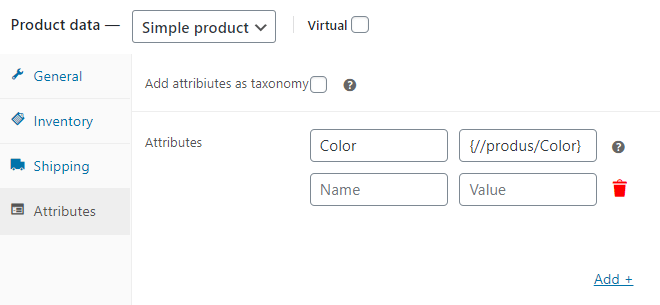
The attributes list is divided into two columns: Name and Value.
Name - enter the name of the attribute. You can enter it manually or use a tag from the file preview.
Value - enter the value of the attribute that will be added to the products. To get the values dynamically from the file, add a tag from your product feed in this field.
Add more attributes using the Add + button. Define each attribute you want to save within a product in your WooCommerce store. Existing items can be deleted using the Delete button.
Attributes in one line - use this field if attributes in the file are contained in a single field. For example: color:red,blue,white.
Attribute separator - specify the character used to separate individual attributes.
Value separator - specify the character used to separate attribute values.
Price modifier
The price modifier allows you to bulk change (increase or decrease) the regular and promotional price of each imported product.

- Click the Add new group button to add a new group containing the price modifier and conditions for conditional logic.
- Click on the group name to expand the group settings.
- Select the modifier type Add fixed value or Add percent value.
- Set the modifier value.
- Select whether the modifier will affect Regular price or Sale price.
- Set conditional logic so that the modifier affects products that meet the set conditions.
In the example below the conditional logic will check if the product name contains the text T-Shirt.- Set the first condition by copying the Xpath of the field e.g. {//node/name}.
- Select the relation between the condition and the value e.g. Contains.
- Enter the value that will be checked e.g. T-Shirt.
- Click the PLUS icon and add another condition (optional).
- Click the Add new group button to add a new group (optional).
- Click the Delete group button to delete the group (optional).
Short product description
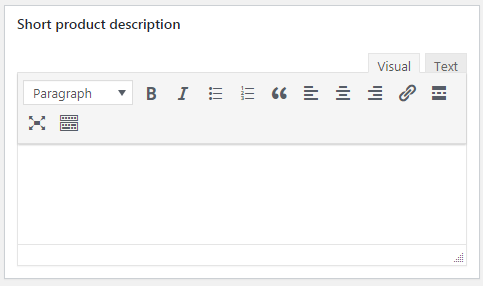
Please fill out a short description of the product if you are using it in your store. You have full flexibility, as in the case of the main description.
GPSR
The Dropshipping XML Import plugin supports importing content into the fields of the free GPSR WooCommerce plugin, which you can find at this link →.
Images
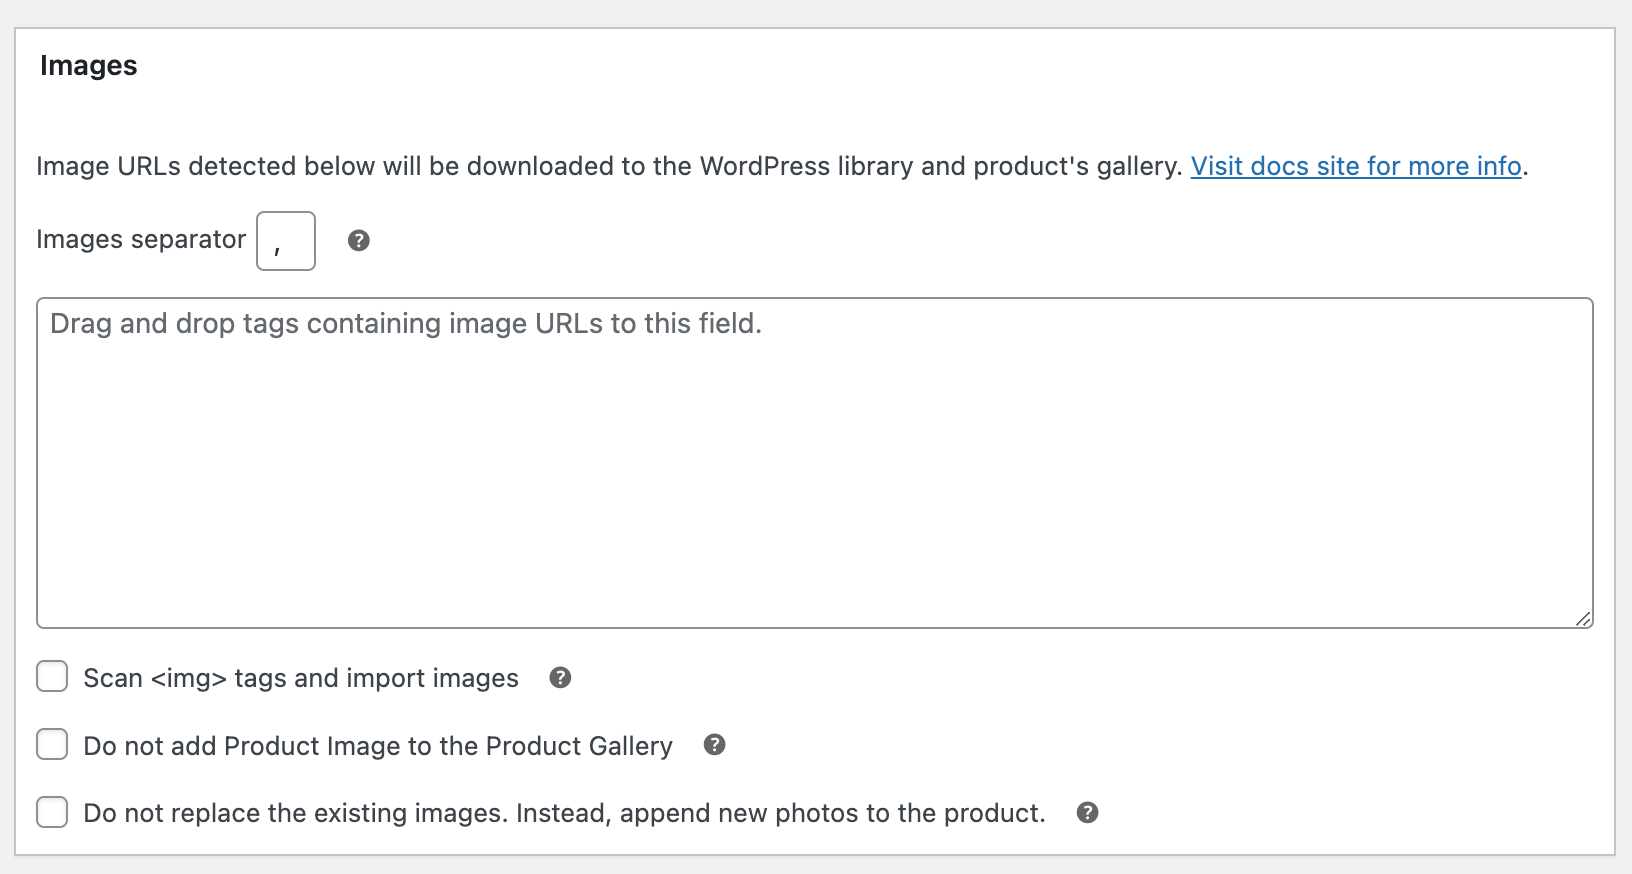
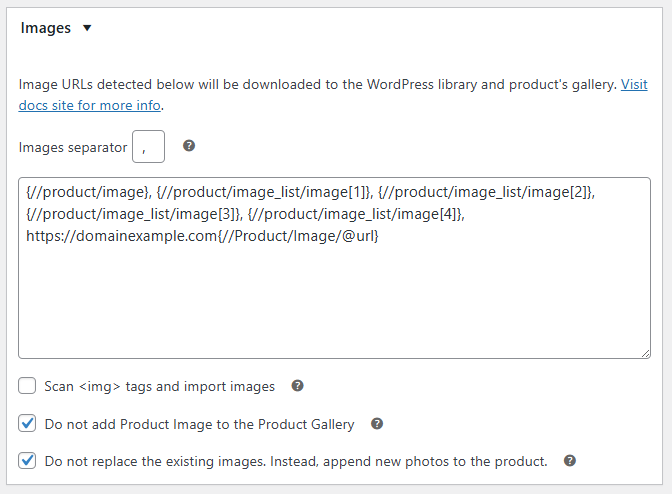
Drag and drop tags containing image URLs to this field. The plugin automatically downloads images to the store from the indicated locations. The images are downloaded to the WordPress Media Library and added to the product gallery. The first image is set as the Product Image.
To correctly map all images related to products, indicate in the mapping field all the elements that lead to them. The following tags must be separated by a set separator character.
Images separator - set a separator that will separate tags in the field from each other.
Scan <img> tags and import images - check this option if the imported file contains images in HTML format. The plugin will automatically download image URLs from HTML tags. If there are paths formulated as <img src = "URL"> inside the given field tags, the plugin will download their URLs.
Do not add Product Image to the Product Gallery - this option will disable adding the first image to the Product Gallery. The first image will only be set as a Product Image and won't be added again to the gallery.
Do not replace the existing images. Instead, append new photos to the product - check this option to add new images without overwriting images from previous imports.
Images hints
The images in the file structure are placed in catalogues.
If in the structure of the XML file, paths to the images leads catalogues/folders direction, as in this example:
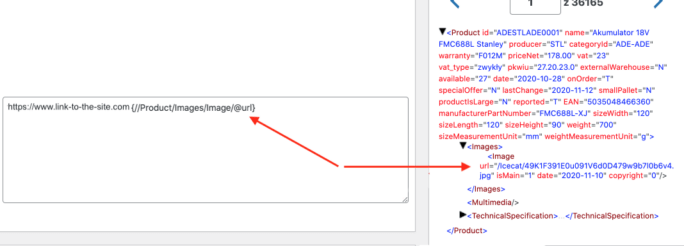
Place a reference to the address of the server where the files are located before the XPath to complete the URL:
{//XPath to the images in XML structure}
Variable Products
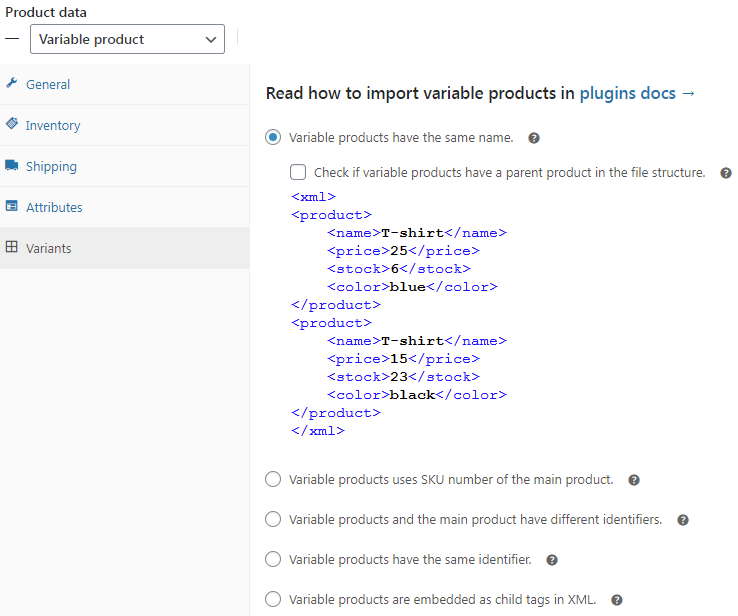
Variable products have the same name - Check this option if variants from the file will be identified by the plugin based on the product name.
Checkbox: Check if variable products have a parent product in the file structure.
This situation occurs when there is a parent product in the XML file.
Variable products have the same SKU number - Check this option if the variant products use the SKU number of the main product. The product SKU number will then be downloaded into the SKU field in the WooCommerce main product settings.
Variable products and main product have different IDs - check this option if the variant products on file use a unique ID.
Variable products have the same identifier - check this option if in the XML file the main product has a "parent" identifier for the identifiers of the variant products. Then point the XPath to both identifiers - the parent product and the variant product.
Checkbox: Check if variable products have a parent product in the file structure.
Variant products are embedded as child tags in the XML file - check this option if in the XML file the main product and individual variants are arranged within one node and are distinguished by their attributes.
After selecting this option, the input field will be expanded. Place an XPath tag in it that points to the path to the first product variant:

After selecting the tag, the fields with which you can configure the creation of individual product variants will be presented:
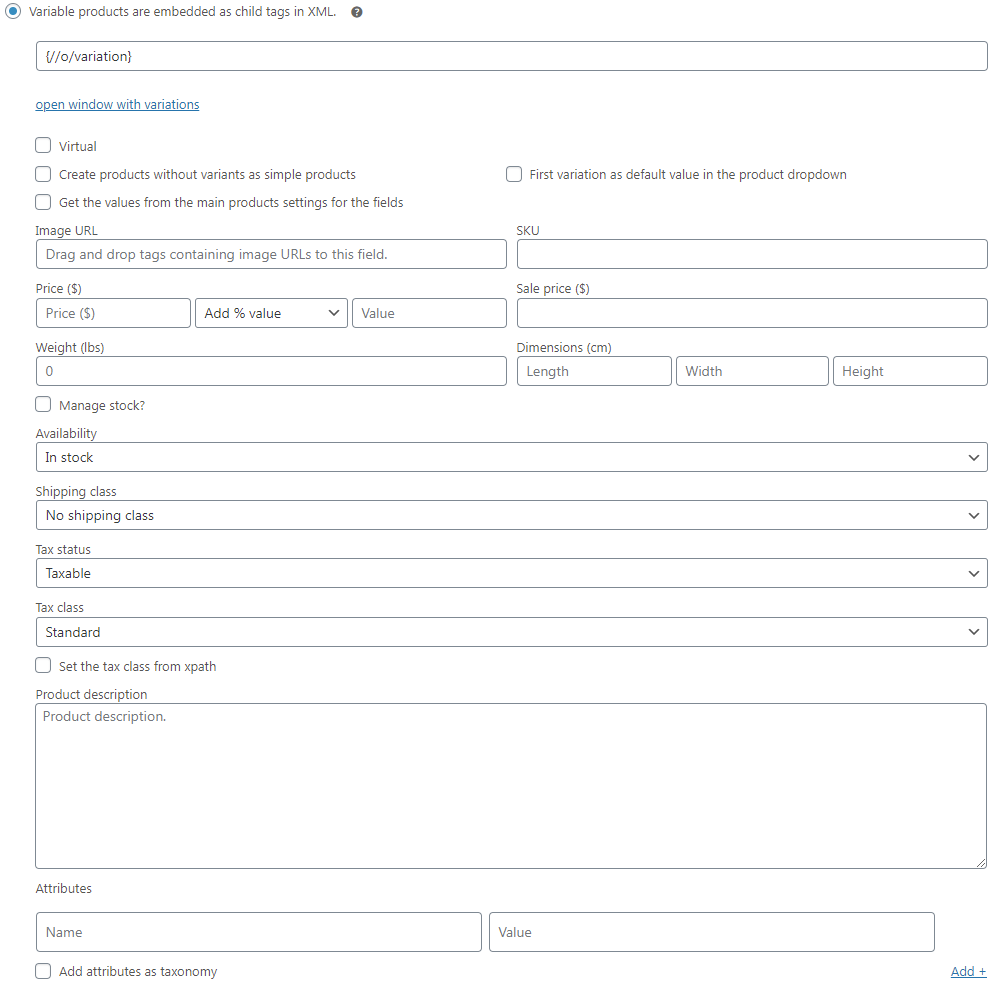
Open window with variations - use this option to switch between variants nested in the XML file in a new window.
Virtual - select the checkbox if you want the variants created to have the status of Virtual products.
Create products without variants as simple products - use this option so that if the plugin does not detect variants within the node (i.e. if there is only one variant), a simple product is created, not a product with variants.
First variation as default value in the product dropdown - select this option to make the first created variant the default. If this option is not checked, none of the variants will be treated as default.
Get the values from the main products settings for the fields - check the box if you want to disable the configuration of individual fields at the variant level and use the parameters set at the configuration level of the parent product. The multiselect field will be expanded, where you can select which variant configuration fields should be disabled. The values of these fields will be set according to the configuration of the parent product.
Image URL - Set a featured image for the variant by providing the path to the field containing the image url. The image will be downloaded to the media library and set as the product variant image
SKU - drag and drop the field marker where the product SKU is.
Price - drag and drop the field marker where the price of the product is located. You can also enter a fixed value.
PRO You have the option to modify the price in flight by a fixed value or a specific percentage:
- PRO Add percentage value - the price of the product in the store will be increased by the percentage that you enter in the next field. Example: If you want the price in the WooCommerce store to be 20% higher than the price in the file, select this option and enter the number 20 in the Value field.
- PRO Add fixed value - the price of the product in the store will be increased by the fixed value that you enter in the next field. Example: if you want the price in the WooCommerce store to be $10 higher than the price in the file, select this option and enter the number 10 in the Value field.
Sale price - If you want the product to be on sale, enter the promotional price in this field.
Weight, dimensions - drag and drop tags from the file corresponding to this product information. They are useful for buyers and also help in calculating the shipping cost.
Manage stock? - After enabling inventory management, you can configure:
Stock quantity - if you want the stock level of products at the variant level to be synchronized with the file, enter (drag and drop) the value from the file here.
When you click on the selection list under Allow Pending Orders , you will get the following options:
- Don't allow - choose if you don't want to order with zero stock
- Allow, but inform the customer - select if you want to give this option, but the store should display relevant information.
- Allow - select, if the sale from the product view side in the store is to be the same as in the case of a positive stock with zero stock.
Shipping class - select the product's shipping class. Useful when you import products with very large or very small dimensions. Thanks to the shipping class, you can better estimate the shipping cost.
Tax status - Optionally enable or disable taxes for a product. Leave as is to use store settings. Or you can tax only shipping costs (Shipping only)
Tax class – Choose which tax class should be applied
Set one tax class for all imported products - import products to one selected tax class in the store.
Tax class - select from the tax classes available in the store to which products should be assigned during import. Tax classes allow you to assign different tax rates to different product types.
Tax class mapper - This option allows you to map tax rates from a tax class file in your store. Tax class names or identifiers must be defined in the file. If the value is different, the standard rate will be set.
Tax class field - place a tag in this field from the file that corresponds to the name or identifier of the tax. If there are multiple tax fields in the file, and you want each field to be mapped, place comma-separated tags here.
The tax class mapper fields consist of the WooCommerce Tax Class field (left) and the External Tax Class field.
WooCommerce tax classes - select a WooCommerce tax class from the list. If the class you are interested in is missing from the list, add it to the list of WooCommerce tax classes.
External tax class - enter in this field the identifier of the given tax class coming from the file you are importing from, corresponding to WooCommerce tax classes.
Add more classes in the list for all classes that exist in the file. Add them using the Add button. You can delete existing entries using the Delete button.
External/ Affiliate Products
PRO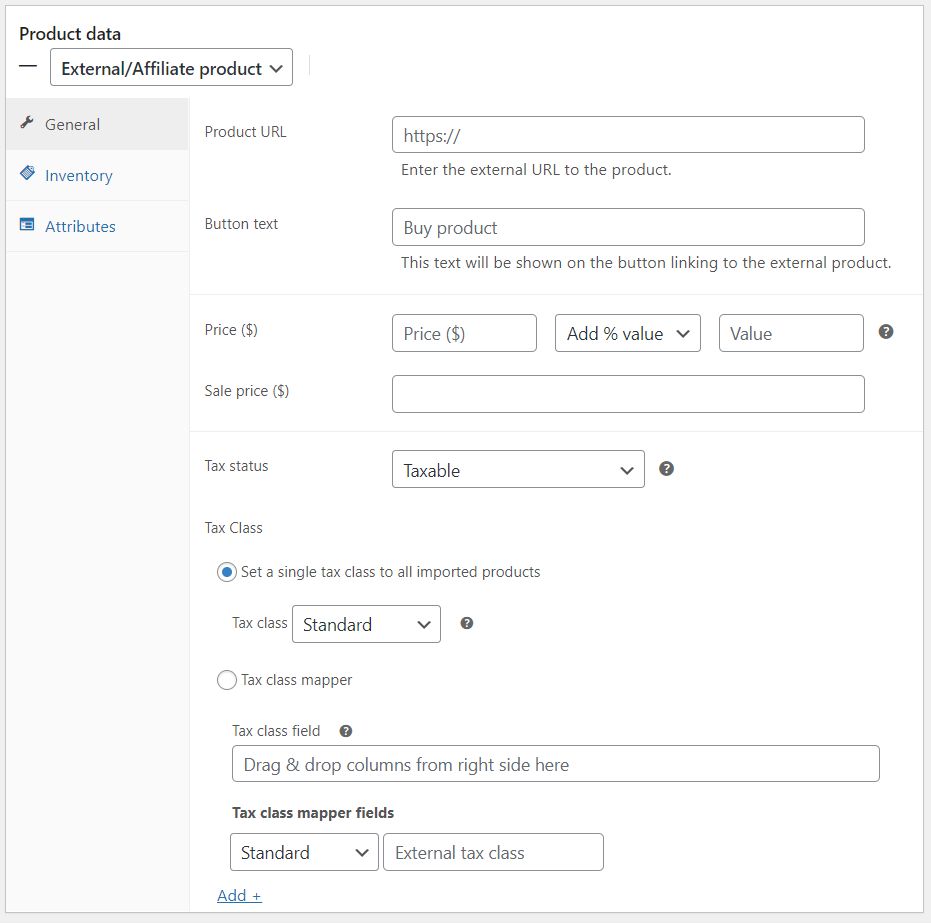
Product URL - place a tag in this field from the file that corresponds to the external/ affiliate product URL. If in the structure of the XML file, paths to the products are relative, enter the beginning of the URL before the XPath to complete the URL:
https://siteaddress.com/{//XPath to the images in XML structure}
Button text - enter the text for the button linking to the external product. You may also place a tag here.
Categories
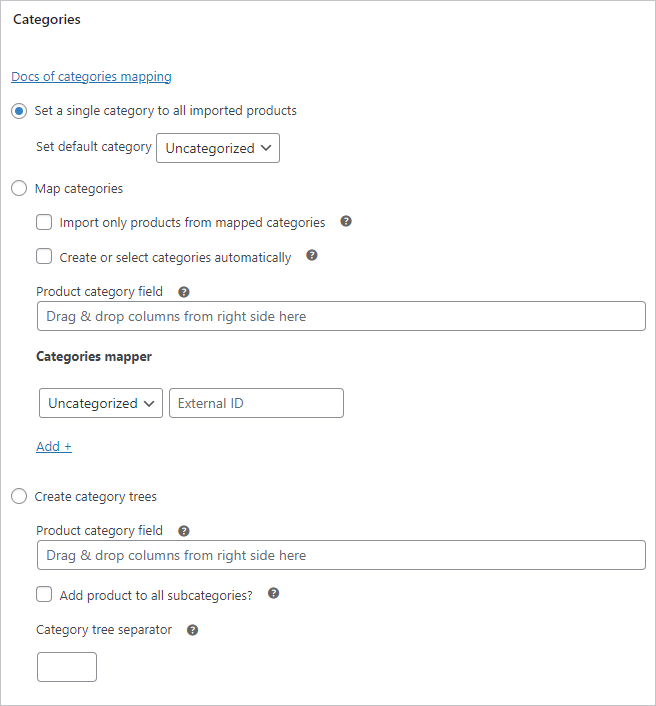
The plugin allows you to import categories according to the following options:
- Set single category to all imported products - import products to one selected category in the store.
- Map categories - the option allows you to map categories from a file with categories in the store. Category names or IDs must be defined in the file.
- Import only products from mapped categories - if you check that option the plugin will import products only from categories with IDs set in the mapper below.
- PRO Create or select categories automatically - check this option if you want WooCommerce product categories to be automatically created on the fly during sync. The plugin will create products, and categories and assign products to the created categories. There must be a tag containing the category name in the Product Category Field.
- Product category field - put in this field a tag from the file that holds the name or ID of the category. If your file has multiple tags with categories, you can paste many of them in this field and separate them with a comma. The product will be added to every mapped category.
- Categories mapper - a list of categories. The components are: WooCommerce category and External ID from the file.
- WooCommerce category - select the WooCommerce category from the list. If the category you are interested in is missing from the list, add it to the WooCommerce category list.
- External ID in the file - enter in this field the ID of the given category from the file you are importing from, which will be mapped to the selected WooCommerce category.
- Map all the categories that occur in the file. Add more using the Add button. Existing items can be deleted using the Delete button.
If the ID is not found during the import process, the product will be added to the default WooCommerce category (default: Uncategorized).
- Create category trees - import categories according to their hierarchy e.g. Women > Clothing > Dresses.
- Product category field - put in this field a tag from the file that holds the name or ID of the category. If your file has multiple tags with categories, you can paste many of them in this field and separate them with a comma. The product will be added to every mapped category.
- Add product to all subcategories - mark this checkbox if you want the product to be added to all categories in the category tree (e.g. Women > Clothing > Dresses) and not only to the lowest level category (e.g. Dresses).
- Category tree separator - set the character that separates the categories in the file e.g. categories in the category tree Women > Clothing > Dresses are separated by >.
Step 4 Import options
This step allows you to set Import Options, for example, product field synchronization, conditional logic & import schedule.
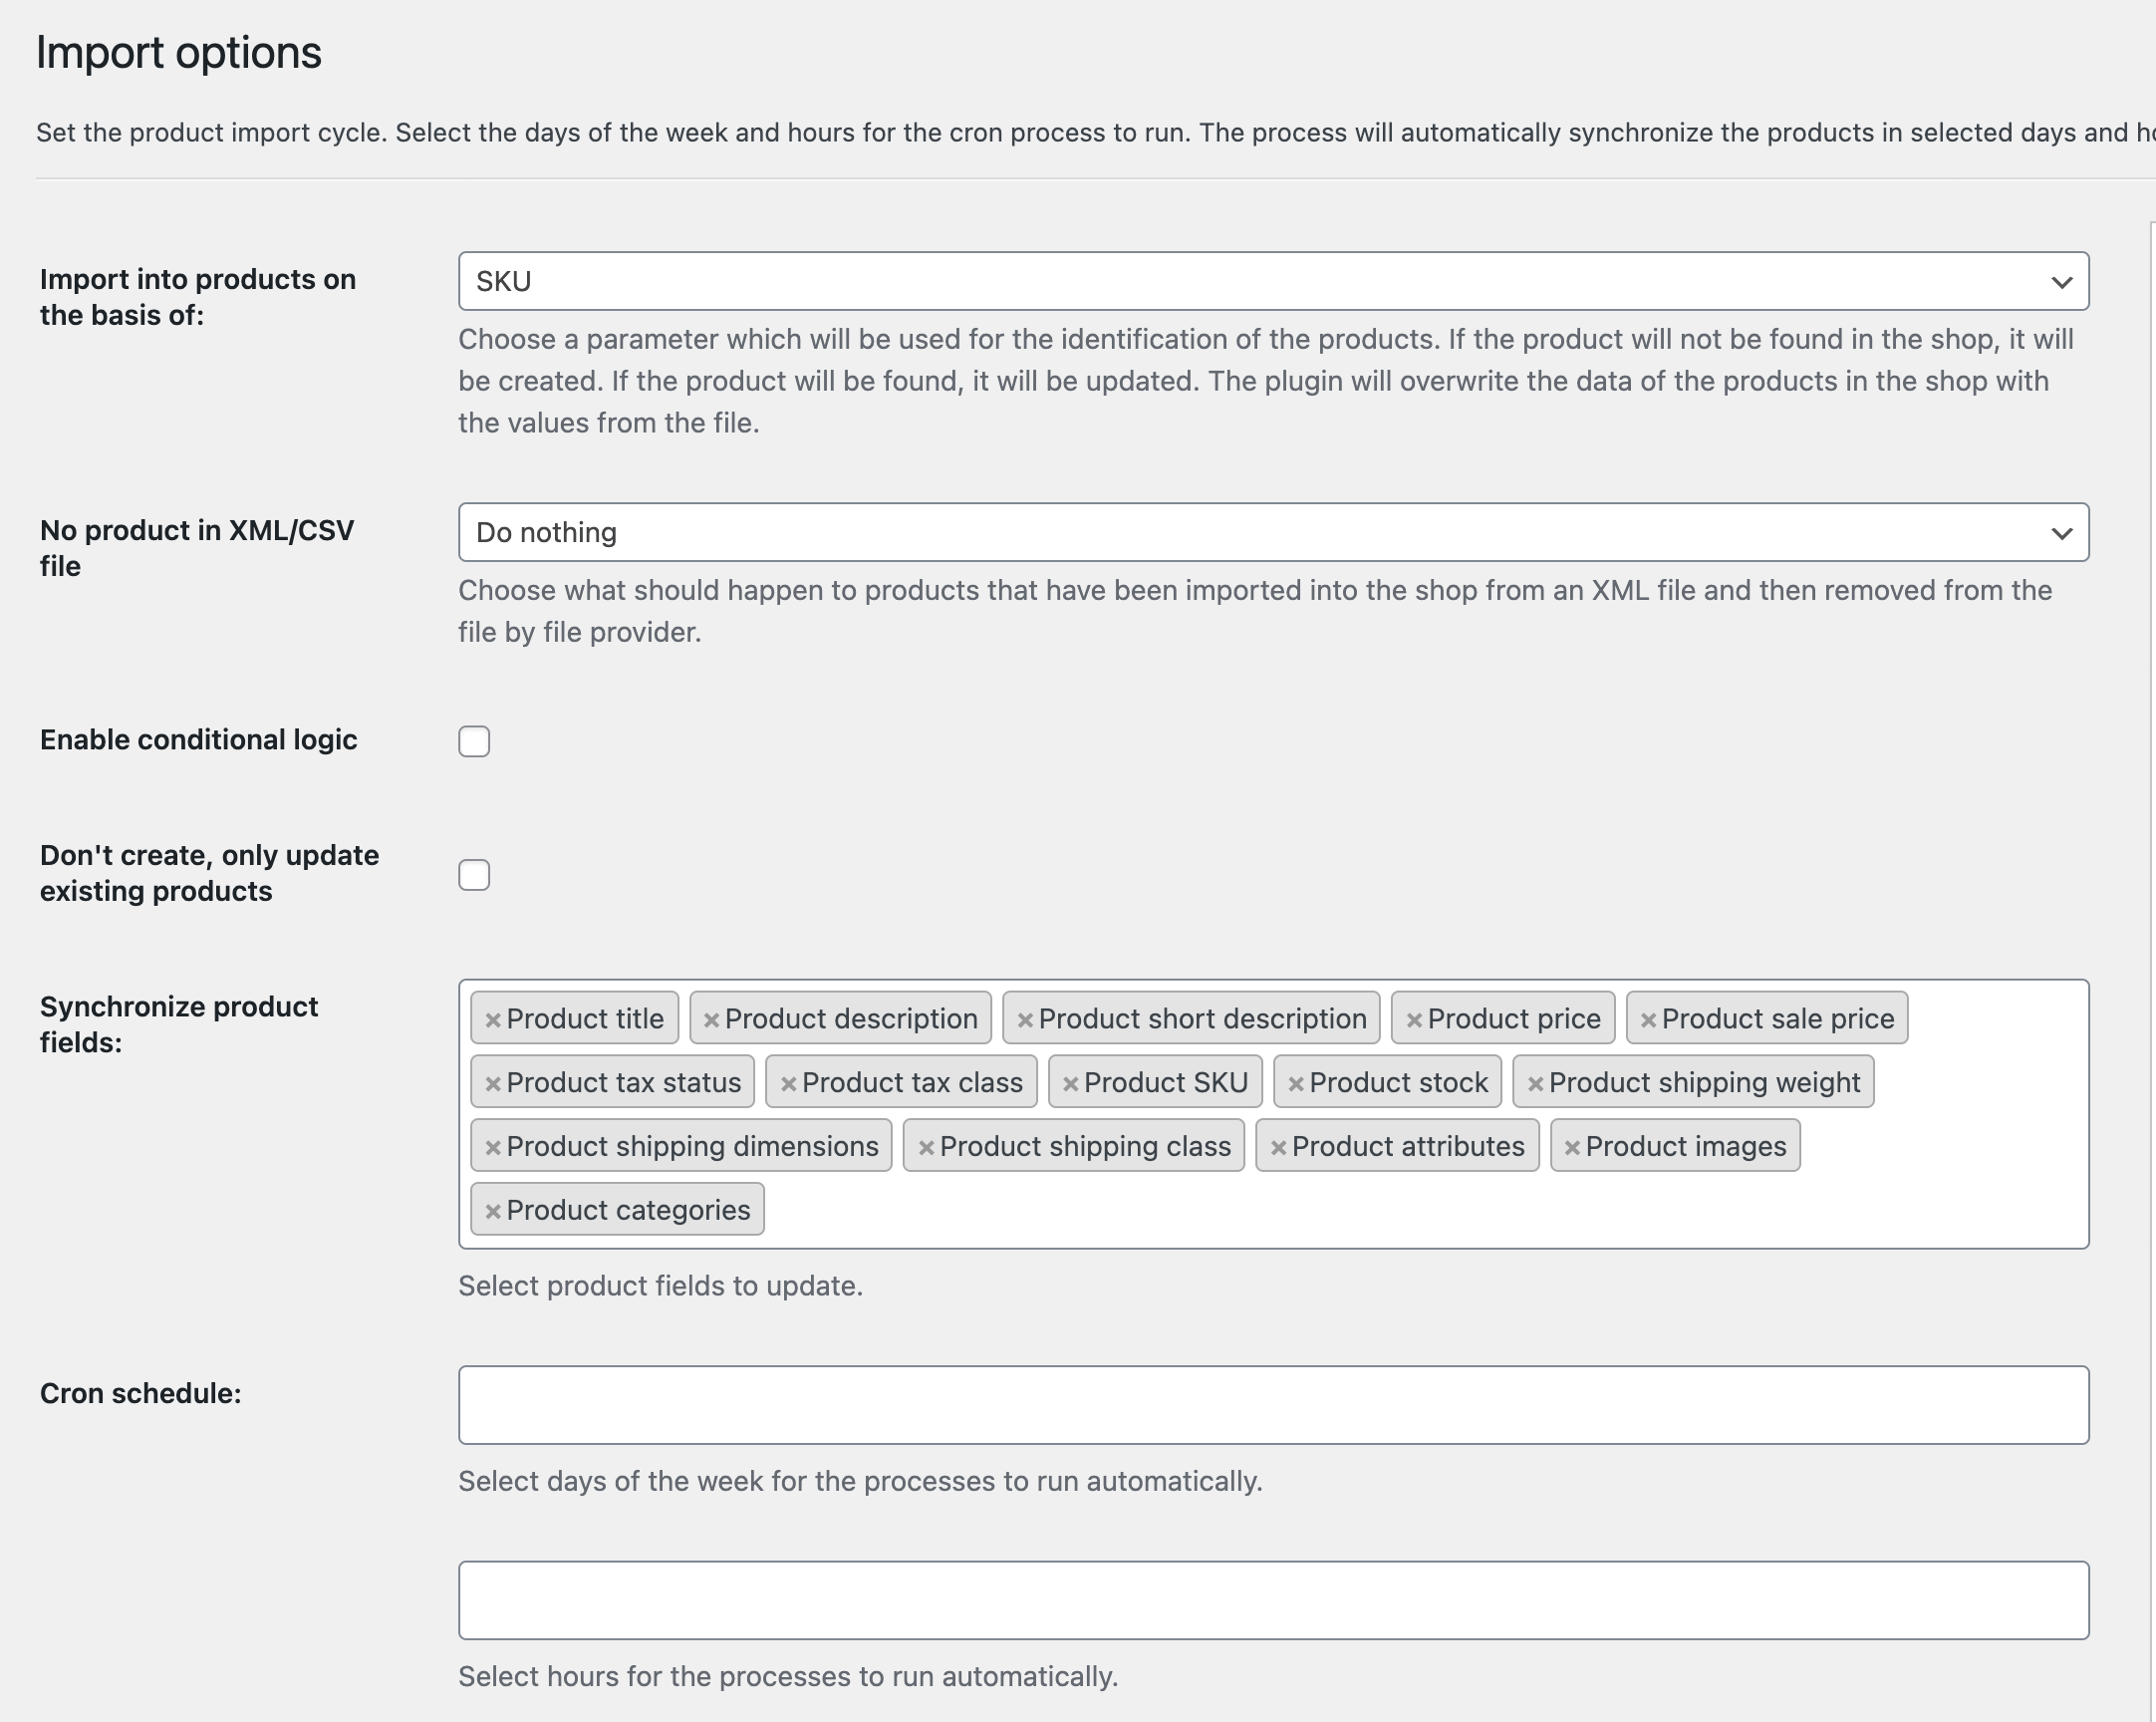
Import into products on the basis of
Select a product parameter. Based on this, the plugin will synchronize the products from the file with the existing products in WooCommerce. Products will be identified according to this parameter. If the plugin detects an existing product with this parameter, it will be updated. If no product with the same name, or ID is found in the store, a new product will be created.
The plugin allows to choose the following identifiers:
- Name,
- SKU,
- Unique identifier,
- EAN.
No product in XML/CSV file
Select what to do when products are not found in the next imports. You may choose to:
- do nothing with previously imported products,
- change shop products stock to 0 - leaving the products in the store, but setting their inventory to 0,
- PRO move products to trash - "missing" products, previously imported from the file, will be moved to the trash.
Enable conditional logic
Check this option to see conditional logic fields
Conditional logic fields:
PRO Import / Don’t import - check this option to choose or skip fields
PRO XPath to field - Use drag and drop interface to choose a specific field
PRO Conditional logic field values:
- Empty
- Not empty
- Higher than
- Lower than
- Equal
- Not equal
- Contains
- Not contains
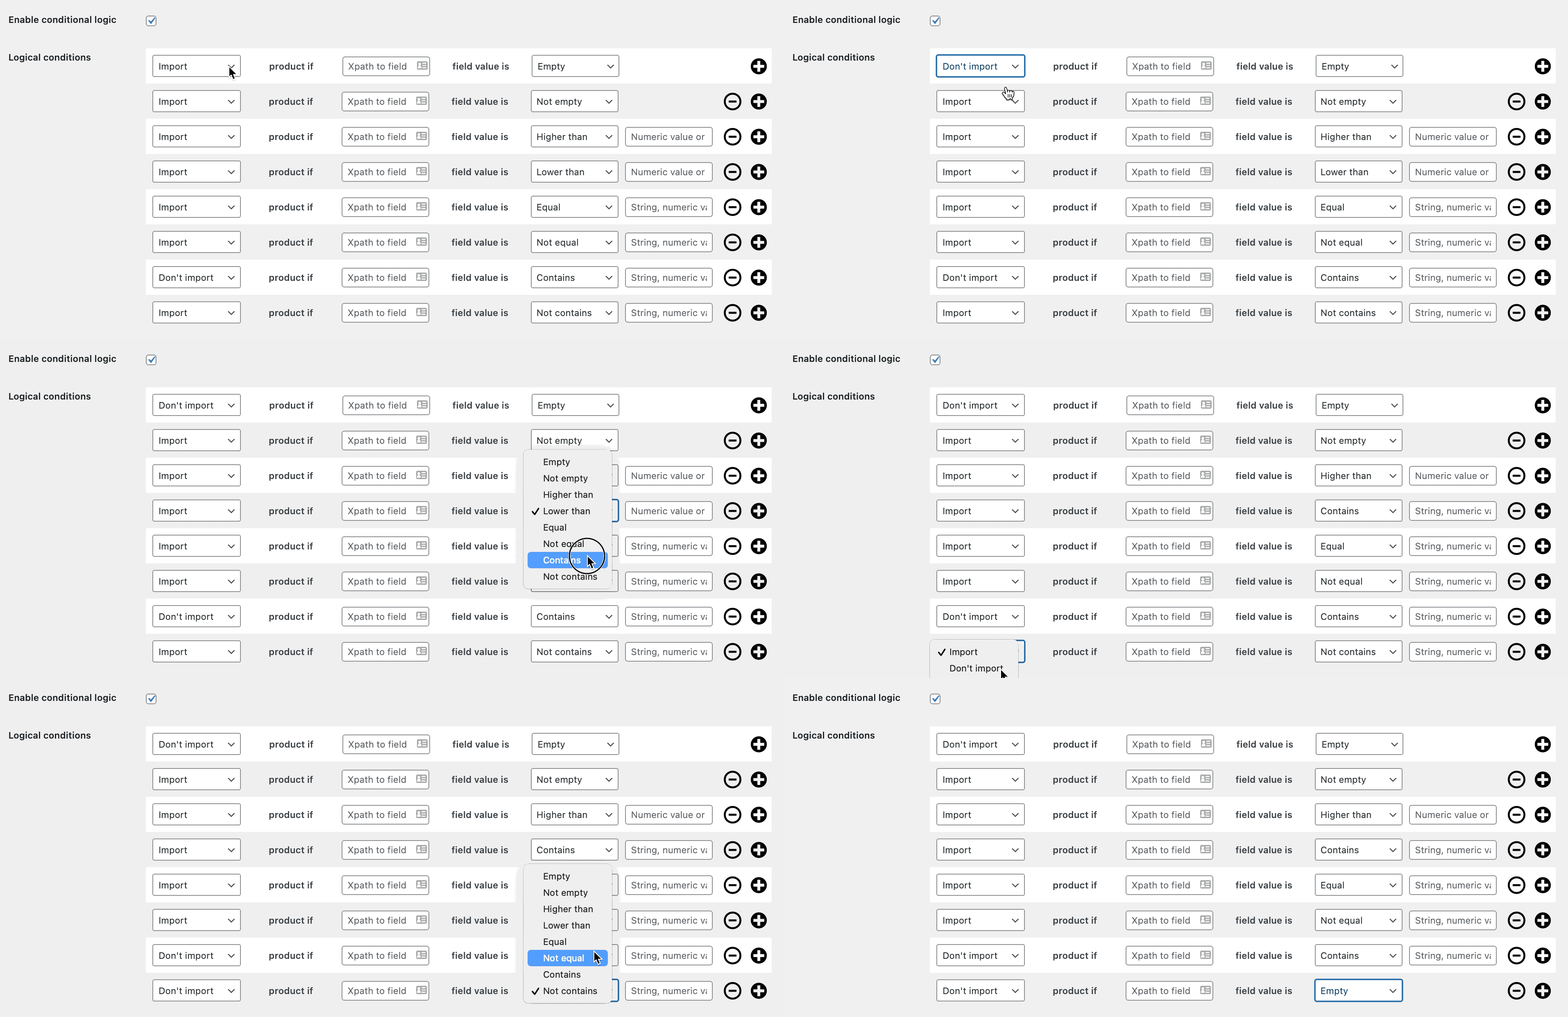
Examples of the use of conditional logic:
Skip product with Stock quantity equal to 0
PRO
To skip products with Stock quantity 0, drag the tag corresponding to the value of the Stock quantity. Then enter the field value as the digit 0.

Skip product without SKU
PRO
To skip the import of products that do not have an SKU, drag the tag that was used as the SKU in the product mapping and set the field value to Is empty.

Import products with price Higher than $15 and Lower than $100
PRO
In the logic condition settings, drag the tag that handles a price. Select the value of the less than field and enter the value 100. Then click the + icon to add a second condition. Select the same tag as in the previous condition, set the value of the field greater than, and enter the number 15.

Import products only with a 23% tax rate
PRO
Select Import product if and select a specific tag with the tax rate. Then select the field Equals and enter the number 23.

To do this, use the | symbol (On computer keyboards, it is accessed by pressing ⇧ Shift + \ simultaneously)
For example:
If you want to import products that have the color attribute: black or white, select Import product if, select the specific tag for color. Then set the field value to Contains and type black | white

Don't create, only update existing products - Check this option if you want to update only products that exist in the store. During synchronization no new products from XML file will be created

Create new products as draft
Check the box so that all products created by the plugin have the status Draft. Products with the Draft status are not visible to buyers. This option is useful if you want to test the import process in a live store. The option will only be active if the Don't create, only update existing products option is not active. If the checkbox remains unchecked, new products will be created with the Published status.
![]()
Synchronize product fields
Select product fields to be updated on subsequent imports. By default, the plugin will synchronize all fields. Remove from the list those which should be skipped. This option is useful especially when it comes to updating prices, stock levels.
Cron schedule
Select the days of the week and hours of the automatic file sync. If you do not select any options, the process will not start automatically in the future.
If you leave the browser tab open, the import will be faster as subsequent tasks will be invoked by AJAX functions. If you close your browser tab, the process continues in the background with wp-cron jobs.
Import Log
If you start the import process manually, the event log will be displayed on the screen, allowing you to monitor the process progress. If you leave the browser tab open, the import will be faster as tasks will be run by AJAX functions. If you close your browser tab, the process will continue in the background using wp-cron jobs.
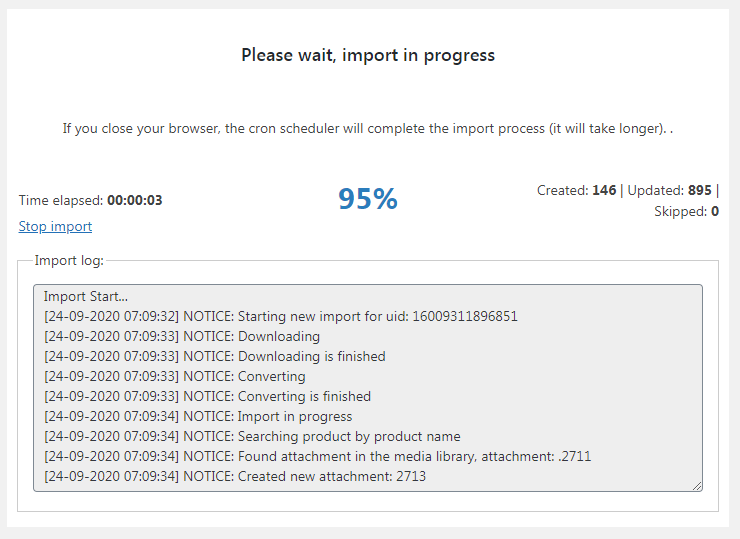
Explanation of the information on the screen:
Time elapsed - time since the import process started.
Progress - percentage value showing what part of the process has already been completed.
Created - the number of products that were created in the WooCommerce store during import (if no products were found in the store based on the selected parameter, therefore they were created).
Updated - The number of products that have been identified based on the selected parameter, therefore they have been updated based on the product feed.
Skipped - the number of items in the file that have been skipped (they were not saved in the WooCommerce store). This message appears when an error occurs while importing or WooCommerce does not allow you to add products. Information about the reason should be available in the box below:
Import log - the event log is saved here. Explanation of the messages:
- Starting new import - starting the import with the given individual file identifier,
- Downloading - start downloading an XML / CSV file from the indicated URL,
- Downloading is finished - the file has been correctly saved on the server,
- Converting - starting to convert an XML / CSV file to a format prepared for import,
- Converting is finished - the process of converting an XML / CSV file to the format prepared for import,
- Import in progress - starting the process of saving information about products in the store,
- Searching product by SKU - identifying the product based on the selected identifier - SKU,
- Searching product by product name - identifying the product based on the selected identifier - product name,
- Product not found - the product has not been found in the store based on the selected identifier,
- Creating new product - Start creating a new product from an item in the file,
- Created product ID X - a new product with the indicated ID has been created correctly,
- Updated product ID X - the product with the indicated ID was correctly updated,
- Found attachment in the media library, attachment X - while downloading photos to the product gallery, the photo with the specified ID was found in the media library and assigned to the product (the photo was not downloaded again),
- Created new attachment X - the photo has been downloaded to the store and saved in the Media Library under the given ID
List of imported products
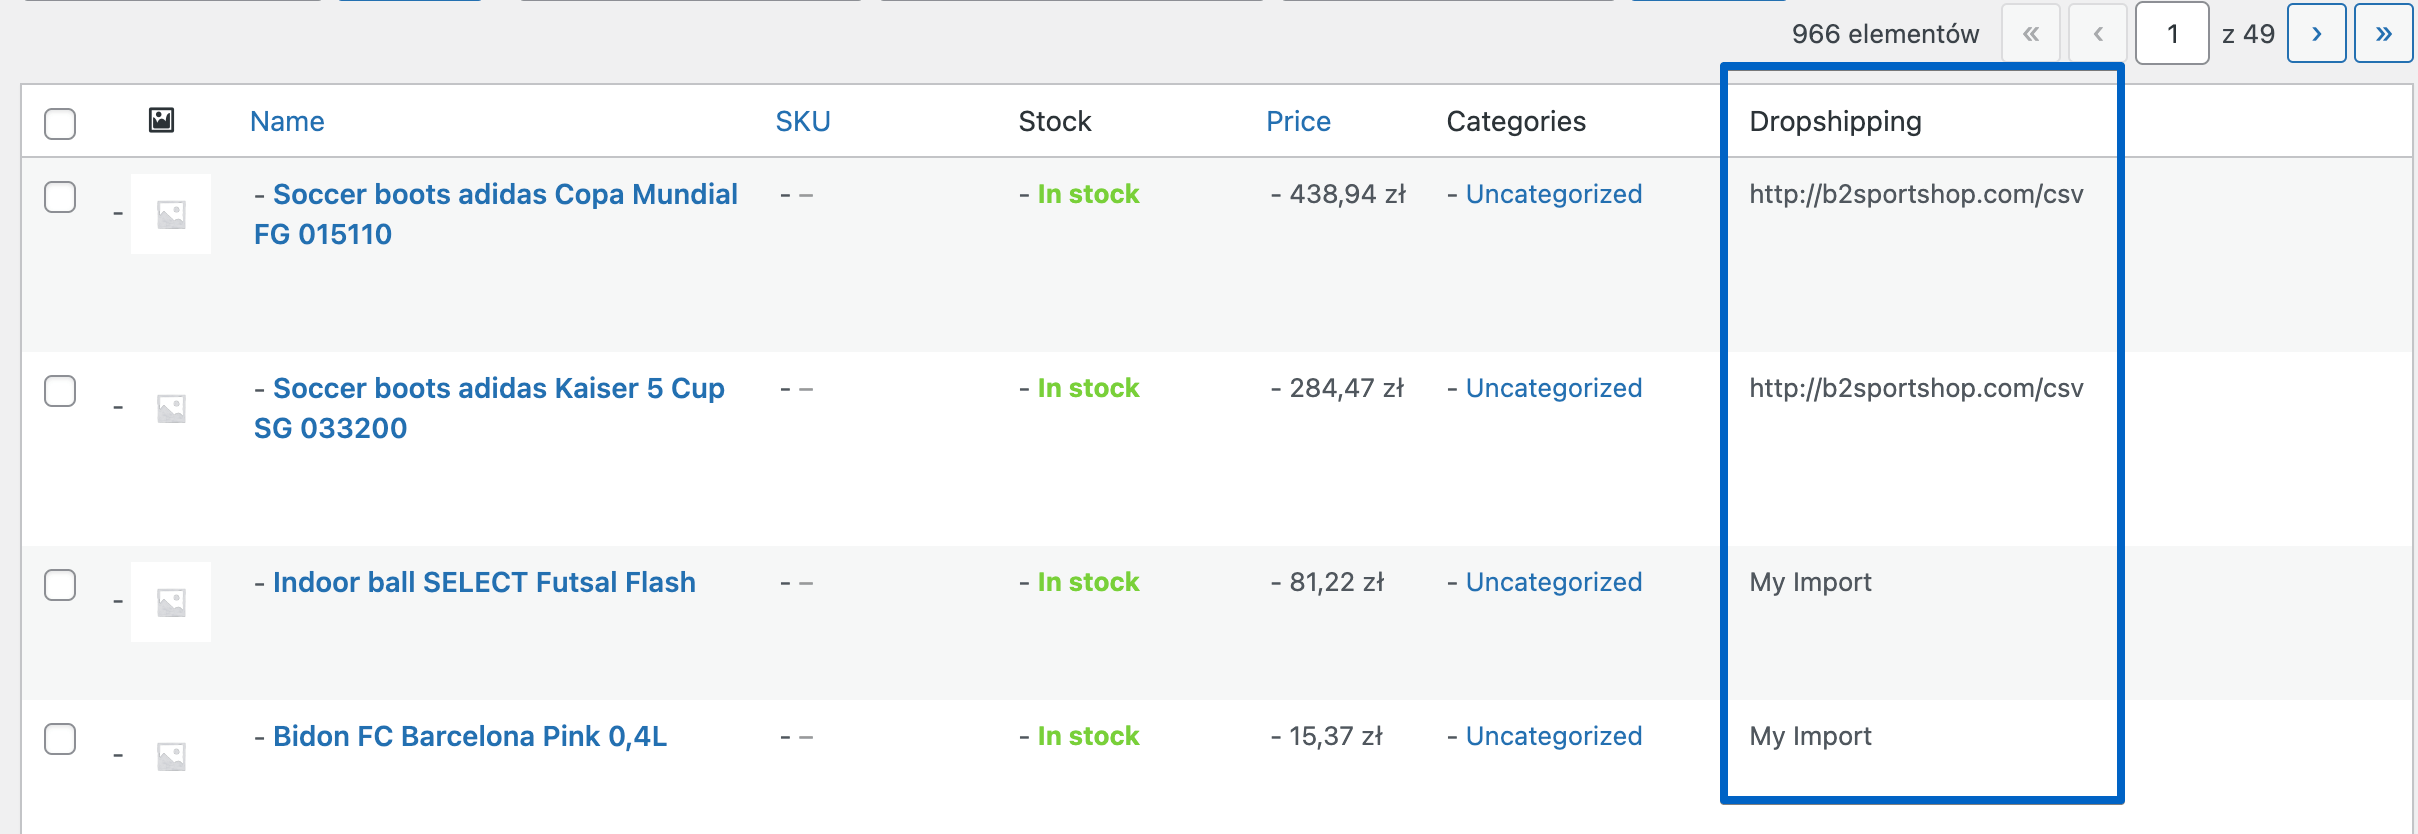
Go to WooCommerce → Products. In the Dropshipping column, you will find information on the import of the products. If you have given a name to the import, you will find its name in the column. If the import has no name, you will find the URL of the file used for the import in the column.
Advanced options
Modify data on the fly
PRO
The plugin has built-in filters that allow modifying the product data during the saving process. Below there are three filters with example uses. The code will cut out brackets - { and }. This code will also cut out the text which is not included inside given HTML tags:
Modify product name on the fly
PRO
Modify product description on the fly
PRO
Modify product short description on the fly
PRO
Filter special characters in image addresses
PRO
Mapping of unusual stocks
PRO
Correct file encoding
PROYou can use the wpdesk_dropshipping_source_encoding filter to set the file encoding, for example to UTF-8, UTF-16, WINDOWS-1250, or ISO-8859-2.
Correct mime encoding
PRO
Correctly download images when the file does not contain the full image address
PRO
Roadmap
In the future, we plan to develop the plugin with the following functionalities:
- Import Variable Products - completed,
- Adding new file import methods (FTP) - completed (see the add-on),
- Exporting orders
If you have an idea for functionalities that the plugin could support, write to us about them.
Free vs. PRO Feature Comparison
To make it even easier for you to see the difference between the free and pro versions of the Dropshipping Import Products for WooCommerce plugin, we've prepared a summary table of all the features. Take a look and decide which version you choose.
| Feature | FREE → | PRO → |
| Import products to WooCommerce from any CSV or XML file | ✅ | ✅ |
| No limit of imported files | ✅ | ✅ |
| File preview | ✅ | ✅ |
| Import simple and variable products | ✅ | ✅ |
| Start, stop, and pause the import process | ✅ | ✅ |
| Drag & Drop XML or CSV fields in the Product mapper | ✅ | ✅ |
| Visual and classic editor for description and short description | ✅ | ✅ |
| Create products in a selected category or map categories | ✅ | ✅ |
| Import product categories with a tree structure dynamically | ✅ | ✅ |
| Import (and update) WooCommerce products automatically based on the cron schedule (days and hours) | ❌ | ✅ |
| Conditional Logic options to import products that meet specific rules | ❌ | ✅ |
| Import External/Affiliate Products | ❌ | ✅ |
| Import WooCommerce products with categories – create new categories automatically | ❌ | ✅ |
| Price modifier | ❌ | ✅ |
| Adding attributes as taxonomy | ❌ | ✅ |
| No limit for imported images | ❌ | ✅ |
| Compatible with the Dropshipping FTP Import Products for WooCommerce add-on | ❌ | ✅ |
WooCommerce import troubleshooting
Let's take a look at frequent questions about product import in WooCommerce.
How to import products from a CSV or XML file?
The plugin allows product import into WooCommerce from two file types: CSV and XML. The file format and its structure depend on the platform or the product feed provider.

Then, you may map the fields and choose the import. Steps for the import of WooCommerce products ↑.
How to import WooCommerce products from Shopify or Etsy?
The process is similar. You need a product feed (CSV or XML), and then you may follow the steps to import or update products. It's also possible to modify product data on the fly using filters.
Is it possible to import WooCommerce products with custom meta fields?
You may import meta fields, for example, as attributes or place them in the description. If you have an idea or feature request, you may send an email.
How to import products with images?
The plugin allows choosing/ mapping the field to get the product image (or images in PRO).
You may read more on how to import WooCommerce products with images.
What about categories?
It's also possible to map the product categories. But in this case, you may use more settings including creating categories automatically or category trees.
There is an article on how to import products with categories.
How to synchronize the data?
You may use the product import to update products or only specific fields using the "Synchronize product fields" and scheduling the imports (in PRO).
You may see available import options.
It's possible to use the import plugin as a suite with the extension to export products to manage product feeds.
Is it possible to import products using FTP?
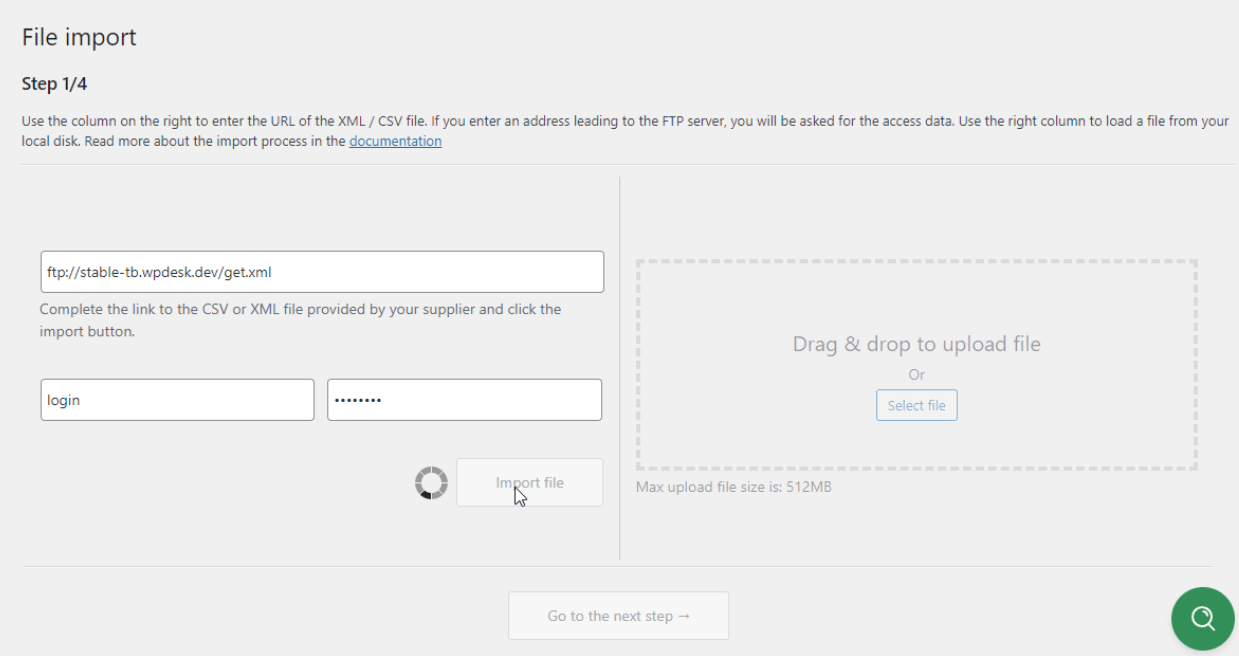
Yes. You need the Dropshipping Import Products for WooCommerce plugin (PRO) and the FTP add-on.
Then, you will be able to enter the file address on FTP with login credentials to get the file.
How to handle errors with product import in WooCommerce?
Write down the error/ notice message. You also may go to WooCommerce → Status → Logs to check if there are more notices that could trigger the error. Then, you may try to fix the issue e.g. regarding server requirements, or contact technical support. You may also read more on debugging in WordPress and WooCommerce.
How to choose the appropriate product data columns?
It's possible after selecting and uploading the file into the importer.
CSV example
XML example
Where to find the file path for product import into WooCommerce?
You may find the file URL on an external platform or warehouse. The file address may also be on the same server provided the file's already been uploaded. You need to enter the full address. If you have the FTP add-on, you may also add the FTP address with login credentials.
How to delete products with the importer?
Using the No product in XML/CSV file option, you may choose to move products to trash if products are not available but were present for the import file.
How to import WooCommerce products as drafts?
On the import options screen, you may enable the "Create new products as draft" option. The plugin will import new products and save them as drafts.
You may find draft products in Products by filtering the product by post status (wp-admin/edit.php?post_type=product&post_status=draft).
Is it possible to import and sync WooCommerce products?
Yes. The Dropshipping Import Products for WooCommerce plugin allows both product imports and updates. You may use one product import or several with different conditions, for example, price modifiers or updating specific fields.
"Synchronize product fields" is an important feature for product updates (set at the import options). There are also options to change fields for products meeting conditional logic criteria.
The plugin can bulk update products based on field mapping and advanced settings.
You may see the plugin's import options.
