Here’s the translation with the same HTML structure preserved:
The Allegro WooCommerce plugin provides a complete “I ship with Allegro” module that lets you handle shipments, labels, and courier pickups without leaving the order screen. Below you’ll find an article describing only this feature—from requirements, through configuration, to daily work and automation.
Contents
Requirements and access
- An active connection to at least one Allegro profile under WooCommerce → Allegro.
- Orders must come from Allegro (identified by Allegro order ID/checkout ID); otherwise the metabox is locked.
- The store administrator or manager needs permission to edit orders and WooCommerce settings.
- WordPress cron must run so the automation (the “allegro_delivery” schedule every 5 minutes) can create shipments and labels and tidy up files.
- The server should be able to write to
wp-content/uploads, because PDF/ZPL label files are stored there.
Global configuration
Fill in the fields in the profile form located in WooCommerce → Allegro → Settings. Make sure that the Street field contains the street name and the building number.
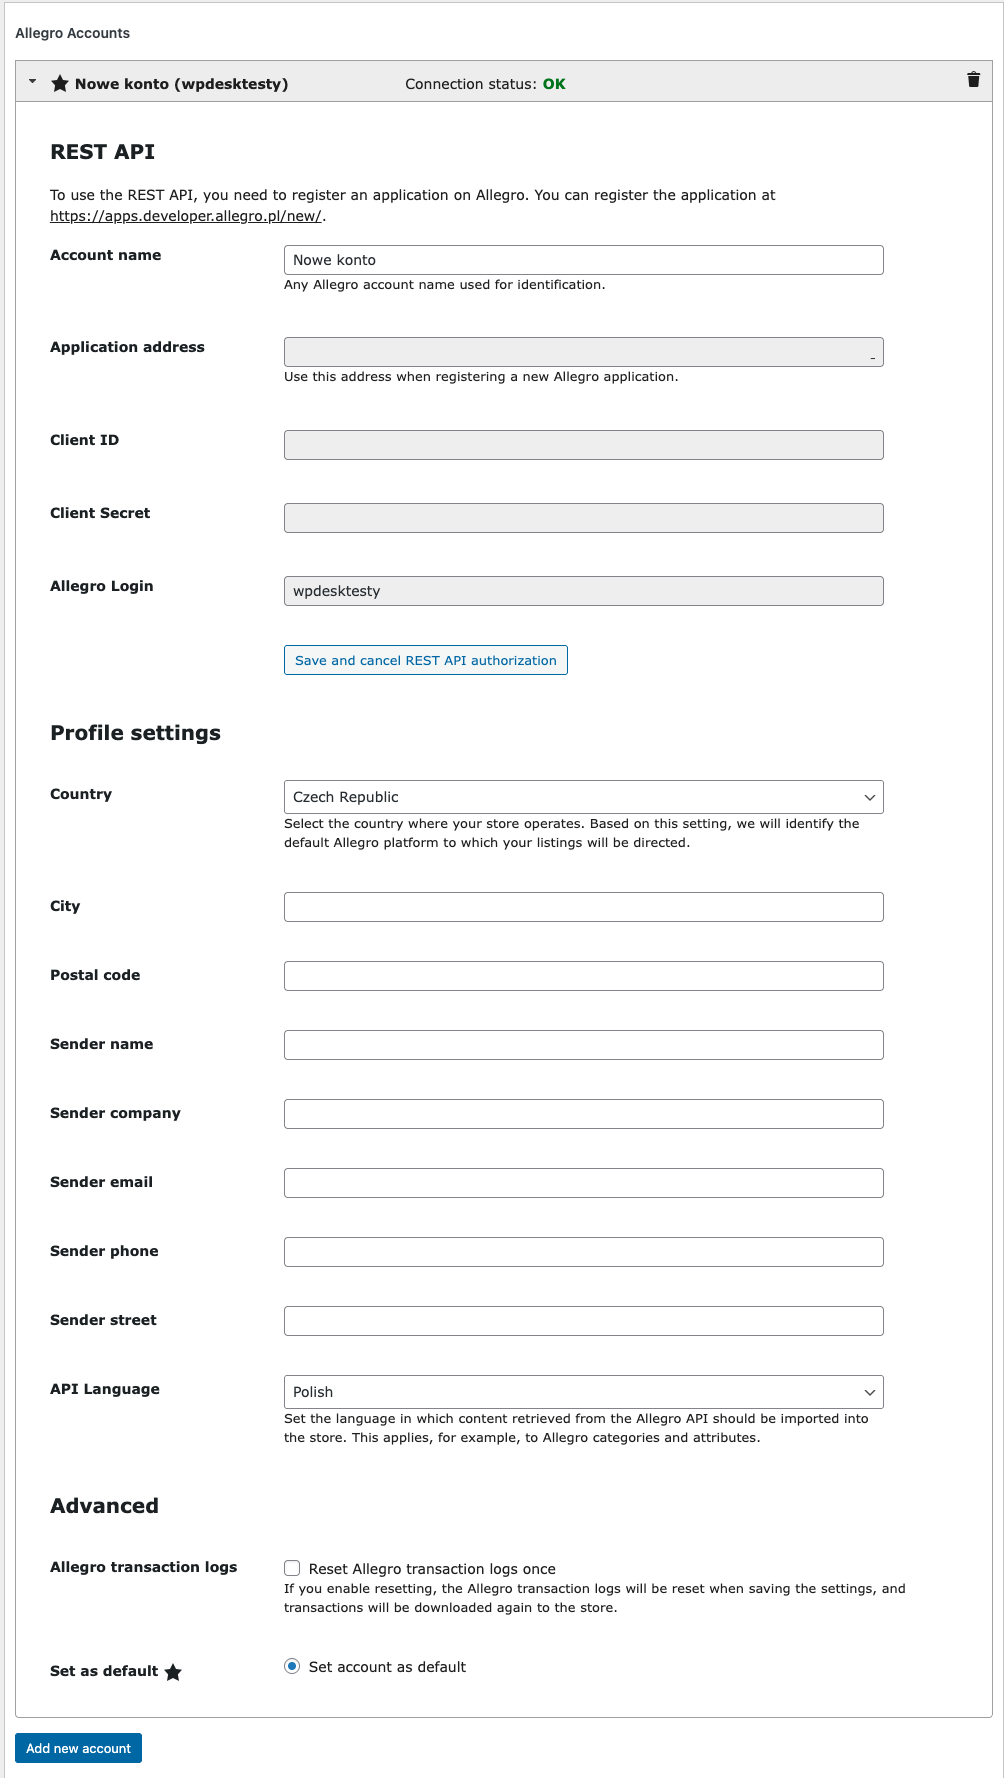
Error: create_shipment_from_orderThe "First name and last name" (name) or "Company name" (company) field must be completed. The "First name and last name" (name) or "Company name" (company) field must be completed. The street field must contain the building number. The field cannot be empty.Service configuration
In the WooCommerce → Allegro → I ship with Allegro panel (URL: admin.php?page=woocommerce_allegro_delivery) you configure how the module behaves.
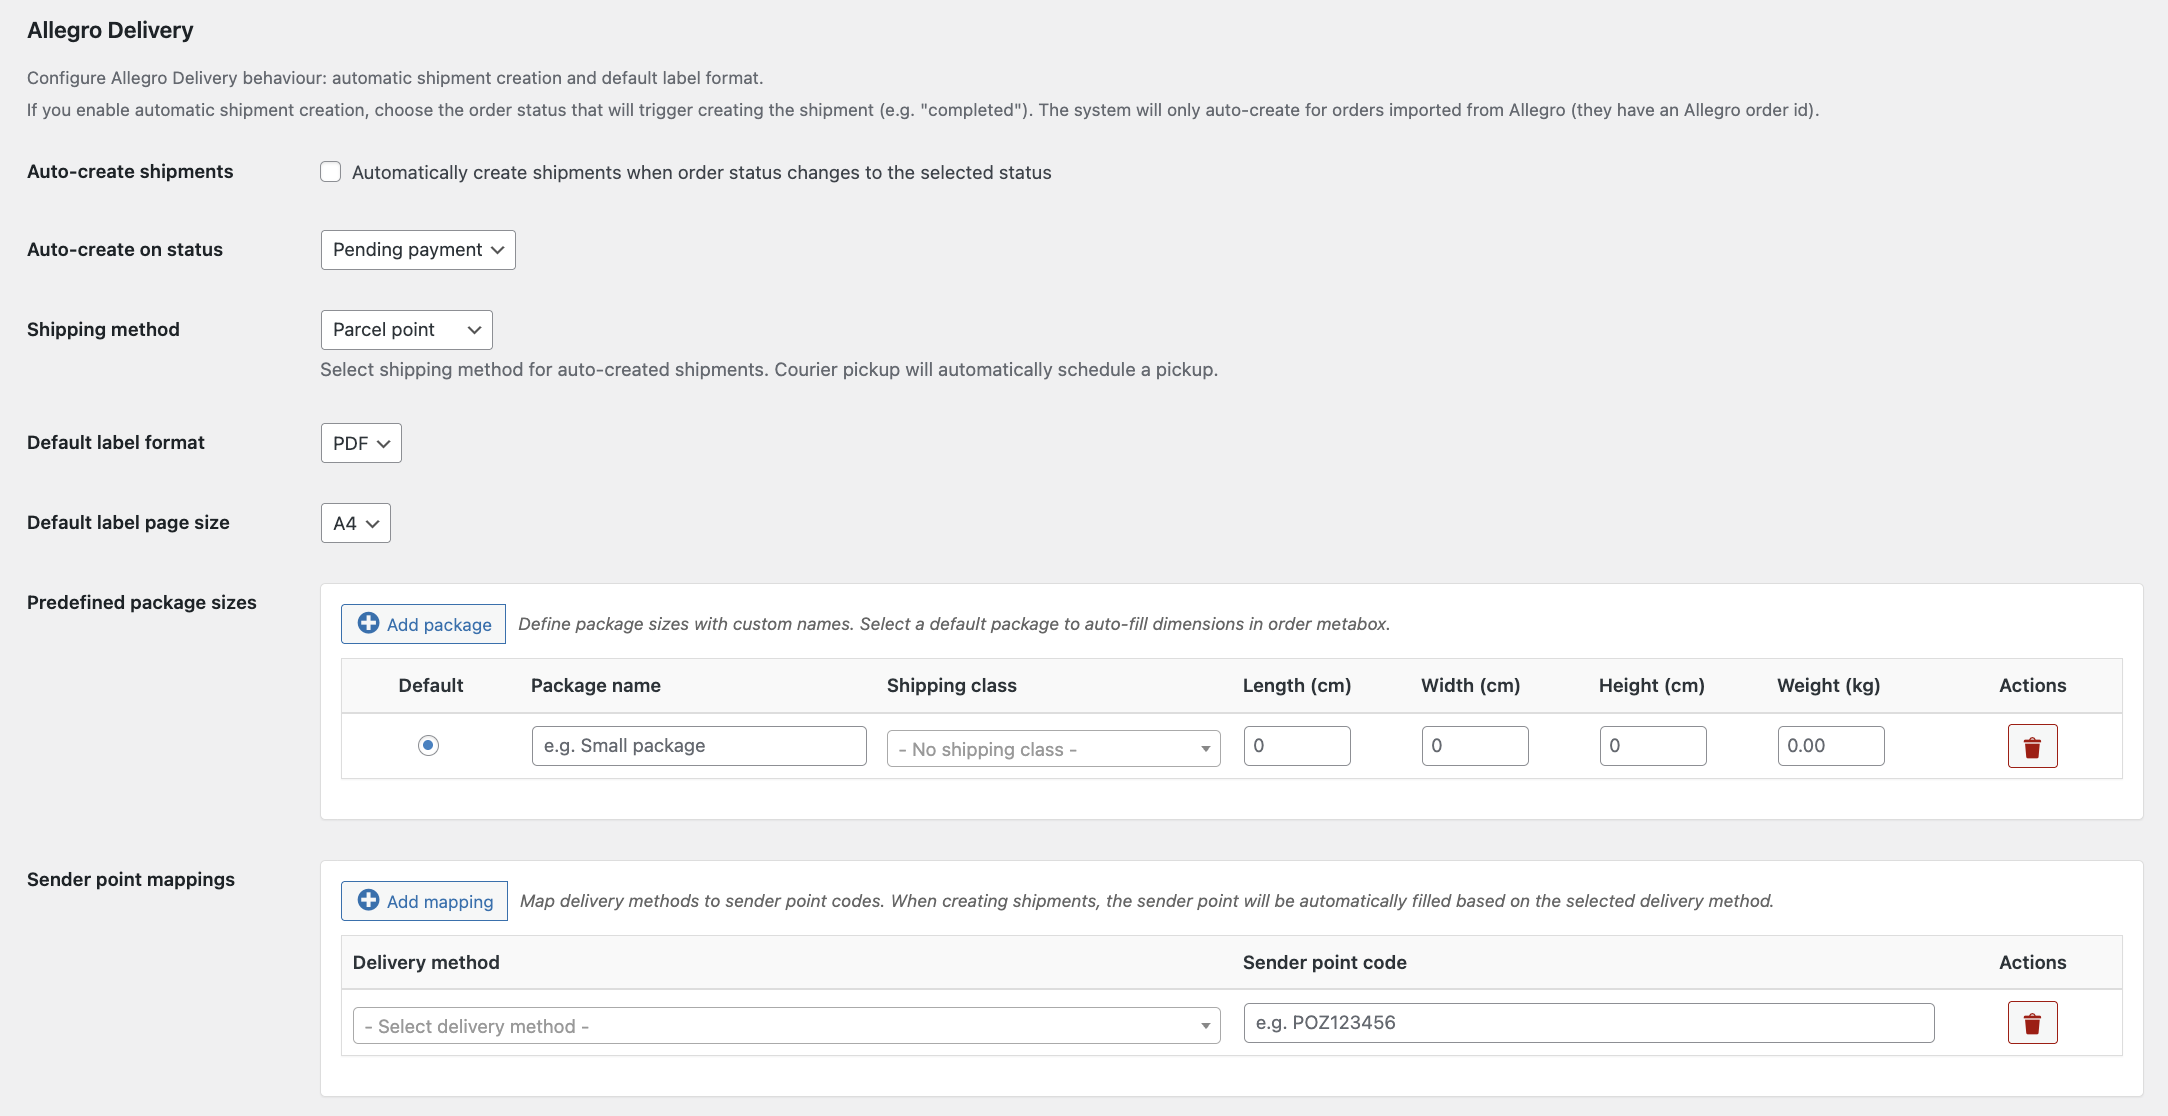
- Automatic shipment creation – check this if you want an order status (default “completed”) to launch the whole background process.
- Trigger status – pick a WooCommerce status; the system watches the from → to transition and flags an order for processing only once.
- Default dispatch method – Drop-off point requires taking the parcel to the point yourself, while Courier pickup automatically orders a courier once the shipment is created.
- Courier pickup window – specify the preferred date (earliest possible, +1/2/3 business days) and time (8:00–16:00); applies only to courier mode.
- Label parameters – choose the format (PDF/ZPL) and size (A4/A6). For A4 a cut line is applied by default so one sheet yields two labels.
- Allegro profile for shipments – you can force a specific profile/API credentials for the I ship with Allegro workflow or stay with whichever profile is active at the moment.
Predefined parcels and mappings
- The Defined parcel sizes table lets you name a parcel, assign it a WooCommerce shipping class, and set dimensions/weight. After marking a parcel as default, one click in the metabox loads the full parameter set.
- If you assign a shipping class, during automatic shipment creation the system scans order lines for that class and picks the proper dimension set.
- In the Drop-off point mappings section you map Allegro delivery methods to drop-off point codes (e.g., parcel lockers). Thanks to this, the Drop-off point code field in the order fills itself. In total—across all countries—over 200 delivery methods are available.
Metabox in the order
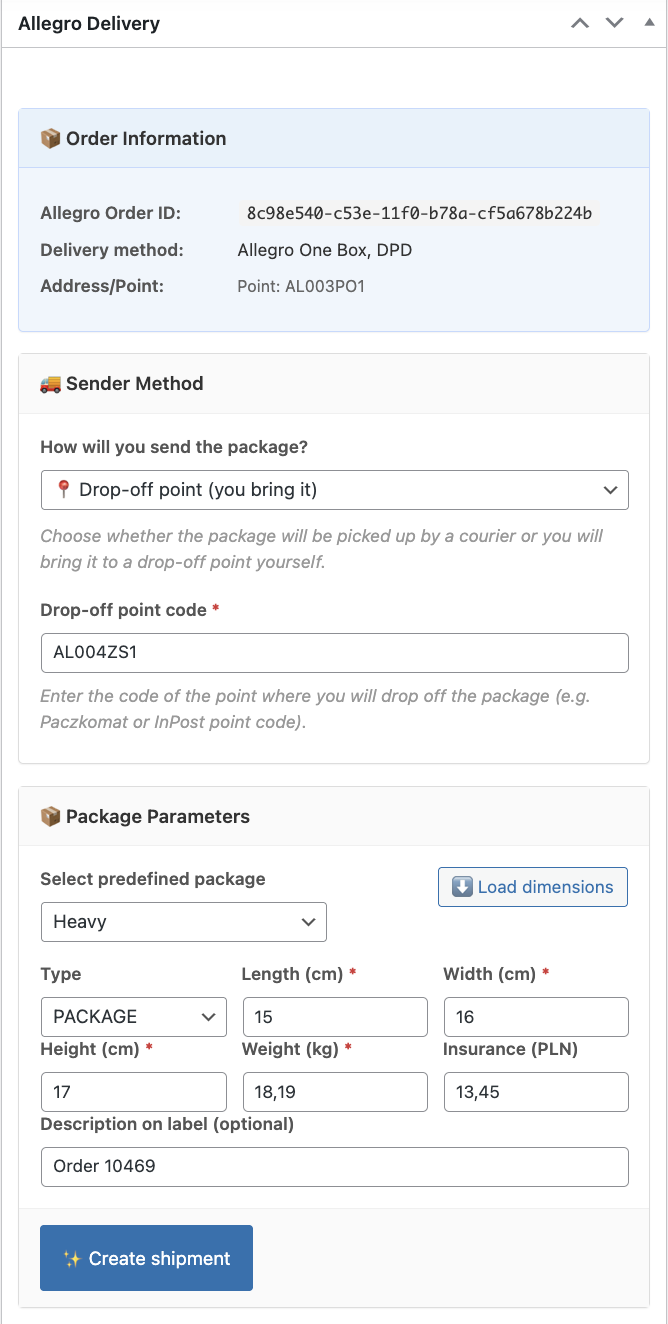
When you open an Allegro order you’ll see the I ship with Allegro metabox, which splits the workflow into four tabs:
- 📦 Order information – reminds you of the Allegro number, delivery method, address details, and pickup point.
- 🚚 Dispatch method – choose courier/point; in point mode the Drop-off point code field appears. The section also shows the COD amount.
- 📦 Parcel parameters – validations, the ⬇️ Load dimensions button, parcel parameter fields, label description, and the ✨ Create shipment button.
- 📋 Shipments – a table with actions (create/label/pickup/cancel), buttons 🔄 Refresh, 🏷️ Generate label, ❌Cancel shipment, plus the 🚚 Order pickup tab for courier mode.
Manual shipment creation
- Verify recipient data and delivery method in the info tab.
- Select the dispatch method; in point mode enter the drop-off code (it may load automatically from the mapping).
- Click ⬇️ Load dimensions or fill the parameters manually; set extra fields such as the InPost sending method, description, insurance.
- Use the ✨ Create shipment button; after a moment refresh the shipment list to see the status and number.
- Generate the label with the 🏷️ Generate label button and download the PDF/ZPL file.
- For courier mode fetch pickup windows (Get proposals) and order the pickup with Order pickup. You can cancel the shipment at any time.
Background automation
- Changing the order status to the configured threshold saves the
_allegro_pending_auto_shipmentmeta. The allegro_delivery cron (every 5 minutes) grabs up to 20 such orders and runs the process. - The system sets default dimensions (predefined parcels + shipping classes), parcel type, description Order {ID}, and insurance.
- Next it sends the command to create the shipment, waits for the ID, orders the courier (if courier mode is set), and generates the label.
- Labels are stored in
wp-content/uploads/woocommerce-allegro/ labels/YYYY/MM; a daily cron cleans up old files. - Status history is stored in the metabox and in the
_allegro_auto_shipment_status/
_allegro_auto_shipment_errormeta, making diagnostics easier.
Labels and documents
- You define the format (PDF or ZPL) and size (A4/A6) in the settings; manual generation uses the same preferences.
- The A4 variant adds a cut line by default; for thermal printers choose A6 or ZPL.
- Files are stored in monthly folders, which simplifies backup and
cleanup. - The label history is visible in the metabox, so you don’t have to look for them outside WooCommerce.
Courier pickups
- After creating the shipment and selecting courier mode, set the Ready date and click Get proposals to fetch available time
windows (for InPost you can pick ANY). - Choose a proposal and confirm with Order pickup; the command number and pickup status are saved.
- If you set courier mode globally, automation will order the pickup right after the shipment is created, using the preferred date and time.
