Running an online store can often feel overwhelming, particularly when you sell across multiple platforms, such as Allegro and WooCommerce. When you handle Allegro SMART shipments manually — including tasks like creating shipping labels, copying order details, and booking courier pickups — you not only spend a considerable amount of valuable time but also increase the likelihood of making mistakes. However, imagine if you could streamline this entire workflow and, at the same time, automate most of the repetitive tasks directly from your WooCommerce dashboard. In this comprehensive guide, we will show you how to automate Allegro Delivery (“I ship with Allegro”) shipping automation, including Allegro SMART and standard Allegro shipments, with the Allegro WooCommerce integration.
You will learn step by step how to configure the system for Allegro Delivery shipments (both SMART and non-SMART), generate shipping labels automatically, and even schedule courier pickups, ultimately turning a multi-step, time-consuming process into a fast, smooth, and efficient workflow.
By the end of this tutorial, you will understand not only how to automate Allegro SMART shipping but also why adopting this approach can significantly transform your e-commerce business. So, are you ready to improve your Allegro shipping workflow and reclaim your valuable time?
Contents
- The Challenge of Manual Allegro SMART Shipping
- Introducing the Solution: Seamless Allegro WooCommerce Integration
- What is Allegro Delivery (SMART and non-SMART) Shipping Automation in WooCommerce?
- Setting Up Your Allegro WooCommerce Integration for SMART Shipping
- Step-by-Step: Automating Allegro SMART Shipments
- Advanced Tips for Allegro SMART Shipping
- Why WP Desk's Allegro WooCommerce Plugin is Your Best Choice
- Conclusion
The Challenge of Manual Allegro SMART Shipping
Many WooCommerce store owners who sell on Allegro quickly recognize the value of Allegro SMART, as the program attracts buyers with benefits such as free deliveries and returns, which in turn help sellers boost their sales. Nevertheless, behind the scenes, sellers still have to manage Allegro SMART order fulfillment manually, and this process usually involves several time-consuming and repetitive tasks, including:
- Copying order details from Allegro into the shipping carrier’s system.
- Creating shipping labels one by one.
- Booking courier pickups or personally delivering parcels to drop-off points.
- Adding tracking numbers back into Allegro to keep customers informed.
Although each individual task might appear minor, collectively they consume a significant amount of time. Instead of dedicating their efforts to marketing, product development, or customer support, sellers often spend hours managing these repetitive shipping tasks. Furthermore, manual data entry increases the risk of errors, which can lead to issues such as incorrect addresses, delayed deliveries, or frustrated customers. Therefore, automation does not merely improve convenience; it becomes an essential strategy for efficiently scaling your business while minimizing errors and freeing up your time for higher-value activities.
Introducing the Solution: Seamless Allegro WooCommerce Integration
Imagine a world where your Allegro orders appear directly in your WooCommerce store, complete with all necessary shipping details. Then, with a few clicks (or even automatically in the background), shipping labels are generated, and a courier is scheduled. This is precisely what the Allegro WooCommerce plugin makes possible. It acts as a bridge, connecting your WooCommerce store with your Allegro account, allowing you to manage products, synchronize stock, and most importantly, handle orders and shipping from a single, familiar interface.
The plugin is designed to streamline your entire Allegro sales process. It goes beyond just listing products; it's about creating an integrated ecosystem where your Allegro sales flow effortlessly into your WooCommerce operations. This means less manual work, fewer errors, and more time for you to focus on growing your business. Are you ready to take control of your Allegro shipping and reclaim your time? Discover how the Allegro WooCommerce plugin can revolutionize your workflow today!
What is Allegro Delivery (SMART and non-SMART) Shipping Automation in WooCommerce?
Allegro Delivery shipping automation in WooCommerce refers to the process of automatically handling order fulfillment for Allegro orders using the “I ship with Allegro” (Allegro Delivery) service. This includes both Allegro SMART and standard (non-SMART) shipments.
Whether an order is placed with Allegro SMART or as a standard Allegro Delivery shipment, sellers use exactly the same integration and automation process.
The only difference lies in the settlement model:
for standard Allegro Delivery shipments, the seller is charged a fixed shipping rate by Allegro,
while for SMART orders the seller pays a smaller co-financing amount for the shipment.
From a technical and automation perspective, both types of orders are handled in exactly the same way.
Setting Up Your Allegro WooCommerce Integration for SMART Shipping
Set up the Allegro WooCommerce plugin to start automating Allegro Delivery shipments, including both SMART and non-SMART orders.
Prerequisites for Integration
- Active Allegro Account: Create a seller account with proper permissions.
- Plugin Installed: Install and activate the Allegro WooCommerce plugin.
- Connected Profile: Link at least one Allegro profile under WooCommerce → Allegro for API communication.
- Allegro Orders: Target orders originating from Allegro (via order/checkout ID).
- WordPress Cron: Keep your cron job active to trigger automatic shipment creation and label generation.
- Server Permissions: Allow writing to
wp-content/uploadsto store PDF/ZPL labels.
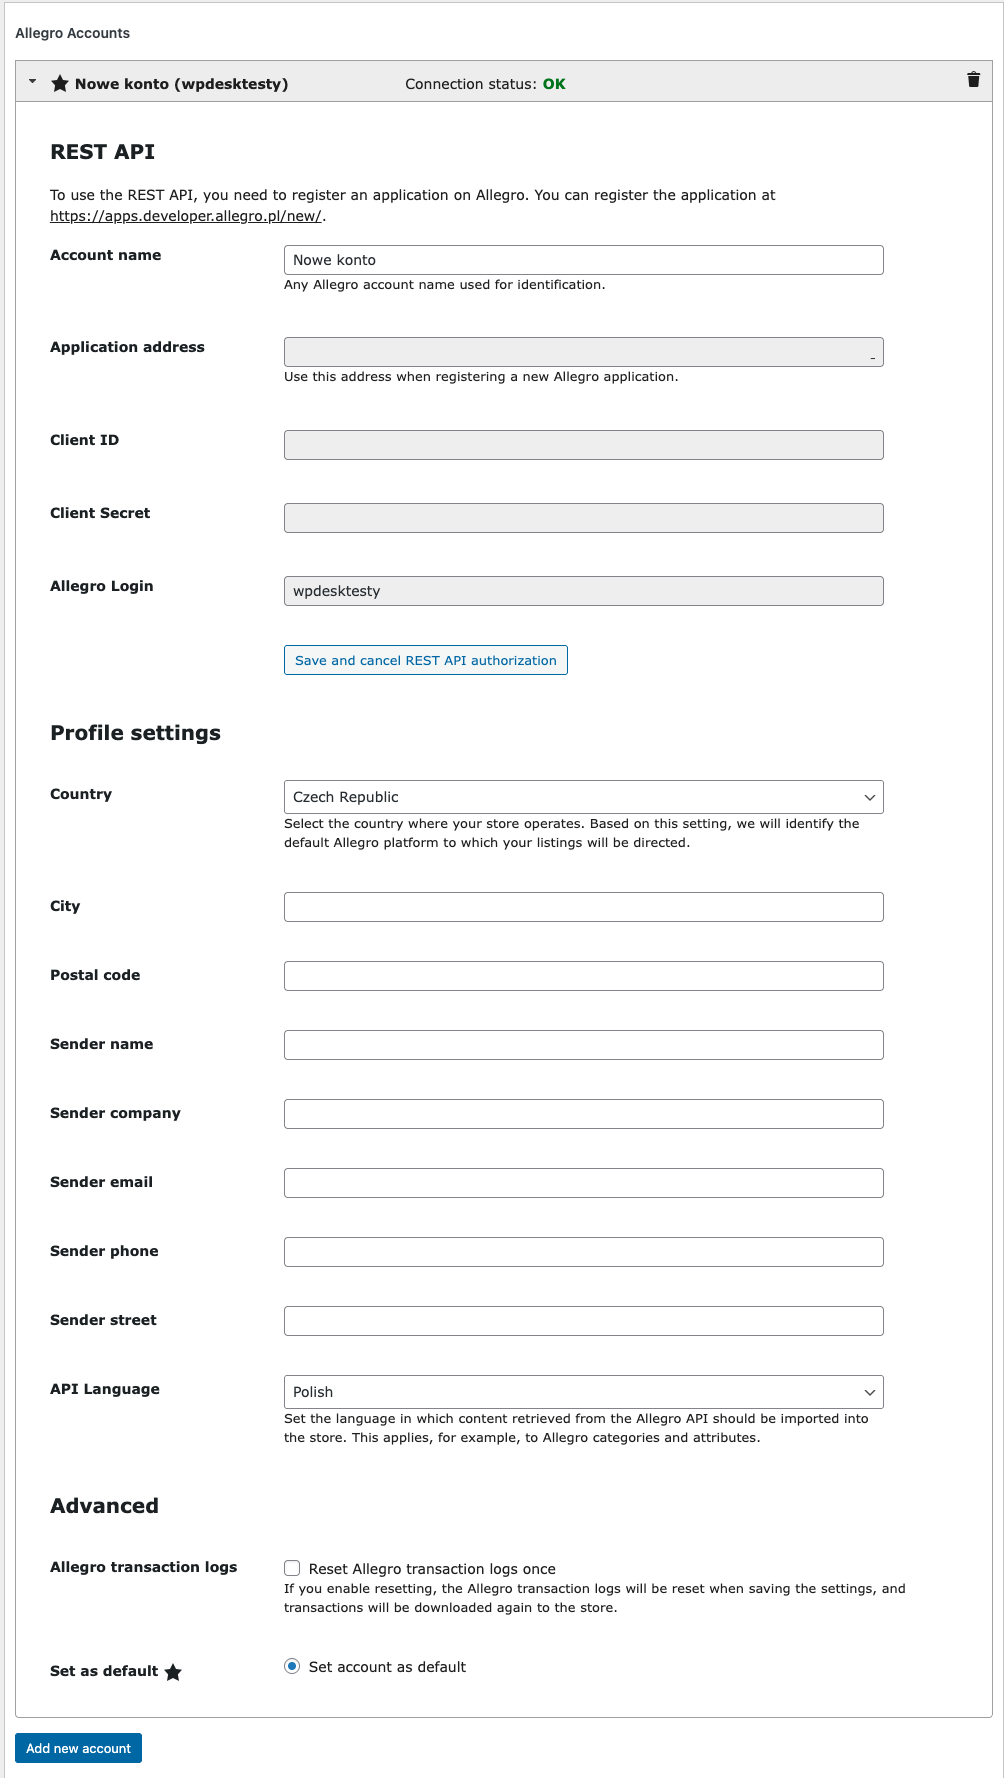
Essential Global Configuration
Configure global settings in the 'I ship with Allegro' module under WooCommerce → Allegro → Settings. Complete your profile fully, especially the _Street_ field (street name + building number) to prevent errors.
Service Configuration: The 'I Ship with Allegro' Panel
Open WooCommerce → Allegro → I ship with Allegro (admin.php?page=woocommerce_allegro_delivery) to configure automation.
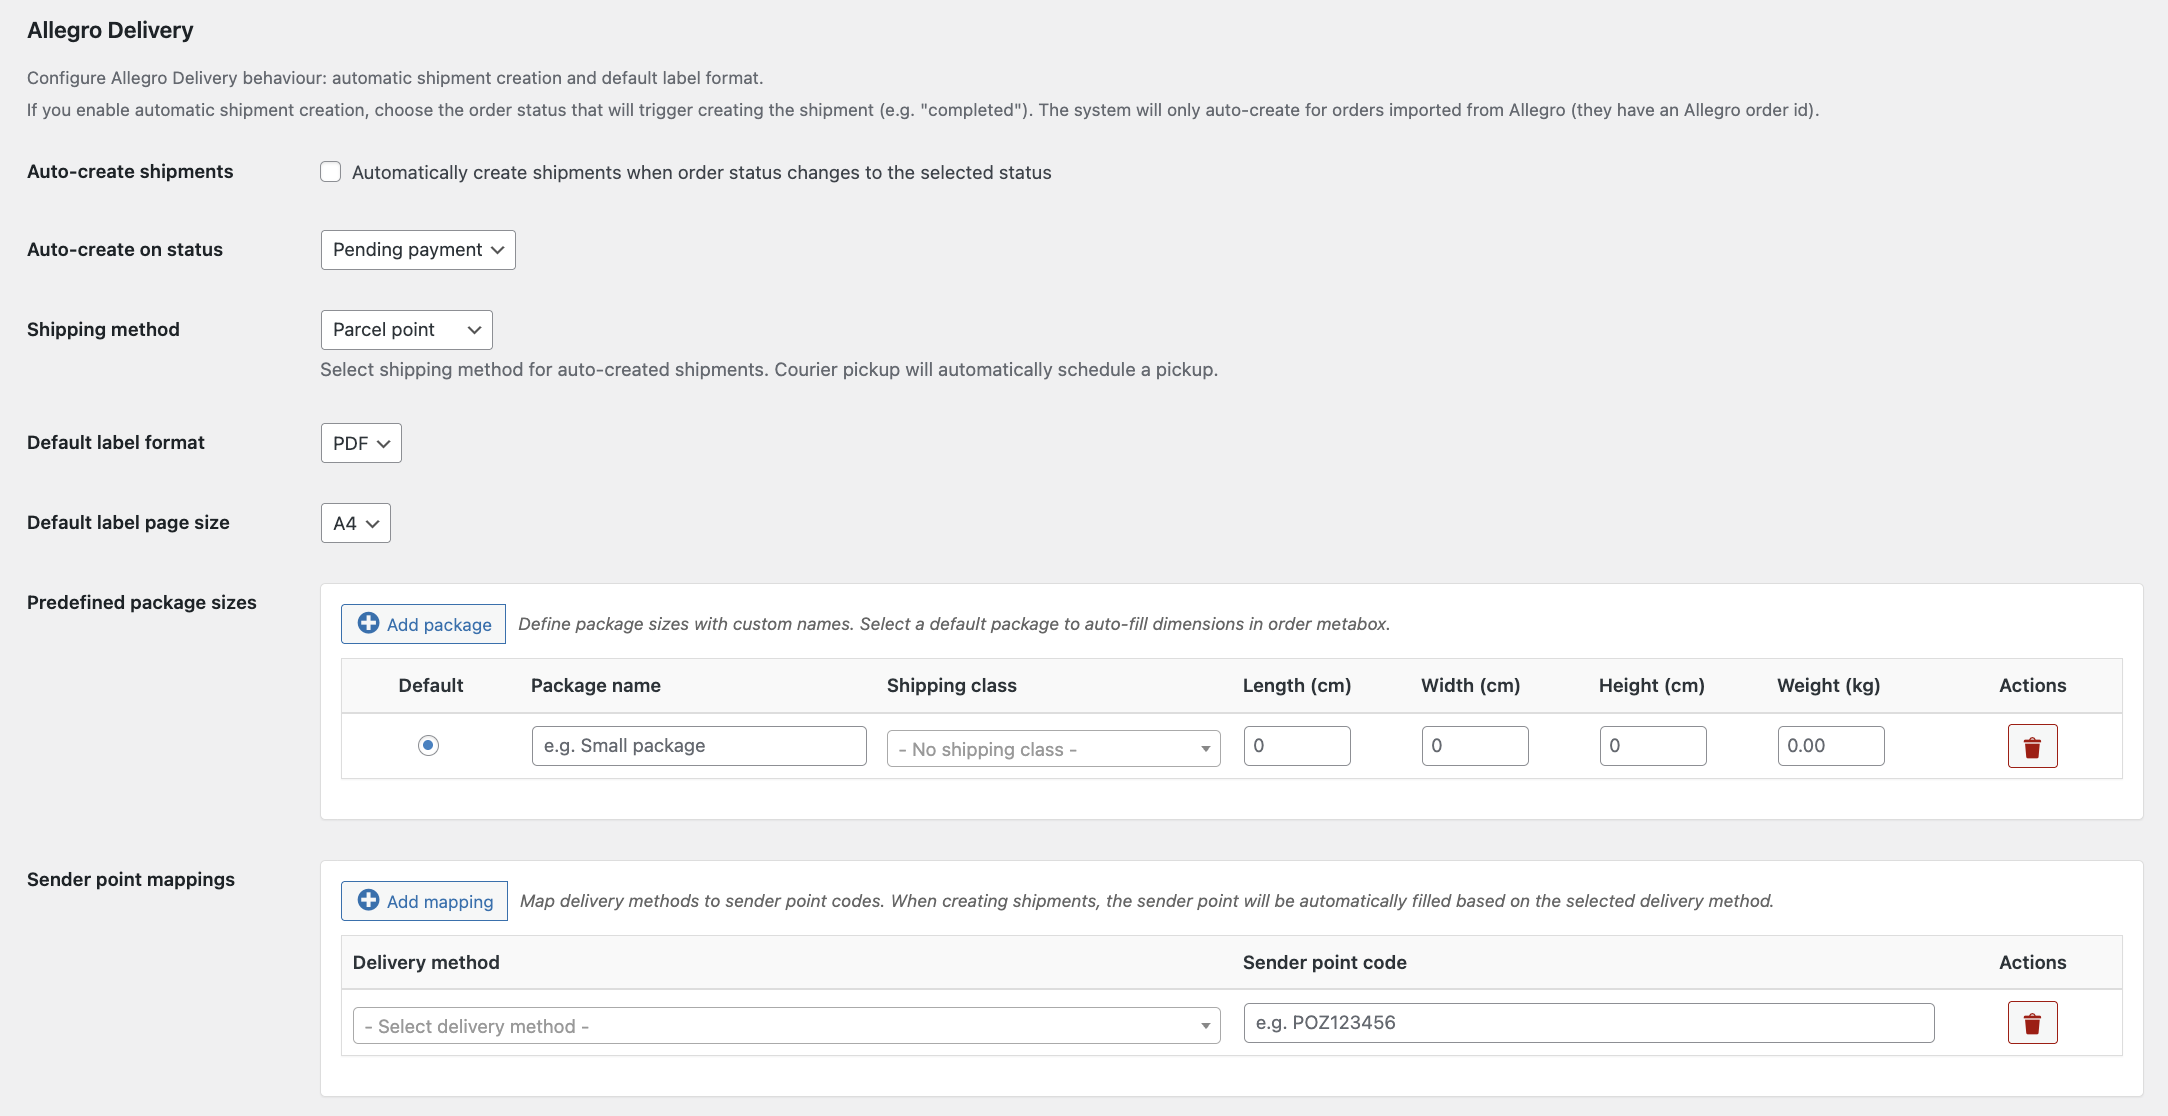 Adjust settings for automatic shipment creation and label generation.
- Automatic shipment creation: Enable to create shipments automatically when orders reach a chosen status.
- Trigger status: Select the WooCommerce order status (e.g., 'Completed') that starts automation.
- Default dispatch method: Choose 'Drop-off point' or 'Courier pickup' for automatic scheduling.
- Courier pickup window: Set preferred date and time frame for courier deliveries.
- Label parameters: Choose format (PDF/ZPL) and size (A4/A6). A4 adds a cut line for two labels per sheet.
- Allegro profile: Use a specific profile or the currently active one for shipments.
Predefined Parcels and Drop-off Point Mappings
Speed up shipping by defining standard parcel sizes and mapping Allegro delivery methods to drop-off points.
- Parcel sizes: Name parcels, assign WooCommerce shipping classes, set dimensions/weight, and mark defaults to load parameters with one click. Shipping classes auto-select dimensions during automatic shipment creation.
- Drop-off point mappings: Map Allegro delivery methods to drop-off codes. The order field populates automatically, covering 200+ delivery options across multiple countries.
Step-by-Step: Automating Allegro SMART Shipments
Now that you have completed the setup, let's walk through the process of managing and automating Allegro SMART shipments directly within WooCommerce, so you can handle orders more efficiently and reduce manual work.
Understanding Order Synchronization
The first crucial step in automation involves making sure your Allegro orders arrive in WooCommerce. The Allegro WooCommerce plugin takes care of this automatically.
When a buyer completes the delivery and payment form on Allegro, the plugin automatically imports the order into your WooCommerce store.
However, this works only if the corresponding Allegro auctions have been imported into WooCommerce first.
The plugin links orders to products based on imported offers, so if your listings were created directly on Allegro and have not been imported, the orders will not be downloaded.
You control this process through the “Download purchases from Allegro” setting under
WooCommerce → Allegro → Settings → Synchronization, which ensures that all new orders are captured promptly.
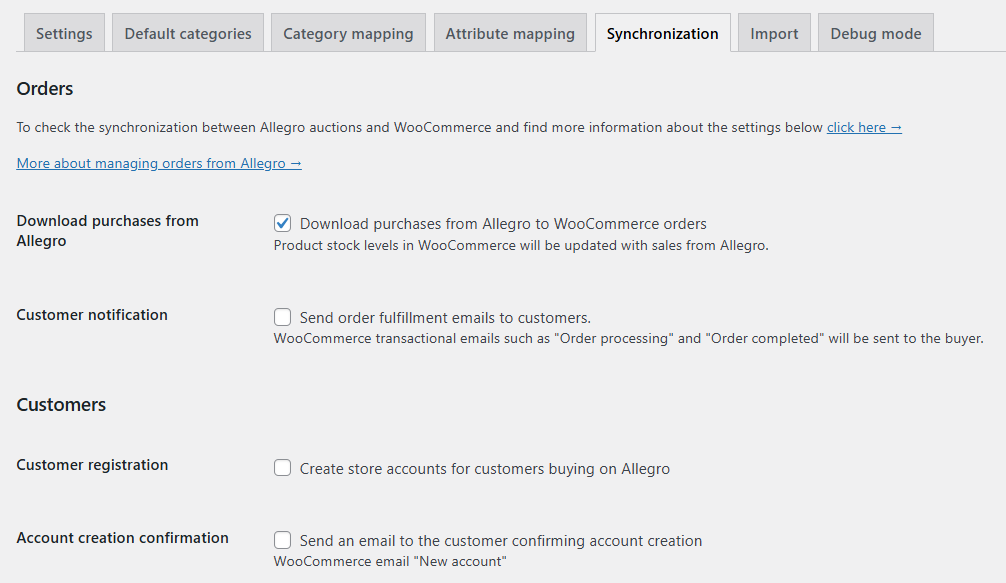 Configure automatic order import from Allegro to WooCommerce so all orders are centralized in one place.
Additionally, the plugin recognizes a wide range of Allegro shipping methods, especially those offered by popular Polish carriers like InPost and Poczta Polska. For example, it identifies:
- InPost: Paczkomaty 24/7, Allegro Paczkomaty InPost, Allegro Kurier24 InPost (including COD options).
- Poczta Polska: Economic/Priority postal packages, COD shipments, Allegro Registered Shipment, Pocztex Kurier48/24 (including COD options).
When you import an order with one of these methods, a special metabox appears on the WooCommerce order edit screen, ready for shipment generation. Thanks to this seamless integration, you can manage all Allegro orders alongside your regular WooCommerce sales without missing a single one.
The "I Ship with Allegro" Metabox in WooCommerce Orders
After importing an Allegro order, open its edit screen in WooCommerce (WooCommerce → Orders → Edit Order) to access the "I ship with Allegro" metabox. This panel acts as your central control for all Allegro SMART shipping tasks, organized into four intuitive tabs:
 Manage Allegro SMART shipments directly from the WooCommerce order screen using the 'I ship with Allegro' metabox.
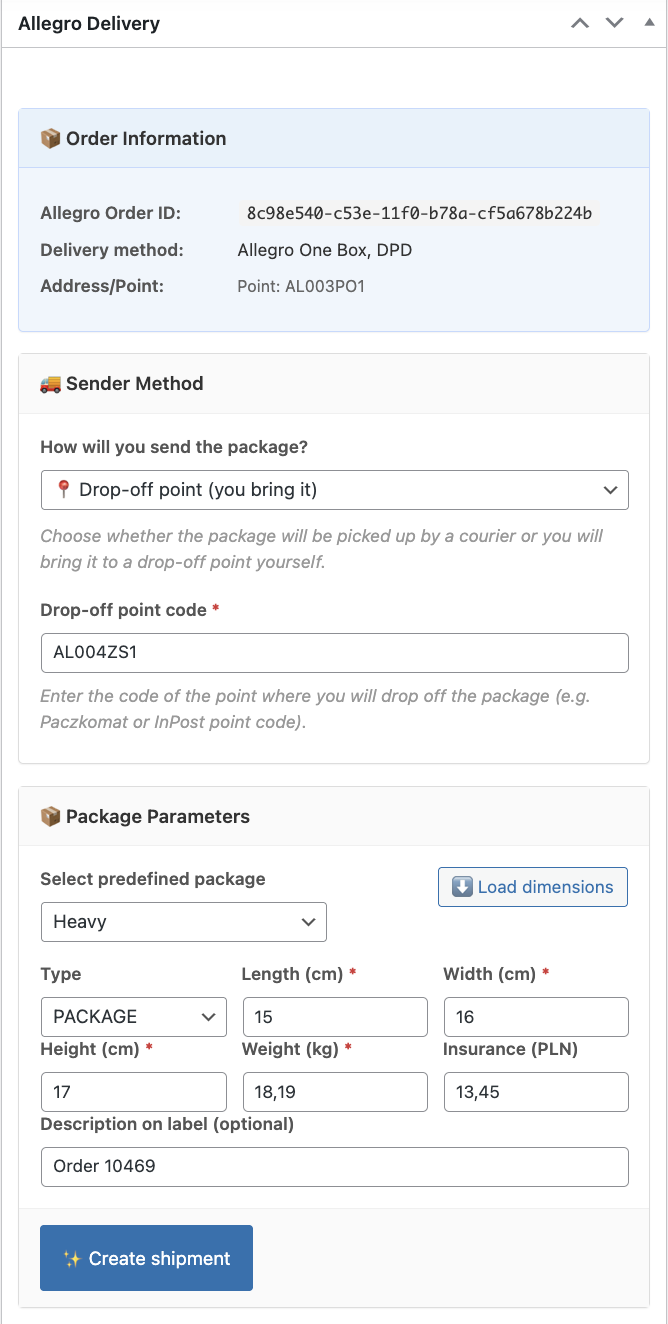
- 📦 Order Information: Get a quick overview of the Allegro order, including the Order ID, delivery method, recipient address, and any chosen pickup point.
- 🚚 Dispatch Method: Choose between 'Courier pickup' or 'Drop-off point'. If you select 'Drop-off point', the field for the drop-off code may auto-fill based on your mappings. This tab also shows any Cash on Delivery (COD) amount.
- 📦 Parcel Parameters: Set parcel dimensions (length, width, height) and weight. Use the '⬇️ Load dimensions' button to apply predefined parcel sizes, or manually fill in additional details such as the InPost sending method, label description, or insurance. Once completed, the '✨ Create shipment' button becomes active.
- 📋 Shipments: Track shipment history and manage actions like refreshing data, generating labels, and ordering courier pickups. For courier shipments, use the '🚚 Order pickup' tab to schedule collections.
This structured layout ensures that all essential information is visible and that you can manage every step of the shipping process efficiently in one place.
Manual Shipment Creation (The Foundation)
Even though full automation is the ultimate goal, understanding manual shipment creation provides a solid foundation and flexibility when needed. Follow these steps:
- Verify Recipient Data: Check the 'Order Information' tab to confirm recipient details and delivery method, preventing errors.
- Select Dispatch Method: In the 'Dispatch Method' tab, pick either 'Courier pickup' or 'Drop-off point'. Enter the drop-off code if needed.
- Load or Fill Parcel Parameters: In 'Parcel Parameters', click '⬇️ Load dimensions' to apply a predefined size or manually enter dimensions, weight, and extras like label description or insurance.
- Create Shipment: Click '✨ Create shipment'. Then refresh the 'Shipments' list to see status updates and the shipment number.
- Generate Label: In 'Shipments', click '🏷️ Generate label' to create a PDF or ZPL label according to your settings.
- Order Pickup (Courier Mode): In '🚚 Order pickup', fetch available time windows, select a proposal, and confirm. Please note that shipment cancellation is not available, as Allegro Delivery API does not allow canceling shipments for supported delivery methods.
This manual workflow demonstrates the Allegro WooCommerce plugin’s ability to simplify shipment management while providing full control.
Full Automation: Set It and Forget It
Full automation unlocks the plugin's true potential, saving time and letting you focus on other business areas without constantly monitoring Allegro orders. Here's how it works in the background:
- Triggering Automation: When an order reaches the 'Trigger status' you set (e.g., 'Completed'), the plugin adds a meta field
_allegro_pending_auto_shipment. - Cron Job Processing: WordPress cron runs the
_allegro_deliveryschedule every 5 minutes, scanning orders with this meta field and processing up to 20 at a time, balancing server load. - Automated Parameters: For each order, the plugin applies default dimensions from predefined parcels, sets parcel type, generates a label (e.g., 'Order {ID}'), and applies insurance.
- Creating Shipments and Ordering Couriers: The plugin sends commands to Allegro's API to create the shipment. If 'Courier pickup' is selected, it schedules the pickup automatically using your preferred settings.
For InPost shipments, it is only possible to select the first available pickup term – choosing a specific date and time is not supported by the carrier. - Generating and Storing Labels: Labels are created and stored in organized monthly folders (e.g.,
wp-content/uploads/woocommerce-allegro/labels/YYYY/MM), with a daily cleanup job to maintain order. - Updating Status: The plugin logs all updates, including errors, in the 'I ship with Allegro' metabox and the meta fields
_allegro_auto_shipment_status/_allegro_auto_shipment_error, allowing easy troubleshooting.
This hands-off workflow ensures Allegro SMART orders are processed quickly and accurately, significantly reducing manual effort while maximizing efficiency.
Advanced Tips for Allegro SMART Shipping
To get the most out of your Allegro SMART shipping automation, consider these advanced tips:
Label and Document Management
The Allegro WooCommerce plugin offers flexibility in how you handle your shipping labels:
- Format and Size: You define the label format (PDF or ZPL) and size (A4 or A6) in the plugin settings. For standard office printers, A4 PDF is suitable, with a default cut line for two labels per sheet. For thermal label printers, choose A6 or ZPL for optimal results.
- File Storage: All generated labels are stored in monthly folders within your
wp-content/uploads/woocommerce-allegro/labels/directory. This organized structure simplifies backup and file management. The label history is also visible directly in the order metabox, eliminating the need to search for files outside WooCommerce.
Courier Pickups: Scheduling and Status
Efficient courier management is key to timely deliveries:
-
Manual Scheduling: After creating a shipment in courier mode, you can request available pickup proposals from the courier.
For InPost, only the first available pickup term can be selected – choosing a specific date and time is not possible.
Once the proposals are fetched, select the available option and confirm it using “Order pickup”. The command number and pickup status are then saved for your reference. - Automated Pickups: If you've configured 'Courier pickup' as the default dispatch method globally, the automation will order the pickup right after the shipment is created, using your preferred date and time settings. This means you don't even need to manually schedule pickups for automated orders.
Troubleshooting Common Issues
Even with automation, occasional issues can arise. Here are some common problems and how to address them:
- API Connection Errors: Ensure your Allegro API credentials are correct and your profile details (especially address fields) are fully completed in the plugin settings.
- Shipments Not Being Created Automatically: Double-check that 'Automatic shipment creation' is enabled and the 'Trigger status' is correctly configured. Verify that your WordPress cron job is running regularly.
- Labels Not Generating: Ensure your server has write permissions to
wp-content/uploads/woocommerce-allegro/labels/. Check the order's status history in the metabox for any error messages. - Courier Not Picking Up: Confirm that the pickup was successfully ordered in the 'Shipments' tab. Review the 'Courier pickup window' settings for any conflicts.
- Problems with courier ordering: Always verify the shipment directly in your Allegro seller panel.
All ordered shipments are visible there. If a shipment does not appear in Allegro, it means it was not created correctly and the cause should be diagnosed before continuing.
Always refer to the status history in the 'I ship with Allegro' metabox for diagnostic information. This will often point you directly to the cause of the problem.
Why WP Desk's Allegro WooCommerce Plugin is Your Best Choice
Choosing the right integration for your e-commerce store is crucial. The WP Desk Allegro WooCommerce plugin stands out as the optimal solution for managing your Allegro sales and automating SMART shipping. Here’s why:
- Comprehensive Integration: It's not just about shipping. The plugin offers full Allegro integration for WooCommerce, allowing you to manage auctions, synchronize prices and stock, and import orders, creating a truly unified selling experience.
- Time-Saving Automation: The core benefit is the significant reduction in manual labor. By automating label generation, tracking updates, and courier pickups, you free up invaluable time for strategic tasks that grow your business.
- Error Reduction: Automated processes minimize human error, leading to more accurate shipments, fewer customer complaints, and a better reputation for your store.
- Seamless Compatibility: The plugin is fully compatible with WooCommerce and integrates smoothly with other essential WP Desk shipping plugins like eNadawca and InPost, enhancing your shipping capabilities even further.
- Expert Support and Documentation: WP Desk is dedicated to providing high-quality, up-to-date documentation and responsive support, ensuring you always have assistance when you need it.
- Continuous Updates: As Allegro and WooCommerce evolve, so does the plugin. You benefit from continuous updates that ensure compatibility and introduce new features.
By choosing WP Desk, you're not just getting a plugin; you're investing in a robust, reliable, and continuously improved solution designed to make your Allegro and WooCommerce operations as efficient as possible. It's the smart choice for any serious Allegro seller.
Conclusion
Automating Allegro SMART shipping in WooCommerce has become a strategic must for serious sellers. The Allegro WooCommerce plugin transforms a manual, error-prone process into a streamlined workflow, handling automatic order import, label generation, and courier pickups.
The benefits are clear: save time, reduce costs, minimize shipping errors, and keep customers happy. Centralizing Allegro operations in WooCommerce gives you control, insight, and more freedom to grow your business. Don’t let manual shipping slow you down — automate Allegro SMART shipping today.
Does Allegro work with WooCommerce?
Yes, Allegro integrates with WooCommerce via the Allegro WooCommerce plugin, letting you manage listings, stock, prices, and orders in one place.
Can I automate Allegro SMART shipping in WooCommerce?
Yes, the plugin automates Allegro SMART shipping: it generates labels, updates tracking, and schedules courier pickups from WooCommerce.
Can WooCommerce generate Allegro shipping labels automatically?
Yes, the plugin creates PDF or ZPL labels automatically once Allegro orders are imported and processed.
How to manage Allegro orders and shipping in one place?
Use the plugin to import Allegro orders into WooCommerce and manage shipment creation, labels, and courier scheduling via the 'I ship with Allegro' metabox.
Which shipping carriers are supported for Allegro SMART automation?
The plugin supports popular Polish carriers like InPost Paczkomaty/Kurier and Poczta Polska eNadawca, mainly via WP Desk integrations.
