There are multiple situations where exporting WooCommerce products may be useful or even required. For example, if you decide to migrate your WooCommerce store, and move all or some of your products to a different ecommerce store. Exporting products to a CSV file may be useful if you decide to create a backup file with your products.
Contents
- Why to use Dropshipping Export Products for WooCommerce?
- How to export WooCommerce products to CSV - step-by-step guide
- Export products from WooCommerce in 4 steps
- How to export WooCommerce products to Excel?
- All you need to know about WooCommerce product export import
- How to export WooCommerce products to Shopify with a plugin
- How to export WooCommerce products with images?
Why to use Dropshipping Export Products for WooCommerce?
WooCommerce may be helpful, but at the same time it has some limitations. That’s why we decided to create a plugin which has some advantages over WooCommerce in terms of exporting products - not only to CSV files.
Our WordPress plugin lets you export WooCommerce products like a PRO. There are no limitations on a number of products to export. You are welcome to export even thousands of products to one CSV file. And yes - it works for variable products as well.
How to export WooCommerce products to CSV - step-by-step guide
I’m not a fan of super long introductory parts, so let’s dive into the crème de la crème of this article, which is a short guide, how to export products to an external CSV file. By short, I do not mean that it will lack of explanation. It is short because I like to keep things easy, and do not overcomplicate. Not to mention, that exporting products with our plugin is a piece of cake, and literally, anyone can do it.
Step 1. Select types of products to export
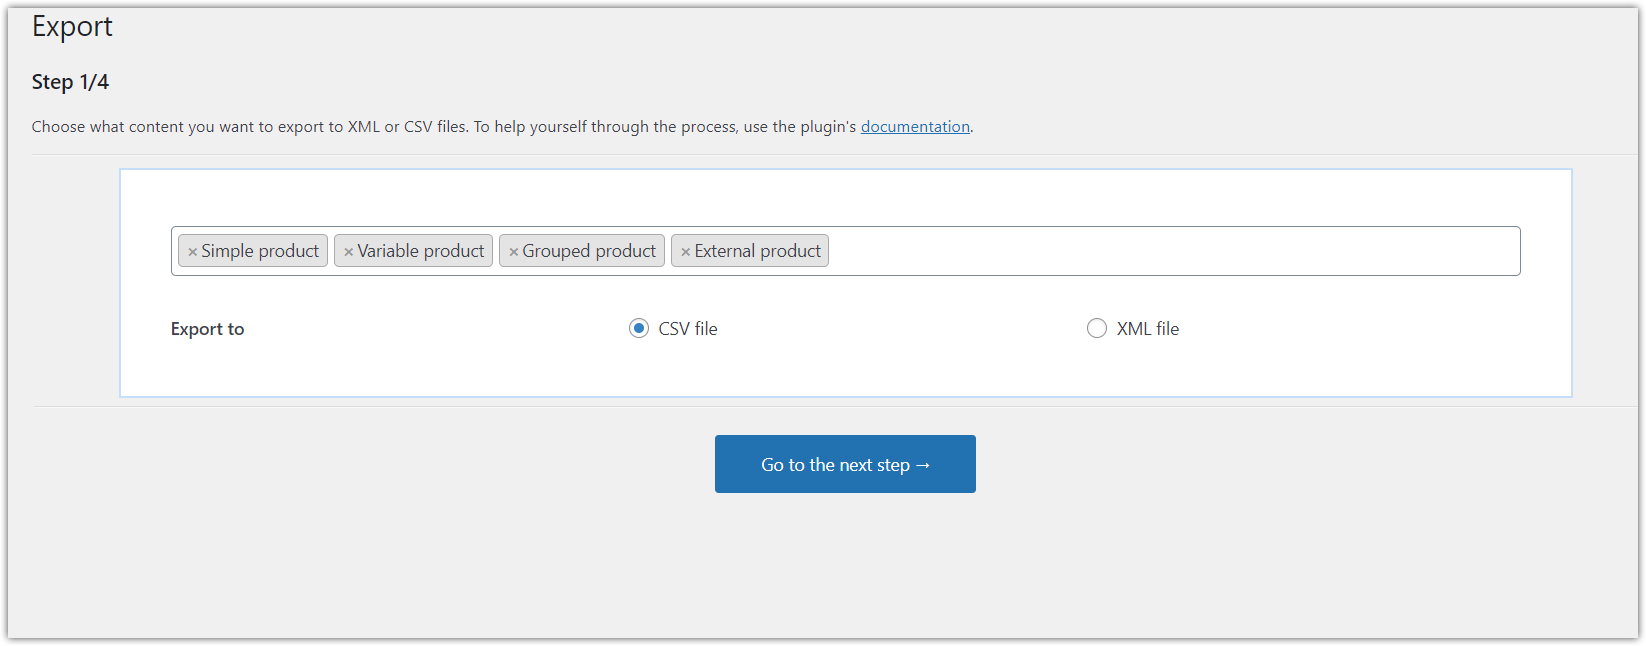
We’ll start with selecting product types. By default, all product types will be selected. However, you can limit your product export to, let’s say, simple or variable products only. Besides those, Dropshipping Export Products for WooCommerce supports grouped and external products as well.
I decided to go the easy way, and simply export all products:
Step 2. Conditional logic
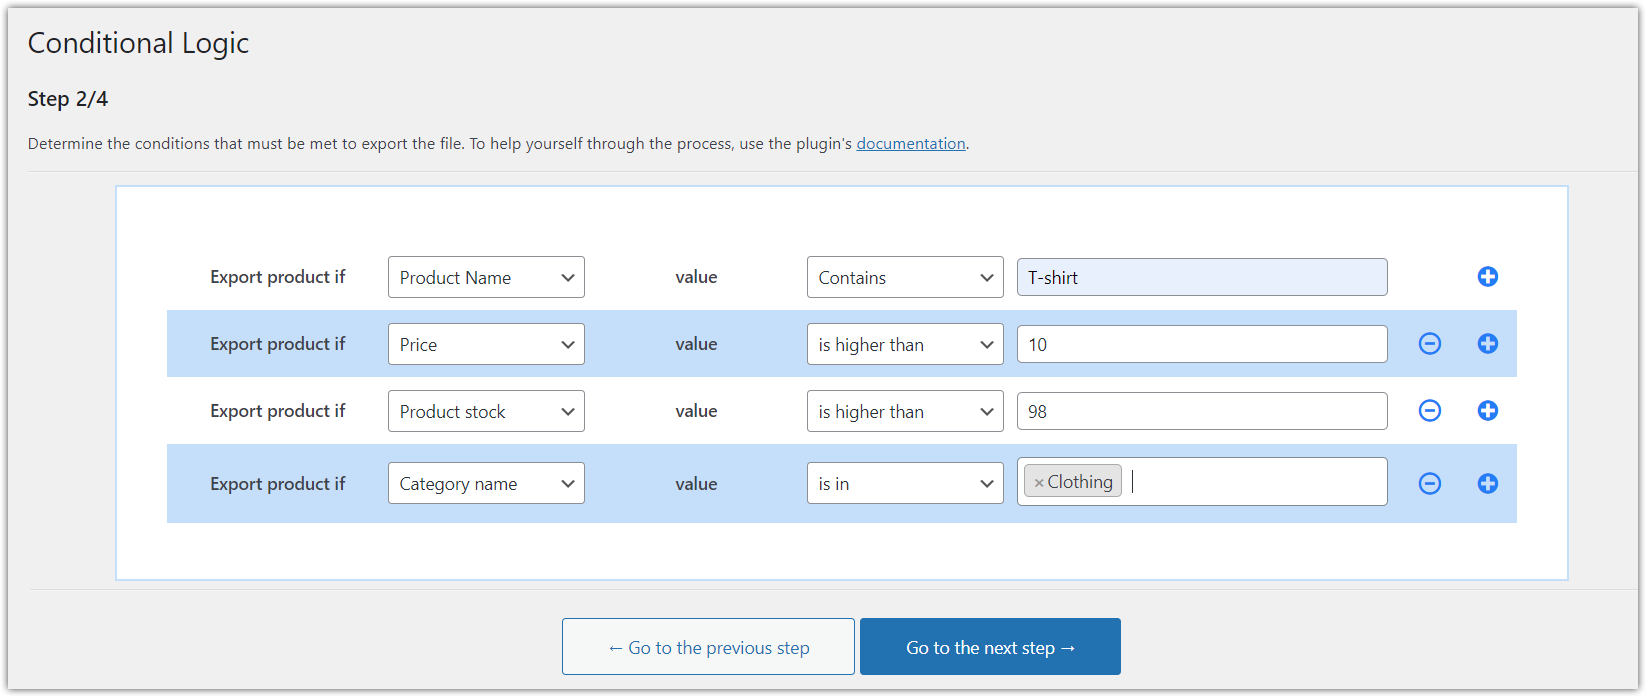
It is an optional step, which means that you can simply hit the Go to the next step button, and move to the next step.
However, a word of explanation, for those who are interested in conditional logic and want to have full control over which products should have been exported.
In this step, you can set a number of conditions, which apply to your export. For this tutorial, we will go the easy way, so I won’t select any conditional logic here. If you decide to choose a similar path, your screen should look like this:

Hit the Go to the next step button to move further.
Step 3. Product mapper in Dropshipping Export Products for WooCommerce
In this step, you’ll see a big table which can look a bit overwhelming at first, but no need to worry. I’ll shortly explain these fields to you. First, let’s take a brief look at the screenshot:
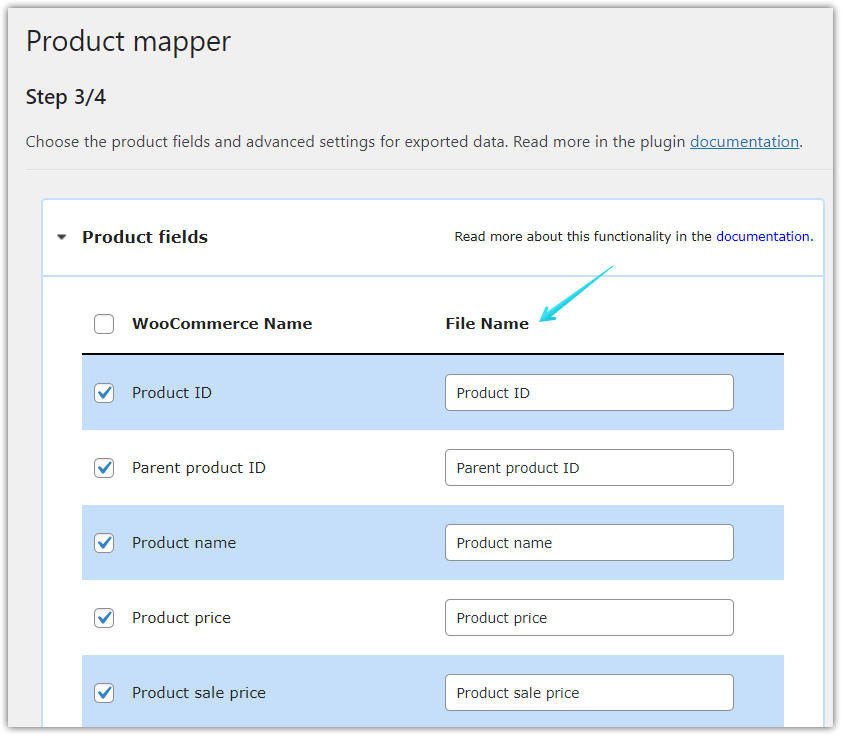
Product fields are simply data and values associated with your products. We assume that you’d like to export all of them to a CSV file. However, it is entirely up to you. If, for any reason, you decide that you do not need to export, let’s say, the Product ID, just uncheck this field.
Similarly, for product fields on the top-right part of the screen. Here, you can select some additional fields like size, color, shape or simply select all, to export all fields.
Lastly, advanced fields. These are a bit more advanced (hence the name), so in this tutorial we’ll only scratch the surface, and move along.
Advanced fields are basically a mix of conditions, which you can apply to the exported file. You can do it when you do not want to simply create a 1:1 export of your product, but you’d like to make some modifications to it.
Let’s take a look at the screenshot:
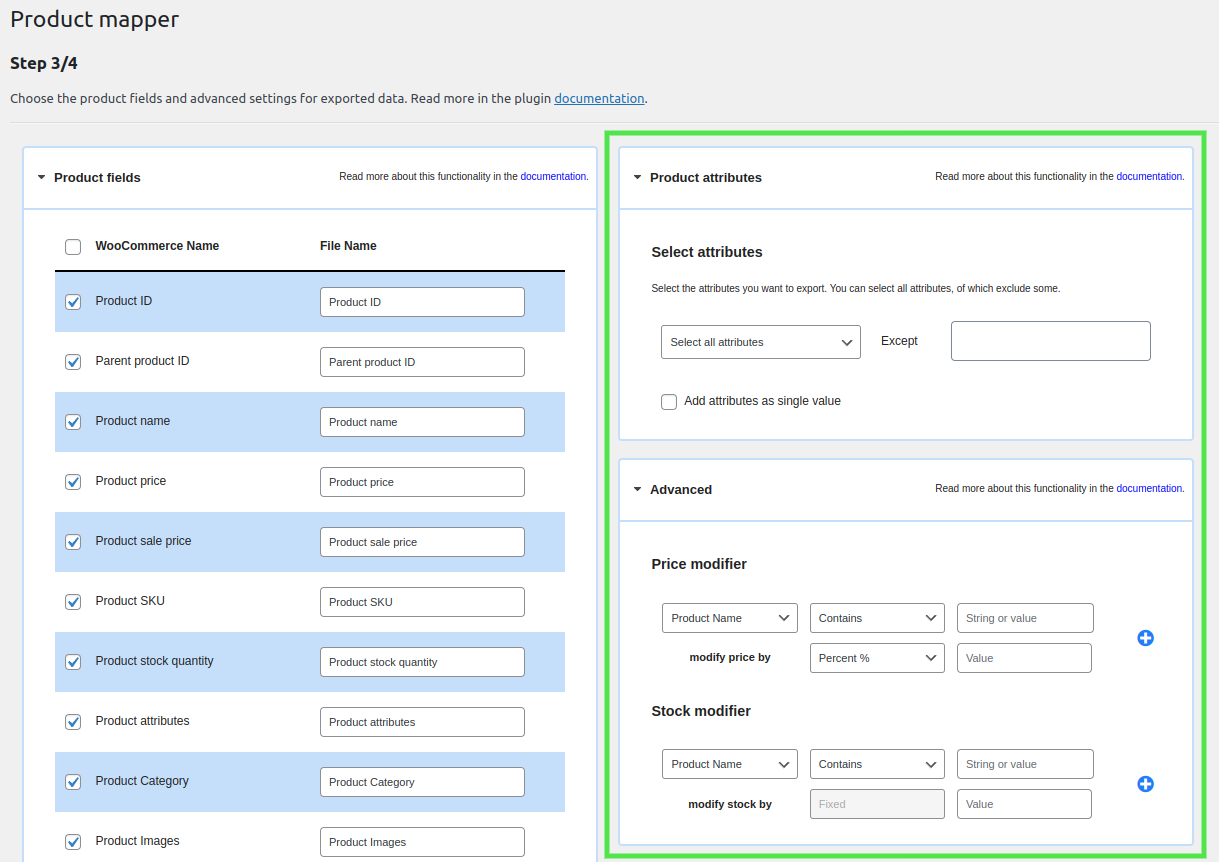
As you can see, there are tons of available options. Super useful feature, and I can imagine thousands of use-cases for it. However, let’s keep this guide as simply as possible. In such a case… you are right. Click on the Go to the next step button.
Step 4. Product export options
We’re almost there! The final step, in which we’ll make some decisions. Here’s how product export options look like:
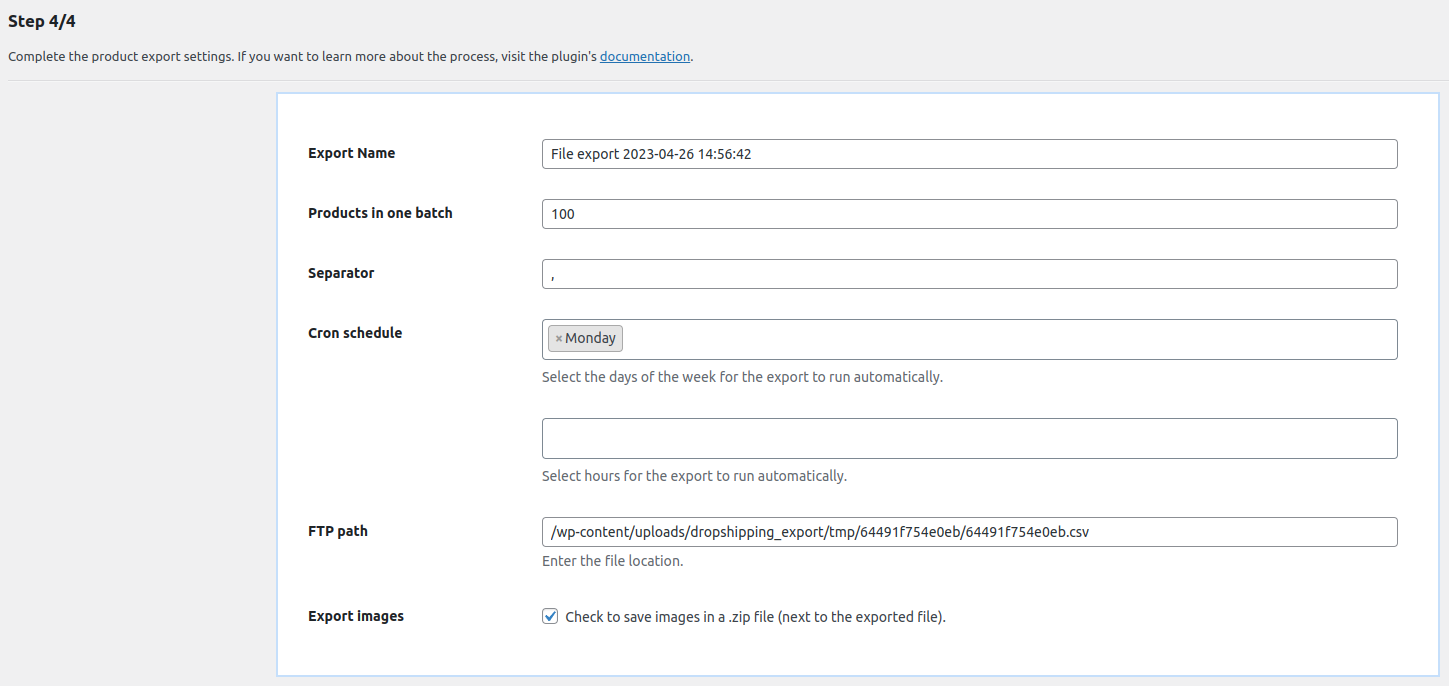
From the top to bottom, you can:
- Choose the name of your newly created CSV file.
- Decide for how many batches you want to split your products. If you decide to go for 100, and have fewer products, they will be simply exported at once. I’d say that this setting becomes more useful if you have numerous products. And its usefulness gradually increases with the number of products. Thanks to it, exports will be as smooth as possible.
- Choose separator field. I’d suggest going for comma, but you are welcome to choose pipeline | or semicolon ; or any other.
- Cron settings. This setting deserves a separate article. It is so useful! You can do it to create a recurring Cron event, which will create a CSV file with exported products automatically, like every Monday at 6pm.
- Next up is the file location. Select a place where you want to save a CSV product file. It can be your server or external server.
- Lastly, if you’d like to export images as well, all you need to do is select the checkbox.
If you filled all the necessary fields, simply click the Start Export button.
Summary of export WooCommerce products to CSV
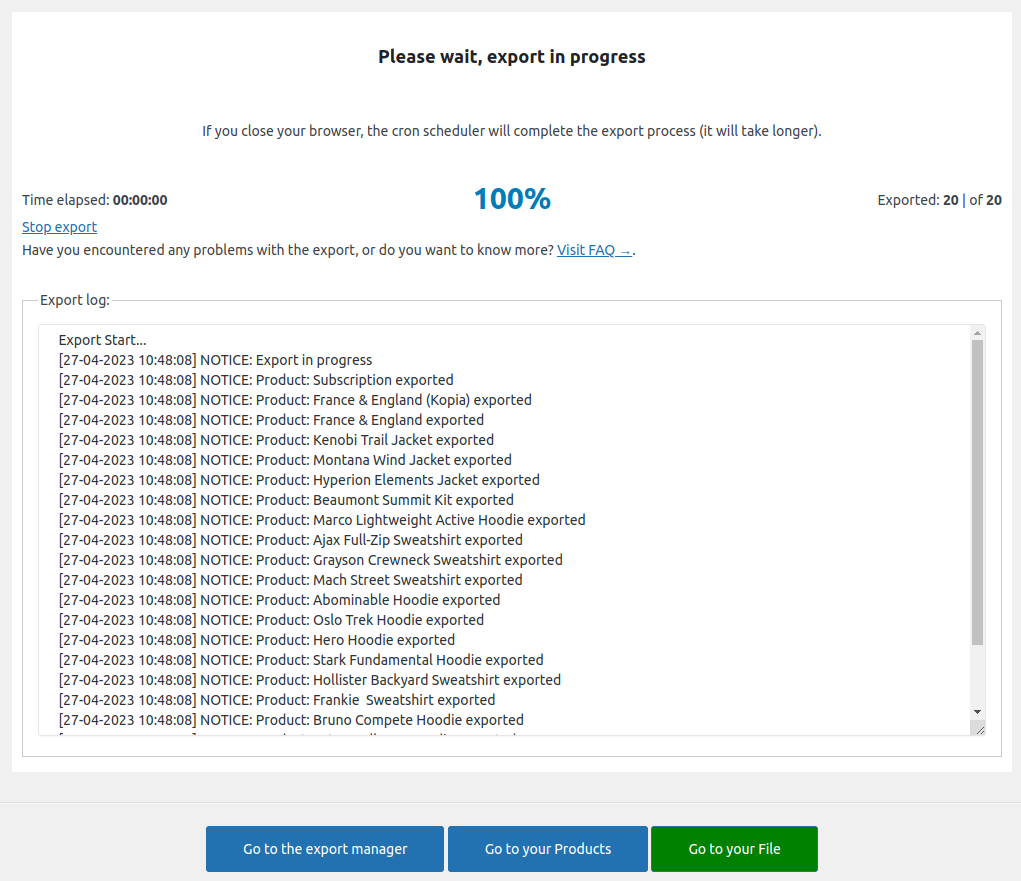
On this screen, you can see a summary of the product export. As you probably noticed, we like to keep things simple, so this screen is no different. Basic information, for a better look at what is going on with your products.
Two things worth mentioning are the option to cancel and logs. Obviously, you can cancel your export when it is still in progress. Secondly, if anything goes wrong, the export log will tell you a bit more about what happened. If you send that log to us, we’d gladly tell you even more about it.
Designing products to be easy to use does not mean that they have to be simple. That’s why when your export is finished, you’ll not only receive a CSV file, but it will be saved as a template, which you can access anytime by navigating to Dropshipping Export > Export Manager.
Here are all of your exports, and here you can edit, clone, change or simple start a new export.
All Plugins Bundle £99
20 plugins included! 1 Site for each plugin Regular updates and support Priority 1-on-1 Support 30-day money back guarantee
Add to cart or View DetailsConclusion
All good things end quickly ;)
My goal was to answer the question, how to export WooCommerce products to a CSV file. I hope that, beside the answer to this question, you saw that exporting products with Dropshipping Export Products for WooCommerce (even in more advanced scenarios!) is super easy.
However, if you have any questions, contact us. We’re waiting for your questions and valuable feedback.


