Contents
Key plugin features
Omnibus for WooCommerce records the history of product price changes and displays information about the lowest price from the selected period to customers, by default from the last 30 days. The plugin works automatically after activation and records changes to regular and sale prices, including when a sale has a schedule set.
Key plugin features:
- automatic recording of the price history of WooCommerce products,
- displaying the lowest price and the date it applied on the product page,
- the option to set the number of days taken into account when searching for the lowest price,
- choosing how the lowest price is calculated: from the current date or from the date of the last price reduction,
- support for variable products: a separate message for the selected variation or one lowest price among all variations,
- the option to display the message on the product page, in product archives, and in the cart,
- a custom message format using the
{date},{price}, and{days}variables, [omnibus_price]and[omnibus_price_message]shortcodes for manually inserting the price or the full message,- the “Omnibus: price history” table on the product edit screen,
- support for WPML / WooCommerce Multilingual & Multicurrency, including prices in different currencies,
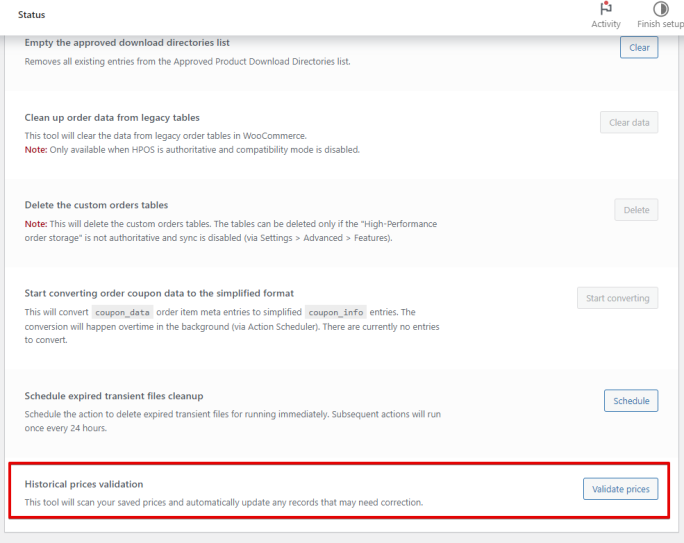
- the “Verify prices” tool in WooCommerce → Status → Tools, useful when there are issues with historical price records.
The plugin is especially useful for stores that regularly change prices, run time-limited promotions, use variable products, or sell in multiple currencies. It helps display information about the lowest price to customers in a way that matches the store configuration and reduces the need to manually monitor price history.
Demo
On the demo page, you can check how the PRO versions of our plugins work before purchase. You only need a valid email address to create a test account.
Installation
Subscription activation
What the plugin does
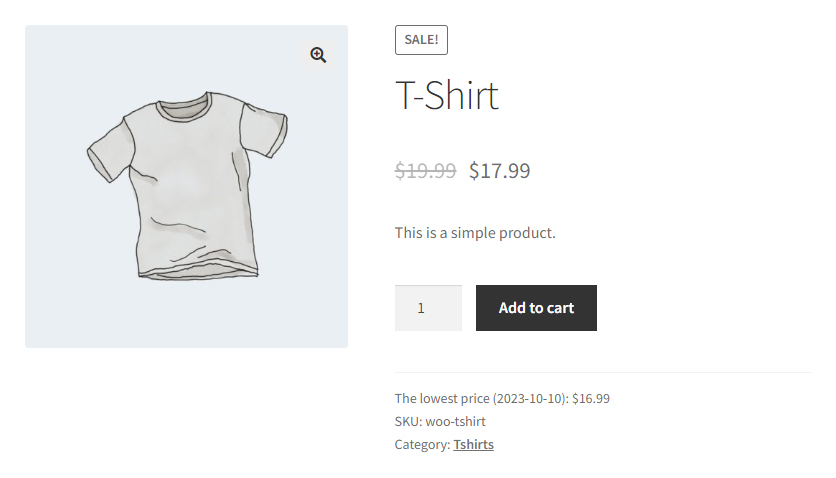
The plugin’s basic function is to show the lowest product price and the date when it applied.
Price history
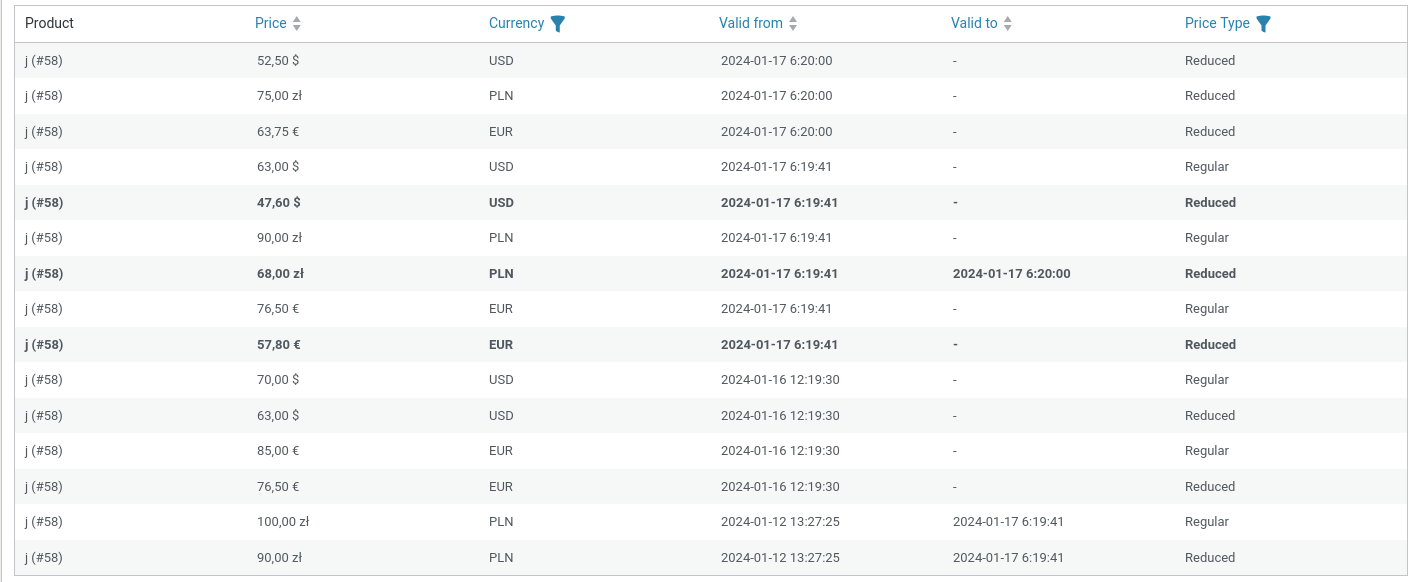
Each product price change is saved to the table in the Omnibus: price history section as a new row or as a change to an existing entry.
The historical prices table supports sorting, and the lowest prices in different currencies are highlighted in bold.
Product
Shows the product name and its ID. The plugin recognizes variations and displays them separately.
This parameter is not changed when saving new prices.
Price
Shows the price.
This parameter is not changed when saving new prices.
Currency
Shows the currency.
This parameter is not changed when saving new prices.
Valid from
Shows the date and time when the price was created. This is the moment from which the price applied / applies / will apply. The date in Valid from is not the same as the date the price was saved. For example, if you save a scheduled sale price, this date will match the future sale schedule start date.
This parameter is changed when saving new prices only in certain exceptions, for example after removing a sale price schedule.
Valid to
Shows the date and time when the price was closed. This is the moment until which the price applied. A price with a date in Valid to is closed and will never be edited again; dates will not be overwritten.
If Valid to is empty, the price still applies, meaning no new price has appeared to overwrite it, or the sale schedule end date has not been set.
This parameter is changed when saving new prices.
Price type
Shows the price type - Regular or Reduced.
This parameter is not changed when saving new prices.
Examples of saving dates in Valid from / Valid to
Reducing the regular price
A new row containing the reduced regular price will appear in the table.
The date in Valid from will match the date the changes were saved.
The date in Valid to will be empty.
The previous regular price will be closed in the Valid to column with the date the changes were saved.
Reducing the sale price
A new row containing the reduced sale price will appear in the table.
The date in Valid from will match the date the changes were saved.
The date in Valid to will be empty.
The previous sale price will be closed in the Valid to column with the date the changes were saved.
Adding a scheduled sale price (past start date)
A new row containing the sale price will appear in the table.
The date in Valid from will match the date the changes were saved.
The date in Valid to will match the schedule end date, if set, or will be empty.
The previous sale price, if set, will be closed in the Valid to column with the date the changes were saved.
Adding a scheduled sale price (future start date)
A new row containing the sale price will appear in the table.
The date in Valid from will match the schedule start date, if set, or the date the changes were saved.
The date in Valid to will match the schedule end date, if set, or will be empty.
The previous sale price, if set, will be closed in the Valid to column with the date the changes were saved.
Changing the sale schedule (without changing the price)
No new row will appear in the table.
The dates in Valid from and Valid to will be updated, if they were changed.
The previous sale price, if set, will remain closed; the dates in Valid from and Valid to will not change.
Removing the schedule
No new row will appear in the table.
The date in Valid from will be changed from the schedule start date, if set, to the date the changes were saved.
The date in Valid to will be removed.
Requirements
Since version 2.0.0, the plugin requires WooCommerce version 10.5.
First steps
The plugin does not require any user intervention and works based on its initial settings.
Settings
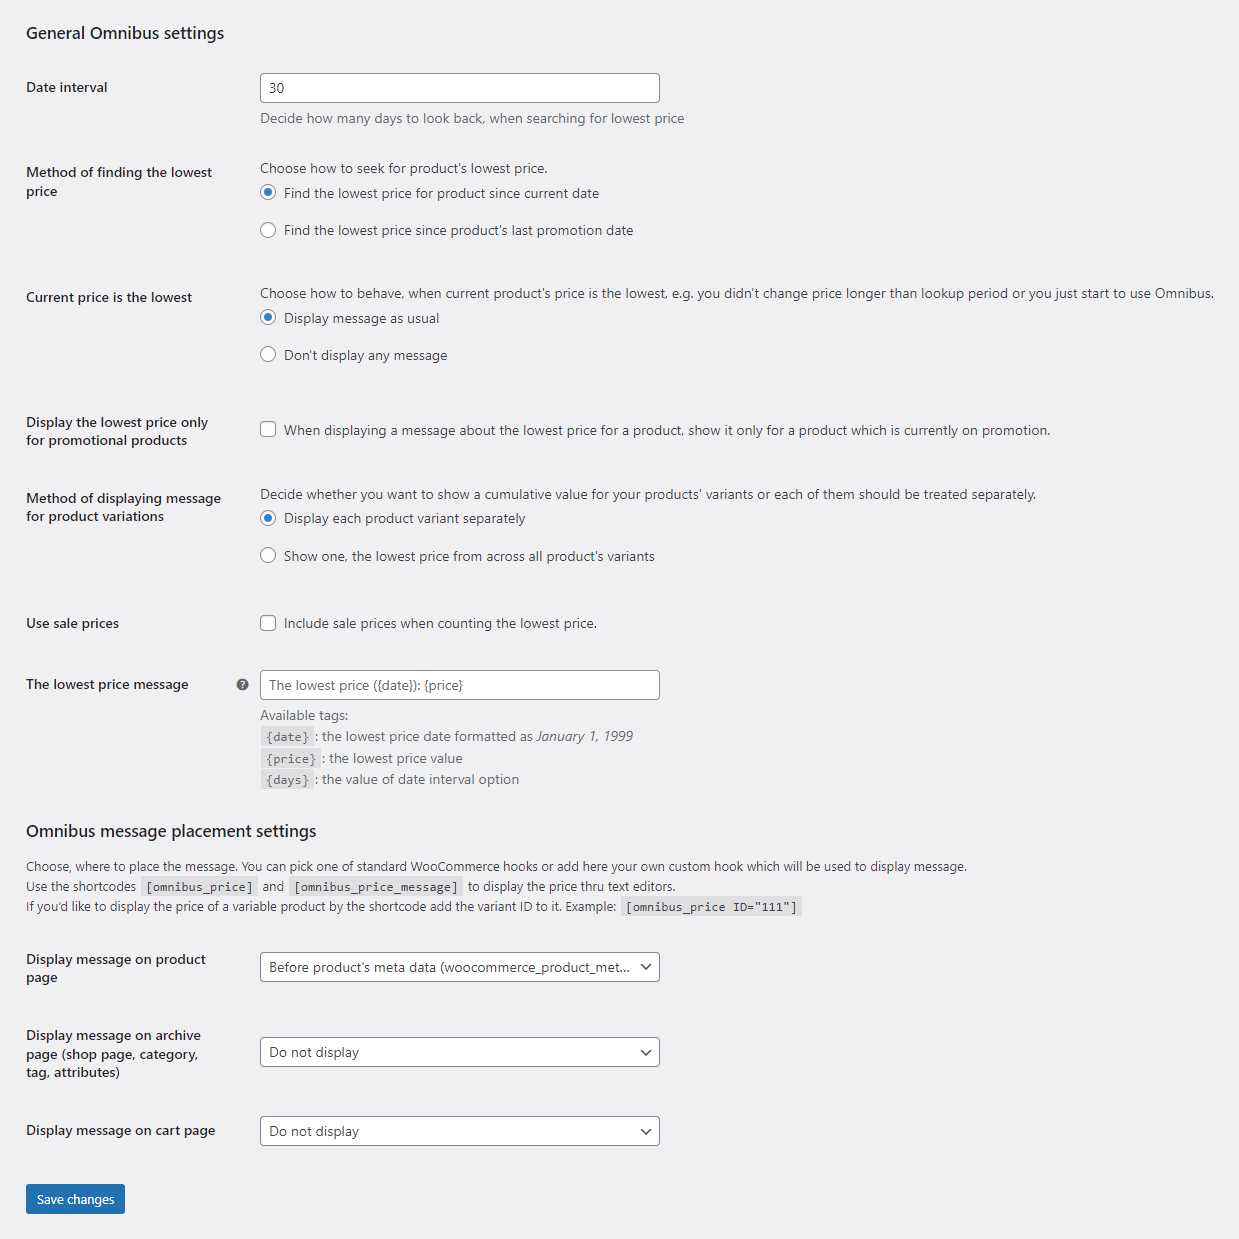
The plugin settings are available in the
WooCommerce > Settings > Products > General > Omnibus tab
Day range
Set the range of days taken into account when determining the lowest product price.
Method for searching for the lowest product price
- Find the lowest price for the product from the current date
Set this option so that the configured Day range is counted from the current date. - Find the lowest price from the date of the last product price reduction
Set this option so that the configured Day range is counted from the date the latest sale price was saved; the latest sale price will not be taken into account.
Current price is the lowest
- Show the message unchanged
Enable this option to show the message when the current price is the lowest product price. - Do not show any message
Enable this option so the message is not shown when the current price is the lowest product price. This option is useful, for example, when the price has not been changed for longer than the configured Day range.
Display the lowest price only for sale products
Select this option so the plugin only takes products with a sale price into account. The lowest price message will then not appear for products with a regular price.
Message display method for product variations
- Display each product variant separately
Set this option so the message is shown only after the user selects a specific variation from the list. Only the selected variation will be taken into account when calculating the lowest price.
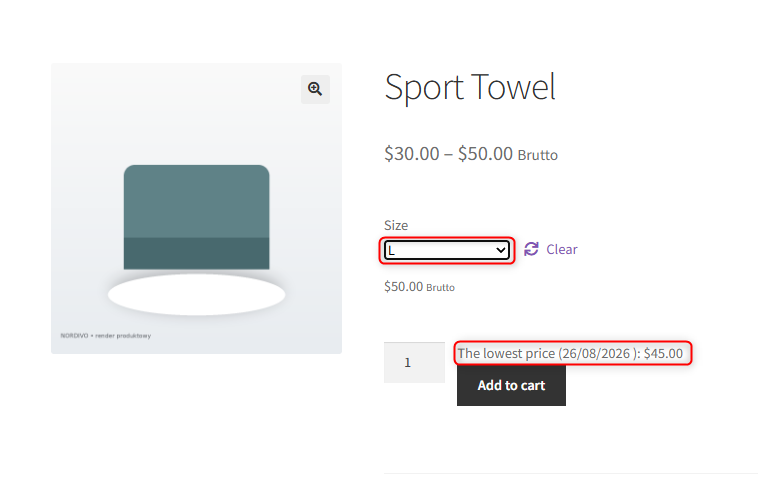
- Show one, the lowest price from across all product's variants
Set this option so the message is shown immediately after the page loads. All variations will be taken into account when calculating the lowest price.
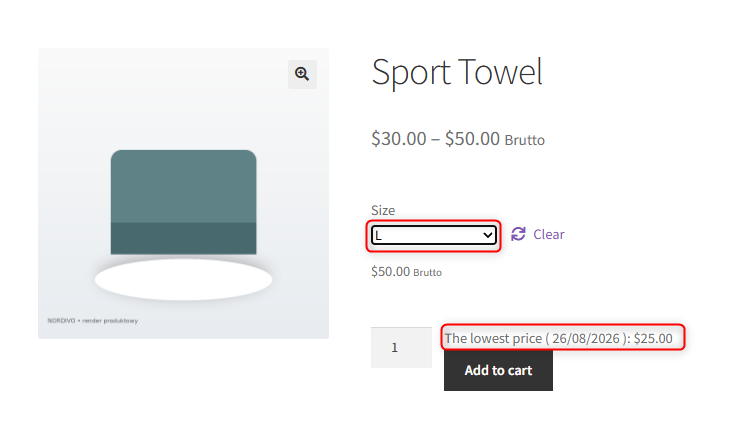
Include sale prices
Select this option so the plugin takes sale prices into account, not only regular prices.
The setting does not work retroactively. If a sale price was saved before this setting was enabled, it will not be taken into account. In that case, you need to save the product with the sale price again.
We do not recommend changing this setting frequently.
Lowest price message
The basic format will show the lowest price in the following format:
Lowest price (date): price
Set your own format using the available variables.
Example:
The lowest price from the last {days} days is {price} from {date}
Show message on the product page
The dropdown list contains all available locations for showing the lowest price on the product page.
The default setting is Before product metadata. This option allows you to show the lowest price as the first element of the product metadata.
Show message on the archive page
The dropdown list contains all available locations for showing the lowest price on archive pages such as:
- shop
- category
- tag
- attribute
The default setting is Do not show.
Show message on the cart page
The dropdown list contains all available locations for showing the lowest price on the cart page.
The default setting is Do not show.
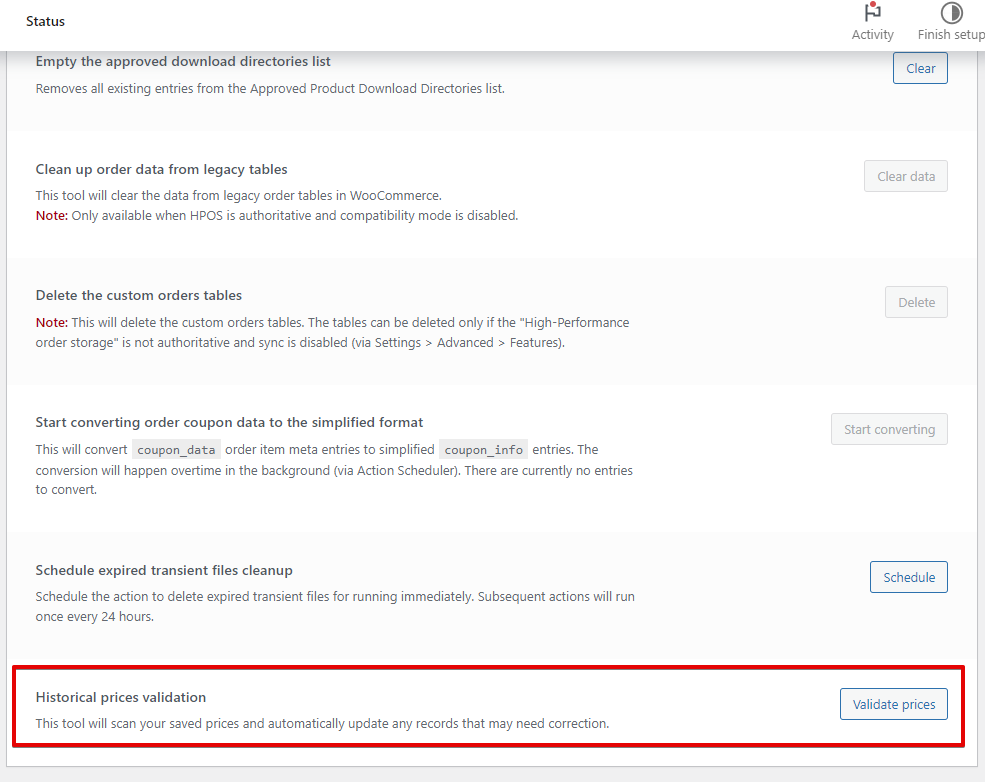
If, for some reason, product prices are not calculated correctly, verify the prices. You can find the Verify prices button in WooCommerce > Status > Tools.
Support for currency conversion and WPML translations
Omnibus WooCommerce supports two types of currency conversion offered by WPML:
Manually adding prices on product pages
Settings for manually adding prices in other currencies on the product page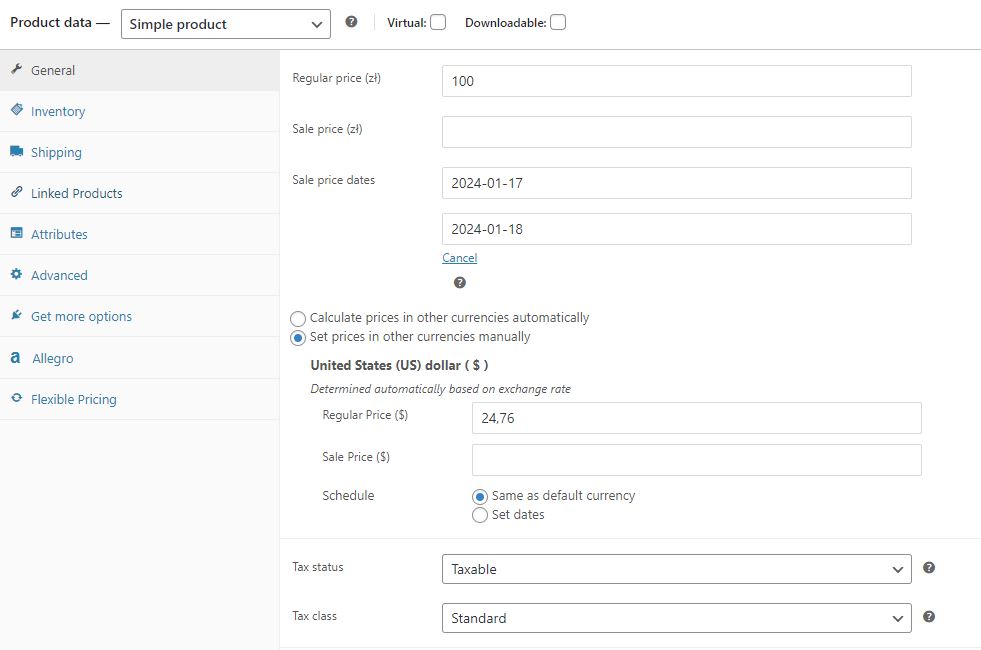 To manually add a price in a currency other than the store’s main currency, go to product editing and select the WPML option Set prices in other currencies manually. After entering the price, save the changes, and the lowest prices in the added currency will be visible on the product page and in the table at the bottom of the product edit page.
Automatic currency conversion in main settings
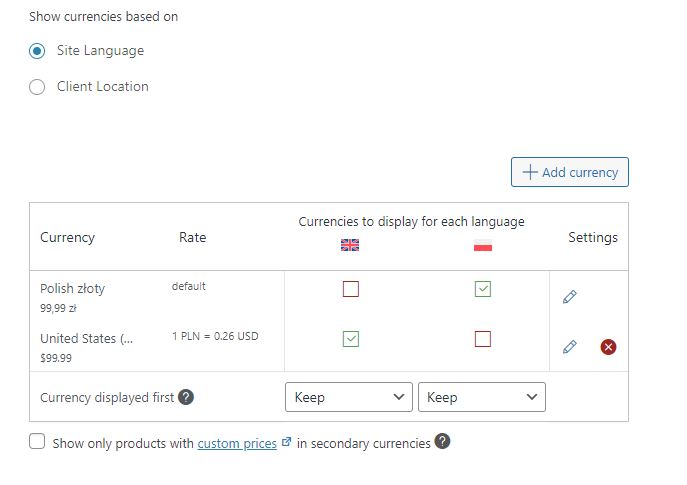
To configure automatic price conversion for all products, go to the WooCommerce → WooCommerce Multilingual & Multicurrency → Multicurrency tab. Add the appropriate currencies and their exchange rates to the table, then save the changes. The new currencies will now be visible in your store, together with historical prices supported by the Omnibus WooCommerce plugin.
Notes on how currency conversion works
In WPML integration mode, Omnibus operates in two states depending on how the price is saved:
- Controlled mode
The user manually saves the price in different currencies. - Uncontrolled mode
The price is automatically converted based on the exchange rate, and the user enters only one price for the product.
In uncontrolled mode, the saved price in a foreign currency reflects the exchange rate at the time of conversion, even if that rate changes later. This is important for maintaining historical price accuracy, especially in the case of long-term exchange rate fluctuations.
Shortcode
The plugin lets you insert the lowest price or the full lowest price message anywhere that supports adding shortcodes, for example on pages or in posts.
[omnibus_price]
Insert this shortcode if you need to show the lowest price on a simple product page.[omnibus_price id="x"]
Insert this shortcode if you need to show the lowest price on other pages, for example on a variable product page. Replace x with the ID of a specific product or variation, for example[omnibus_price id="123"]. You can find the product ID in the WP panel by hovering over the product name in the Products > All Products tab.[omnibus_price_message]
Insert this shortcode if you need to show the full lowest price message on a simple product page. You can change the message text in the Lowest price message setting.[omnibus_price_message id="x"]
Insert this shortcode if you need to show the full lowest price message on other pages, for example on a variable product page. Replace x with the ID of a specific product or variation, for example[omnibus_price id="123"].
For advanced users
The plugin settings include an option named Show message on the product page.
This option lets you choose from a list of predefined action hooks that can be used to display lowest price messages on product pages. However, if you have a specific action hook you would like to use, you can also enter the hook name directly in the field. You will then be able to use this name as a reference to the hook in your own code that displays the message.
Example:
- Set the display setting value to 'omnibus/custom/placement'.
- Register your hook in the theme file:
// page.php in your theme files
<article id="post-<?php the_ID(); ?>" <?php post_class( 'product' ); ?>>

<!-- Ommited for brevity... -->

<?php do_action( 'omnibus/custom/placement' ); ?>

</article><!-- #post-<?php the_ID(); ?> -->
If you use this hook on any landing pages, you can also specify the product to get the lowest price:
// home.php in your theme files

<header>

<!-- Ommited for brevity... -->

<?php

$product = wc_get_product( 14 ); // We want to use a product with ID 14 as a featured one.

do_action('omnibus/custom/placement', $product );

?>

</header>